-
Sign Up! To view all forums and unlock additional cool features
Welcome to the #1 Fiesta ST Forum and Fiesta ST community dedicated to Fiesta ST owners and enthusiasts. Register for an account, it's free and it's easy, so don't hesitate to join the Fiesta ST Forum today!
WestcoaST Performance blue build
- Thread starter westcoaST
- Start date
Thread Starter
#45
Very nice so far. Just had a question though. I just got the front badge for my car and was wondering is it just held on by adhesive, or are there screws through the back of it?
Thread Starter
#47
This weekend I decided to replace my OEM downpipe with the used 2JR catted downpipe that I purchased from Flurry. I followed the DIY from Airjor13, but there are several additional bits of information, I wanted to add
1. Pull the upper and lower cowls off. This is done by pulling both winshield wipers. Mark the location where they sit on the window so you can return them back to their respective positions when you are done. This creates a lot of room. Pull the clips off with long neck pliers and the upper cowl comes off. Pull the lights off so you can remove the lower cowl off. A couple of bolts to get the ower cowl off.
2. Pull the battery, there is a tie down strap and both pos and neg terminals, then remove the neg cable.
3. Pull the ecu cables. There is a lever you flip, the the connector is snugged off. Takes a little effort. Leave the ecu on the battery box.
4. Remove the battery, and set it aside.
5. Place the car up on jackstands
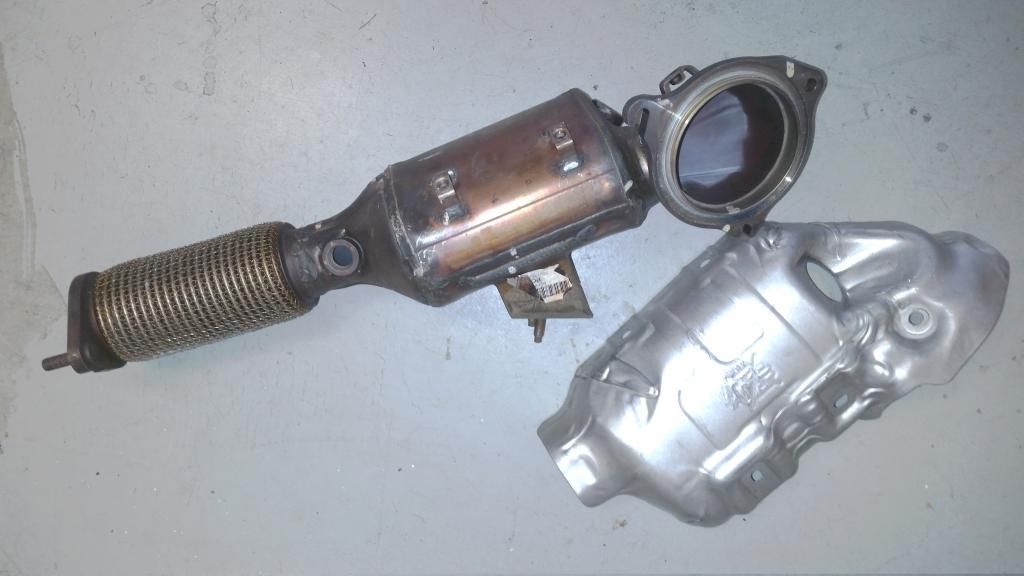
6. remove the two nuts holding the exhaust, pop the hanger off, and separate the downpipe from the exhaust. Remove the four nuts holding the downpipe to the lower bracket and remove the beacket. Its the one by the RMM. Remove the fasteners holding the downpipe heat shield to the downpipe.
7. Spray both o2 sensors with PBblaster, spray all of the bolts that attach the downpipe.
That was it for Friday evening.
8. Remove the upper O2 sensor, Here is a pic of what I used to remove it,
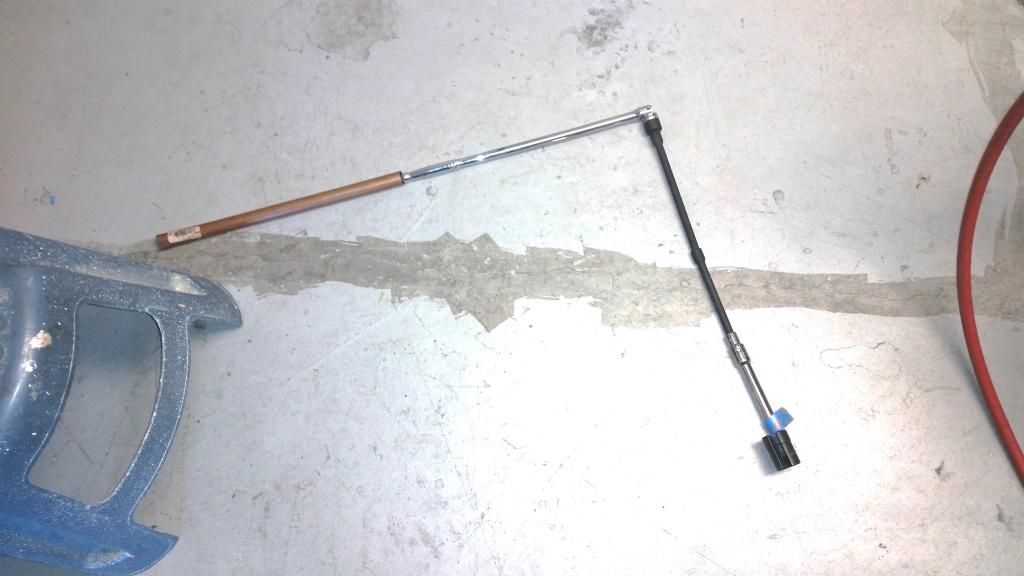
This a 3/8 drive ratcheting breaker bar with two extensions and a O2 sensor removal socket. The ratcheting breaker bar was purchased from Harbor Frieght, and the O2 sensor socket was from Amazon (Great neck OEM 25249 oxygen sensor crowfoot wrench).
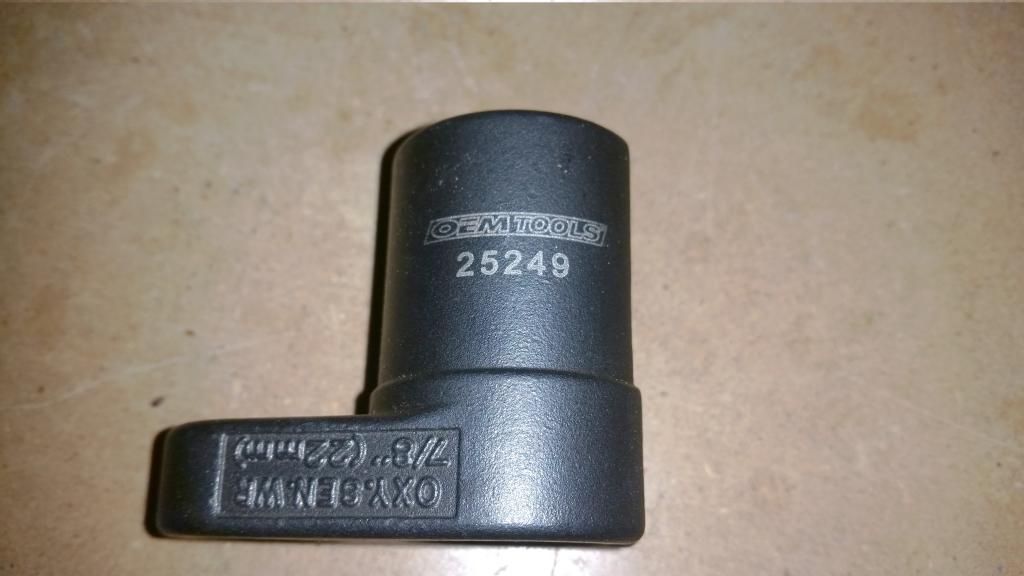
I added a bit of tape to the first extension to keep the sensor socket from faling off. I also used a copper cheater bar to increase the mechanical advantage of the breaker bar.
9. Pop the two shifter rod ends and remove the shift base plate. There are three 10 mm fasteners that hold the plate into place. If you get the Boomba shift plate grommlets, its a good time to install them after you install the 2JR downpipe, like I did. Same for the Mountune or Boomba short shift kit. Pull both shift cables from the shift base plate, and move them aside.
10 Remove the 10 mm bottom bolt that attaches the OEM down pipe. I used a swivel 10 mm socket and the ratcheting breaker bar to remove this.
11. Remove the 8mm bolts that hold the heat shield that covers the exhaust from the bottom.
12. If you're short like me, put the driver's side of the FiST down, so you can reach the top heat shield cover bolts and remove them. Push the heat shield towards the passenger side.
13. Remove the other two 10 mm bolts holding in the downpipe. They should be relatively easy to remove, with the pbblaster on them. I used an 3/8" air wrench with an extension and a 10mm 3/8 swivel socket.
14. Pull the downpipe heat shield up through the space between the firewall and the engine. push the exhaust heat shield towards the passenger side.
Too hot to continue (107F in the garage) Wait until the temp cools.
15. That effen downpipe is like a snake, pull it one way, it moves the tail end the other way. I ended up taking the lower oxygen sensor off of the downpipe from underneath the car.
16. The fricken downpipe has to go between the water hose and the pushed over shifter cables. Without removing the shifter bracket, this is impossible. Its almost like the opening is too small, but somehow it fits, kind of like a birth canal![Crazy Eye [crazyeye] [crazyeye]](/images/smilies/icon_smile_eyecrazy.gif) . Temps in the garage are way too high,so I decided to pull the plug for today. Tomorrow Ill do the install. Should be alot easier that today. I'm glad I did it myself, but $200.00 would not be too much to pay for this work. Of course, now, it would be easier. At least no sensors are broken, nor are any bolts.
. Temps in the garage are way too high,so I decided to pull the plug for today. Tomorrow Ill do the install. Should be alot easier that today. I'm glad I did it myself, but $200.00 would not be too much to pay for this work. Of course, now, it would be easier. At least no sensors are broken, nor are any bolts.
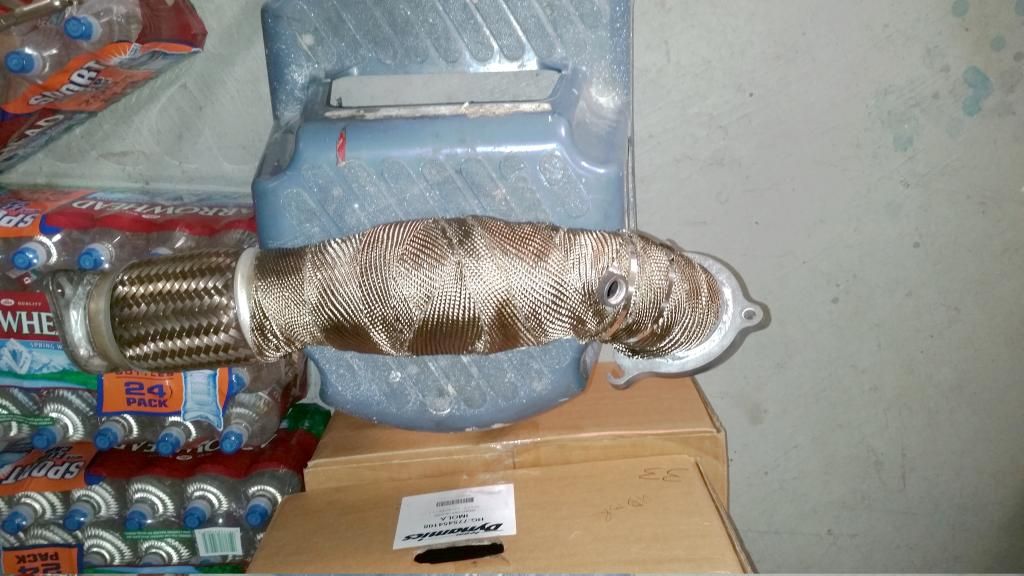
I wrapped the 2JR catted downpipe in titanium ceramic wrap, and secured it in place with stainless steel zip ties. I started from the bottom of the downpipe, and wrapped towards the top. Here is what it looked like.
17. There is a nonmetallic gasket, looks like ceramic fiber, that needs to be removed from the OEM downpipe and placed on the 2JR. A small screwdriver will pry it off. The 2JR catted downpipe goes in pretty easy from the bottom of the car. I had to move the FSWERKS exhaust to one side. I put antiseize on the fasteners that attach the downpipe to the turbo. If you barely install the fastener on the bottom, and the one at the 2 O' Clock position, the down pipe will stay in place until you insert the final fastener. I installed the lower o2 sensor, and the upper o2 sensor. This is what the the downpipe looks like installed.
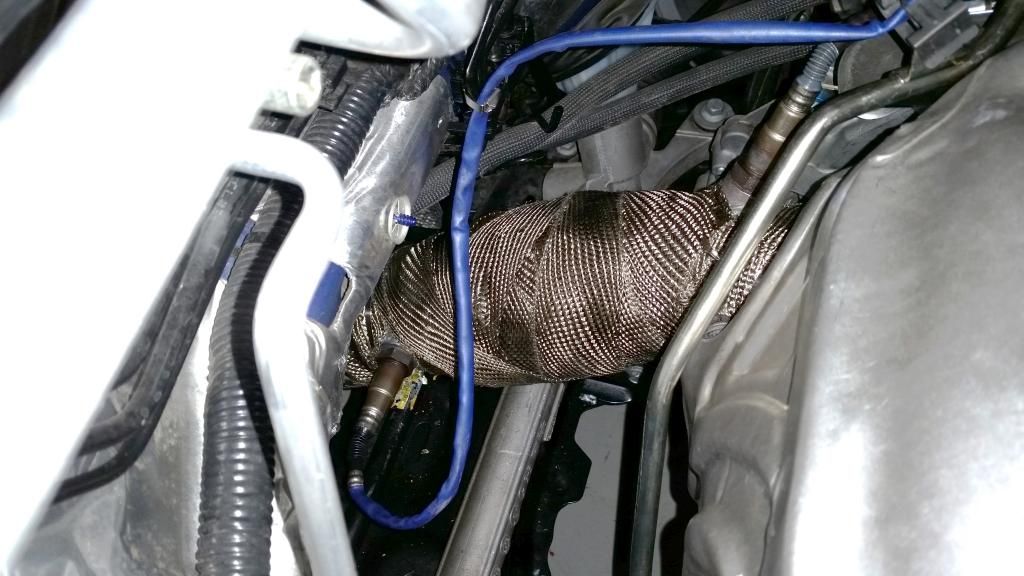
I wired the lower O2 cable out of the way with a stainless steel ziptie.
18. Since my 2JR catted downpipe was used, I didn't get any fasteners with it. I bought some stainless metric bolts, washers, and nuts from the bolt depot. The end of the 2JR downpipe has an articulating joint to allow for misalignment. I had to loosen the clamp at the end of the FSWERKS exhaust, before the s bend, so I could rotate the straight tube, and align it with the end of the downpipe. I inserted a 10mm x 1.5 x 35mm long bolt with a washer through the backside of the downpipe, and a flanged nut on the frontside, with the OEM metal gasket inbetween. Then I torqued the bolts per the FSWERKS installation.
19. The rest of the work was re-assembling everything else back together, and taking her out for a quick run around the block. Tne PBbalster smoked a little, but soon burned off. Tomorrow I load the stage 3 tune.
1. Pull the upper and lower cowls off. This is done by pulling both winshield wipers. Mark the location where they sit on the window so you can return them back to their respective positions when you are done. This creates a lot of room. Pull the clips off with long neck pliers and the upper cowl comes off. Pull the lights off so you can remove the lower cowl off. A couple of bolts to get the ower cowl off.
2. Pull the battery, there is a tie down strap and both pos and neg terminals, then remove the neg cable.
3. Pull the ecu cables. There is a lever you flip, the the connector is snugged off. Takes a little effort. Leave the ecu on the battery box.
4. Remove the battery, and set it aside.
5. Place the car up on jackstands
6. remove the two nuts holding the exhaust, pop the hanger off, and separate the downpipe from the exhaust. Remove the four nuts holding the downpipe to the lower bracket and remove the beacket. Its the one by the RMM. Remove the fasteners holding the downpipe heat shield to the downpipe.
7. Spray both o2 sensors with PBblaster, spray all of the bolts that attach the downpipe.
That was it for Friday evening.
8. Remove the upper O2 sensor, Here is a pic of what I used to remove it,

This a 3/8 drive ratcheting breaker bar with two extensions and a O2 sensor removal socket. The ratcheting breaker bar was purchased from Harbor Frieght, and the O2 sensor socket was from Amazon (Great neck OEM 25249 oxygen sensor crowfoot wrench).

I added a bit of tape to the first extension to keep the sensor socket from faling off. I also used a copper cheater bar to increase the mechanical advantage of the breaker bar.
9. Pop the two shifter rod ends and remove the shift base plate. There are three 10 mm fasteners that hold the plate into place. If you get the Boomba shift plate grommlets, its a good time to install them after you install the 2JR downpipe, like I did. Same for the Mountune or Boomba short shift kit. Pull both shift cables from the shift base plate, and move them aside.
10 Remove the 10 mm bottom bolt that attaches the OEM down pipe. I used a swivel 10 mm socket and the ratcheting breaker bar to remove this.
11. Remove the 8mm bolts that hold the heat shield that covers the exhaust from the bottom.
12. If you're short like me, put the driver's side of the FiST down, so you can reach the top heat shield cover bolts and remove them. Push the heat shield towards the passenger side.
13. Remove the other two 10 mm bolts holding in the downpipe. They should be relatively easy to remove, with the pbblaster on them. I used an 3/8" air wrench with an extension and a 10mm 3/8 swivel socket.
14. Pull the downpipe heat shield up through the space between the firewall and the engine. push the exhaust heat shield towards the passenger side.
Too hot to continue (107F in the garage) Wait until the temp cools.
15. That effen downpipe is like a snake, pull it one way, it moves the tail end the other way. I ended up taking the lower oxygen sensor off of the downpipe from underneath the car.
16. The fricken downpipe has to go between the water hose and the pushed over shifter cables. Without removing the shifter bracket, this is impossible. Its almost like the opening is too small, but somehow it fits, kind of like a birth canal

I wrapped the 2JR catted downpipe in titanium ceramic wrap, and secured it in place with stainless steel zip ties. I started from the bottom of the downpipe, and wrapped towards the top. Here is what it looked like.

17. There is a nonmetallic gasket, looks like ceramic fiber, that needs to be removed from the OEM downpipe and placed on the 2JR. A small screwdriver will pry it off. The 2JR catted downpipe goes in pretty easy from the bottom of the car. I had to move the FSWERKS exhaust to one side. I put antiseize on the fasteners that attach the downpipe to the turbo. If you barely install the fastener on the bottom, and the one at the 2 O' Clock position, the down pipe will stay in place until you insert the final fastener. I installed the lower o2 sensor, and the upper o2 sensor. This is what the the downpipe looks like installed.

I wired the lower O2 cable out of the way with a stainless steel ziptie.
18. Since my 2JR catted downpipe was used, I didn't get any fasteners with it. I bought some stainless metric bolts, washers, and nuts from the bolt depot. The end of the 2JR downpipe has an articulating joint to allow for misalignment. I had to loosen the clamp at the end of the FSWERKS exhaust, before the s bend, so I could rotate the straight tube, and align it with the end of the downpipe. I inserted a 10mm x 1.5 x 35mm long bolt with a washer through the backside of the downpipe, and a flanged nut on the frontside, with the OEM metal gasket inbetween. Then I torqued the bolts per the FSWERKS installation.
19. The rest of the work was re-assembling everything else back together, and taking her out for a quick run around the block. Tne PBbalster smoked a little, but soon burned off. Tomorrow I load the stage 3 tune.
Thread Starter
#48
My video (using an inexpensive mountable camera, mounted to my bumper) of the sound and video of my FSWERKs exhaust and 2JR catted downpipe.
[video=youtube_share;kTXvsFgh_fw]http://youtu.be/kTXvsFgh_fw[/video]
[video=youtube_share;kTXvsFgh_fw]http://youtu.be/kTXvsFgh_fw[/video]
Thread Starter
#49
OZ Ultraleggera 17 x 7 powdercoated wheels mounted with OEM tires.
I got my OZ Ultraleggera wheels powdercoated last week. The color is very close to the performance blue color, Its a combination of blue, purple and silver. I let the wheels "cure" for a week. Last night, I did a trial fit on the right front hub. Everything fit very snug. These wheels were originally black, but had several paint chips on them.
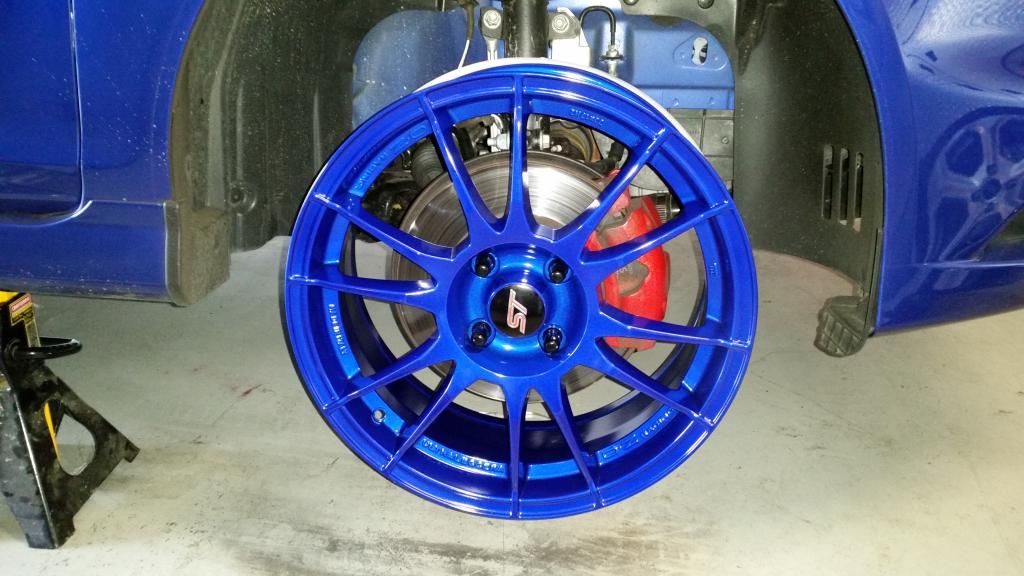
This is what they look like after I swapped the OEM tires and TPMS onto the OZ wheels.
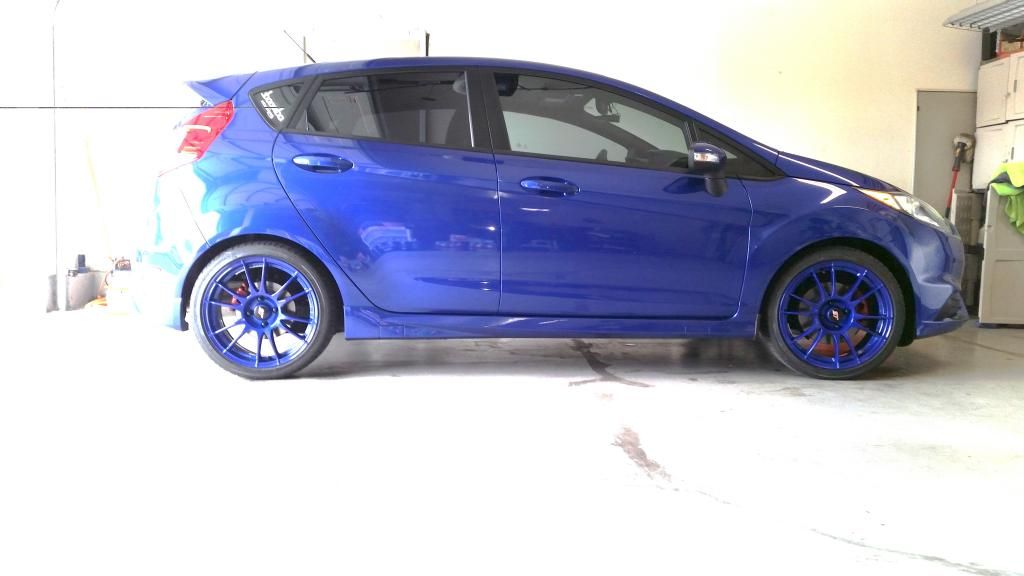
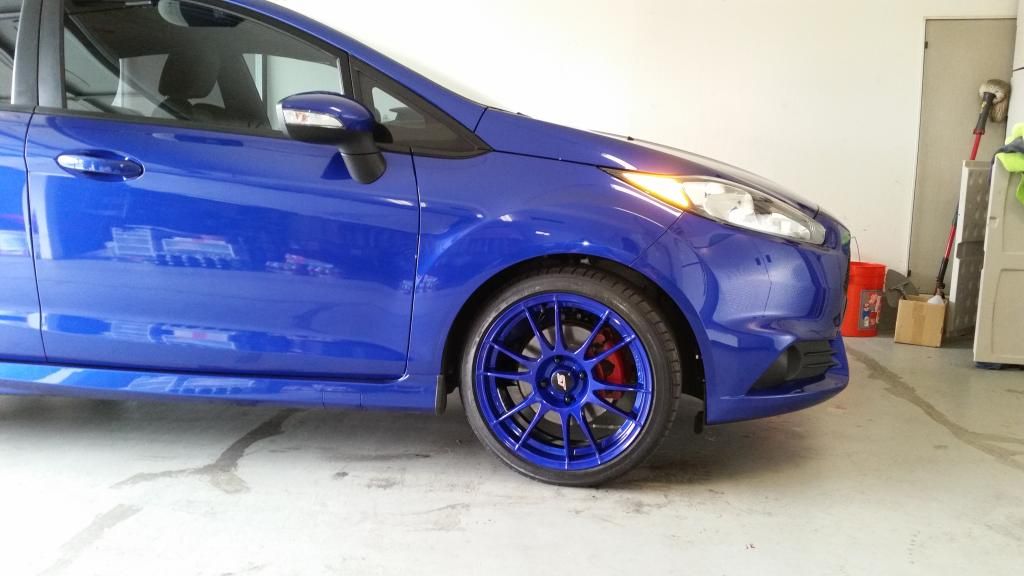
Next week, I'm installing either the Boomba short throw shifter, or the Pierce Motorsports 6 pt lower brace and the upper strut brace.
I got my OZ Ultraleggera wheels powdercoated last week. The color is very close to the performance blue color, Its a combination of blue, purple and silver. I let the wheels "cure" for a week. Last night, I did a trial fit on the right front hub. Everything fit very snug. These wheels were originally black, but had several paint chips on them.

This is what they look like after I swapped the OEM tires and TPMS onto the OZ wheels.


Next week, I'm installing either the Boomba short throw shifter, or the Pierce Motorsports 6 pt lower brace and the upper strut brace.
Thread Starter
#55
I decided to pull the Mishimoto oil catch can and replace it with the top of the line model. I had an offer that I could not refuse, so the new Mishimoto catch can was essentially free. Not often that you get to do a "do over". Based on the last install, I decided to do things a little different.
Here is the Mishimoto catch can I installed. This has a bronze filter but it also has a baffle to help trap the oil. The bottom screws off the top to allow for draining the oil and crud.
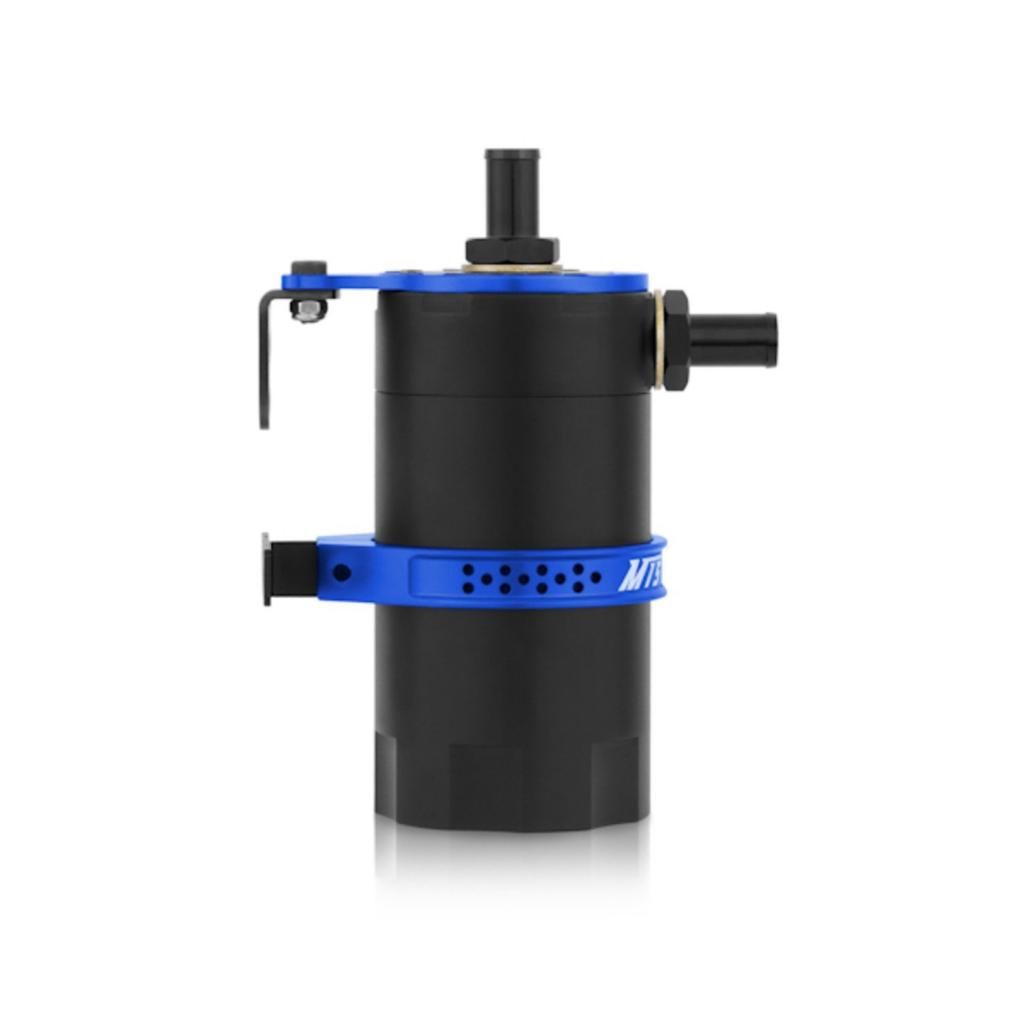
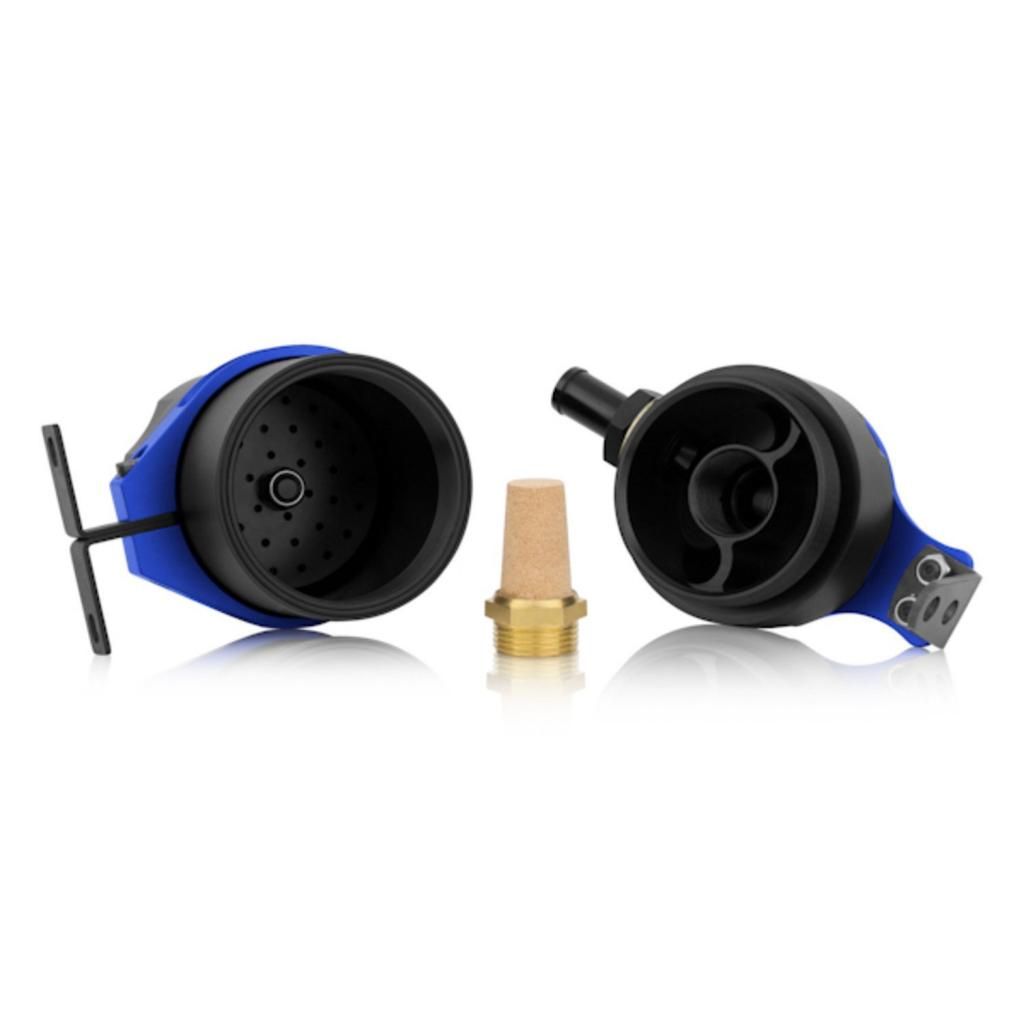
This time I took of the inner and outer cowl, and the windshield wipers so I could have more room to install the OCC. The one I got has blue accents so it matches the car better. I now had more room to place the new OCC, and mark a location for drilling a hole to mount the upper bracket of the OCC. This time I drilled and tapped a hole in the strut tower, and attached the OCC to that. I also plugged up the original hole I drilled for a sheet metal screw. I'm going to sand it and paint it later, when I install the 2 point strut bar. This install looks so much better than the oid OCC, which was slightly angled due to its larger diameter. I still need to trim the bolt that attaches the OCC to the strut tower, or get a shorter one.
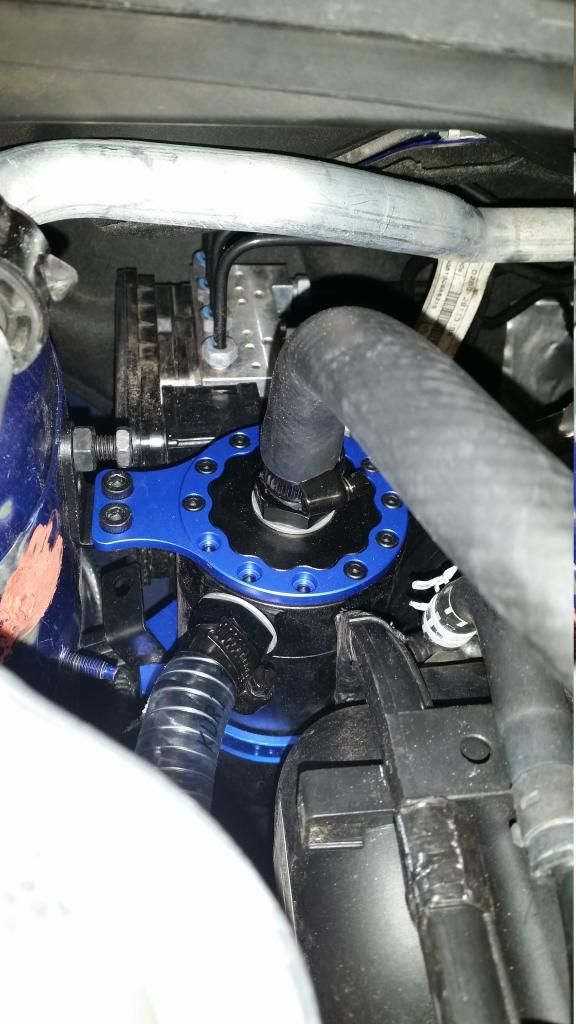
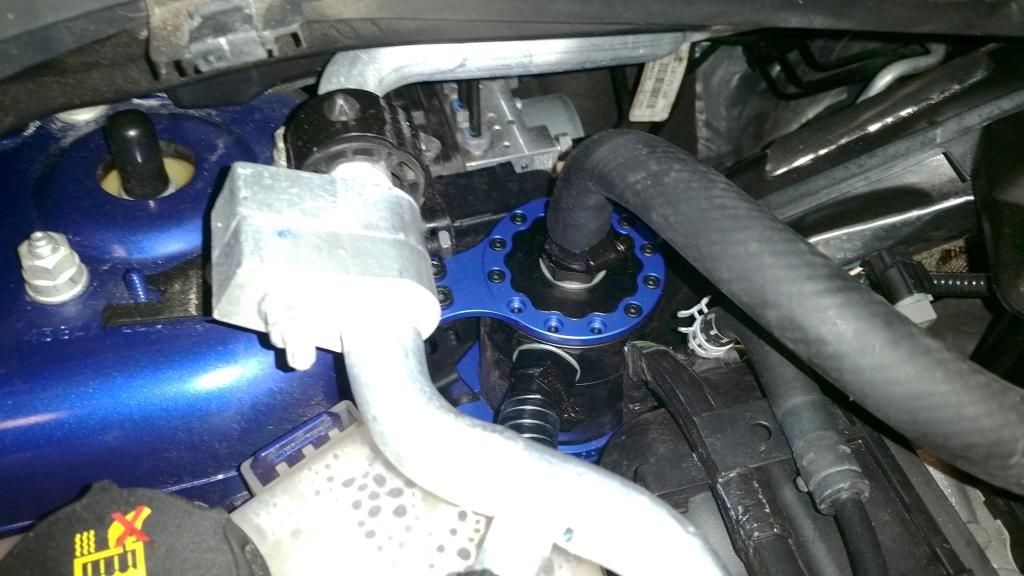
Since I sold my last OCC, I decided to get a clear wire reinforced hose. This is the hose that goes from the OCC to the intake. I used the black hose that comes with the Mishimoto catch can for the hose that goes from the PCV to the catch can. Now I can see how well the OCC is working, and this hose will not collapse.

I'm waiting on my redline shift boot before I install my Boomba short shifter and shift base washers. Then the Pierce stuff.
Here is the Mishimoto catch can I installed. This has a bronze filter but it also has a baffle to help trap the oil. The bottom screws off the top to allow for draining the oil and crud.


This time I took of the inner and outer cowl, and the windshield wipers so I could have more room to install the OCC. The one I got has blue accents so it matches the car better. I now had more room to place the new OCC, and mark a location for drilling a hole to mount the upper bracket of the OCC. This time I drilled and tapped a hole in the strut tower, and attached the OCC to that. I also plugged up the original hole I drilled for a sheet metal screw. I'm going to sand it and paint it later, when I install the 2 point strut bar. This install looks so much better than the oid OCC, which was slightly angled due to its larger diameter. I still need to trim the bolt that attaches the OCC to the strut tower, or get a shorter one.


Since I sold my last OCC, I decided to get a clear wire reinforced hose. This is the hose that goes from the OCC to the intake. I used the black hose that comes with the Mishimoto catch can for the hose that goes from the PCV to the catch can. Now I can see how well the OCC is working, and this hose will not collapse.

I'm waiting on my redline shift boot before I install my Boomba short shifter and shift base washers. Then the Pierce stuff.
Thread Starter
#57
I like your center caps.
Dave
Dave
Thread Starter
#58
It's an early christmas.
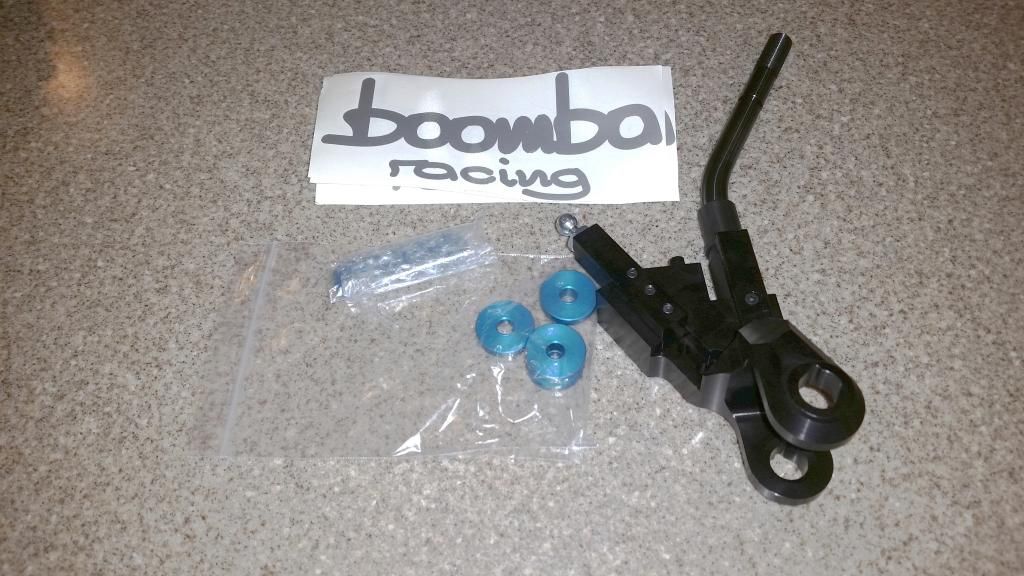
Boomba racing short shifter and shifter base bushings. I already installed the trans bushings
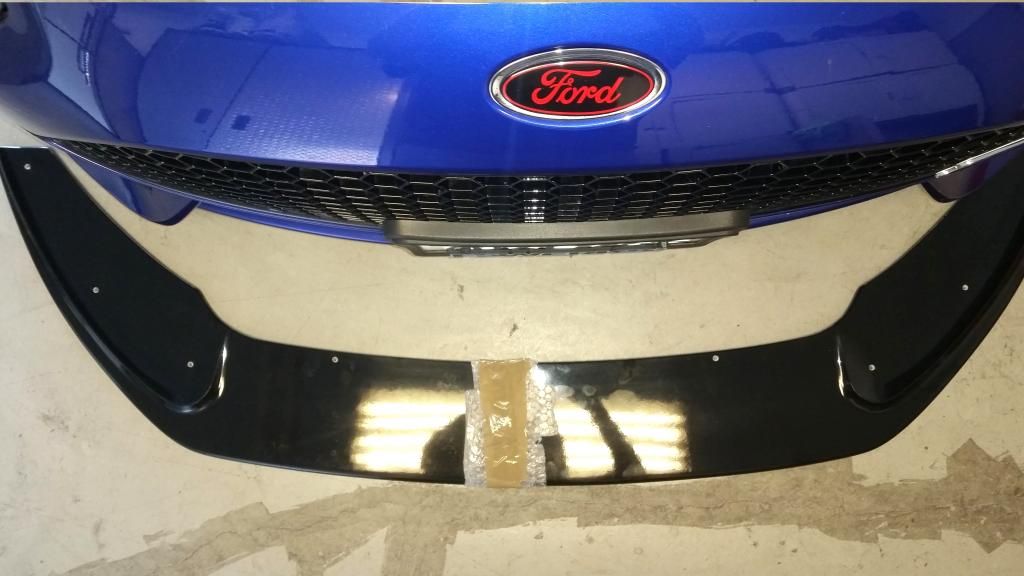
Triple R Front Splitter
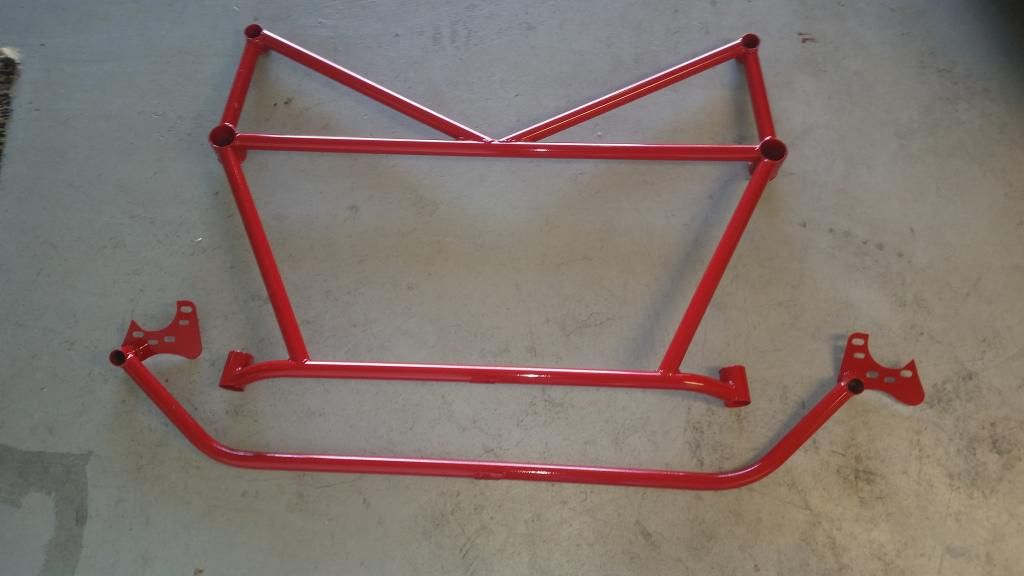
Pierce Motorsport 6 pt and 2 pt bars. Picked these up from Jim today.
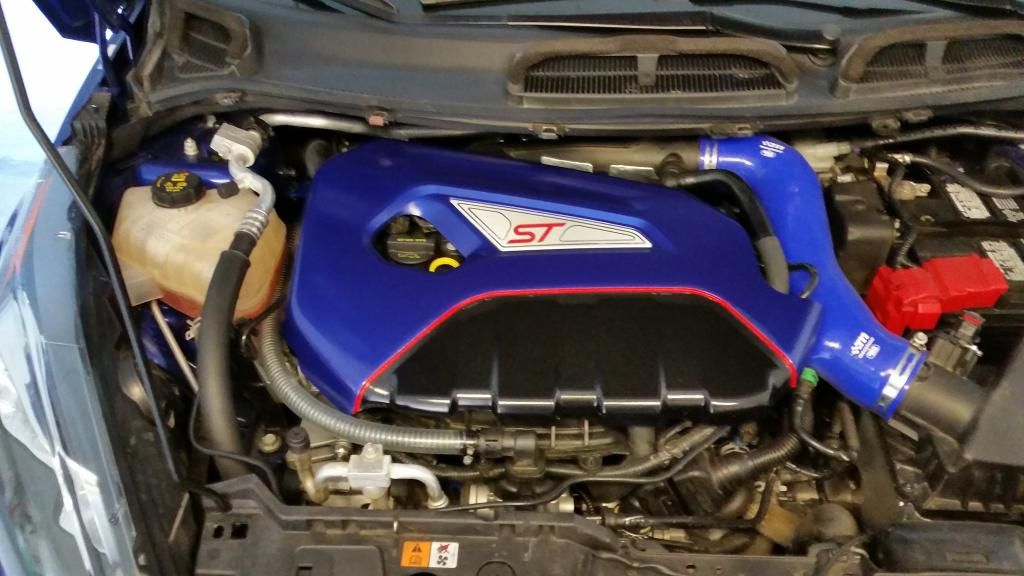
Gotta find some time to install these. I also redid my engine cover to add a touch of red to match the 2 pt strut brace. I stripped all of the color, and changed up the design from my previous effort.
I'm also working on a custom dead pedal. When I get further along, I'll take pics. Right now all I have is the raw materials and a template. I'm trying to match the style of the clutch and brake pedal rubber pad layout.
Boomba racing short shifter and shifter base bushings. I already installed the trans bushings

Triple R Front Splitter

Pierce Motorsport 6 pt and 2 pt bars. Picked these up from Jim today.

Gotta find some time to install these. I also redid my engine cover to add a touch of red to match the 2 pt strut brace. I stripped all of the color, and changed up the design from my previous effort.

I'm also working on a custom dead pedal. When I get further along, I'll take pics. Right now all I have is the raw materials and a template. I'm trying to match the style of the clutch and brake pedal rubber pad layout.
Similar threads
-
-
-
Anyone used the 4 point from TB Performance?
- Started by Woods247
- Replies: 8
-
FND FiST Performance Parts (Tuner, Down Pipe, Intercooler)
- Started by Letsgetit!
- Replies: 1
-
SDPF Delete: Worth the Risk? Performance vs Legal and Environmental Concerns
- Started by sullybosco
- Replies: 6
-
FS ISC coilovers, Whoosh ram air intake, TB Performance trunk brace
- Started by razr_m3
- Replies: 27
-
VIDEOS OF FORD PERFORMANCE ENGINEER TIM SMITH
- Started by Capri to ST
- Replies: 3
-
SBest Can-Am Maverick X3 Max Accessories for Performance and Comfort?
- Started by sullybosco
- Replies: 1
-
-
