• Sign Up! To view all forums and unlock additional cool features

    Welcome to the #1 Fiesta ST Forum and Fiesta ST community dedicated to Fiesta ST owners and enthusiasts. Register for an account, it's free and it's easy, so don't hesitate to join the Fiesta ST Forum today!


When and Where to Change Timing Belt + Cost

jtl

Member
Messages
7
Likes
18
Location
Sandy, UT
#41
The manual should identify items that require/recommend replacement; either via Maintenance Schedule (like the timing belt) or in the course of service. For example...
View attachment 60744
Thanks, Intuit. After looking through the service manual I added this bracket:

Bearing Retainer - Product ID: YS4Z-3N324-AA (referred to as 'the halfshaft bracket' in the service manual)

Interestingly, the service manual makes no mention of discarding either tensioner, at least not where I'm looking (2015, Timing Belt (Removal and Installation, 303-01 Engine - 1.6L EcoBoost)). The accessory belt tensioner is $85 on Tasca ($137 MSRP) and looks pretty beefy, which is why I'm questioning whether it's worth the money to replace.

Your list is good. I also had the thermostat and housing changed while everything was apart. I had my dealership do it so I'm covered under warranty for their work. No complaints so far. The mechanic has over 28yrs of engine building under his belt!
Thanks, I will grab a new thermostat while I'm at it. Was there any particular reason you had the housing changed?

Is the thermostat accessible while doing a timing belt?
Because I understand that it's very difficult and time consuming to get to, so when I have my timing belt done next summer I may consider having my thermostat changed also, thanks.
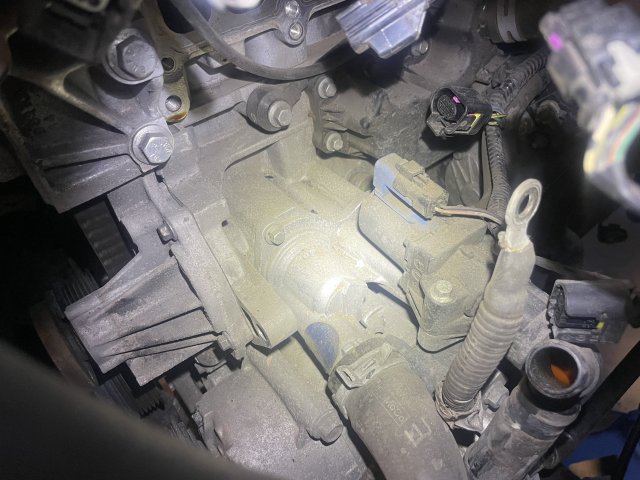
Well I can see the housing here:

thermostat.jpg

It took a good amount of effort to get to this point so I can definitely see why it should be replaced at the same time as the timing belt (and water pump).

in-progress.jpg

I've come this far, so I might as well give it the works!


Intuit

3000 Post Club
Messages
3,982
Likes
2,540
Location
South West Ohio
#42
That jack stand on the crash bar? I don't think that's designed to support any weight. I use two points of the cross-member behind the engine.

Just providing a slightly different perspective, born of experiences with a prior vehicle. First, aftermarket parts were absolute junk. Replacing parts that weren't actually worn or bad, always backfired. It took several examples before that sunk in. For anything as important (or just hard to get to) as what you're doing, at least use the overpriced dealer parts. No remanufactured or aftermarket parts.


Messages
77
Likes
97
Location
Rural
#43
Replacing parts that weren't actually worn or bad, always backfired. It took several examples before that sunk in. For anything as important (or just hard to get to) as what you're doing, at least use the overpriced dealer parts. No remanufactured or aftermarket parts.
Yes! You're already saving thousands of dollars on labor doing the work yourself, don't try to save $75 on timing belt tensioner or water pump. That said, I didn't hesitate to install a Gates accessory belt kit a couple months back. They make excellent belts and that stuff is on the outside of the motor. If their tensioner or idler pulley doesn't last 8 years like the factory parts, I can pivot back to OE Ford in an afternoon.

It took a good amount of effort to get to this point so I can definitely see why it should be replaced at the same time as the timing belt (and water pump).
That lower radiator hose (C1BZ-8286-A) you can see the top of in your photo is also a bear to get to. Since you're draining the coolant to do the water pump and the thermostat, consider replacing that. Or at the very least clean it off and inspect it for signs of wear like little cracks forming.


jtl

Member
Messages
7
Likes
18
Location
Sandy, UT
#44
That jack stand on the crash bar? I don't think that's designed to support any weight. I use two points of the cross-member behind the engine.

Just providing a slightly different perspective, born of experiences with a prior vehicle. First, aftermarket parts were absolute junk. Replacing parts that weren't actually worn or bad, always backfired. It took several examples before that sunk in. For anything as important (or just hard to get to) as what you're doing, at least use the overpriced dealer parts. No remanufactured or aftermarket parts.
That jack stand is supporting the far side of the condenser to decrease torsion on the A/C tubes. Long story short I'm trying to avoid messing with that entire system because I didn't have the refrigerant vacuumed when I started the whole thing. You can sort of see another jack stand peeking out from behind the rotor assembly.

And for better or worse (better for the car, worse for my poor wallet at least in the near term) I'm going OEM for everything (with the exception of upgrading to a Mountune radiator).


Yes! You're already saving thousands of dollars on labor doing the work yourself, don't try to save $75 on timing belt tensioner or water pump. That said, I didn't hesitate to install a Gates accessory belt kit a couple months back. They make excellent belts and that stuff is on the outside of the motor. If their tensioner or idler pulley doesn't last 8 years like the factory parts, I can pivot back to OE Ford in an afternoon.


That lower radiator hose (C1BZ-8286-A) you can see the top of in your photo is also a bear to get to. Since you're draining the coolant to do the water pump and the thermostat, consider replacing that. Or at the very least clean it off and inspect it for signs of wear like little cracks forming.

You know it's funny you put it that way. If I have to replace some of these parts in a few months after deciding I didn't want to pony up the cash now, I'd happily pay double for them to get that time back. As for the radiator hoses... 9 years and 130k miles is a good run for a hose, and I see whoosh hoses (with free shipping!) will end up costing less than OEM.


I'm drifting pretty far off topic, but thanks everyone for your help. I look forward to finishing this job in a few weeks. Maybe I'll make a thread about the whole thing.


Intuit

3000 Post Club
Messages
3,982
Likes
2,540
Location
South West Ohio
#45
I didn't hesitate to install a Gates accessory belt kit a couple months back. They make excellent belts and that stuff is on the outside of the motor.
This matches my experiences as well. Back in the day, the GoodYear Gatorback accessory drive belts were good as well. Dunno if they're still sold.


jtl

Member
Messages
7
Likes
18
Location
Sandy, UT
#46
I finally received all the parts for this job. I did end up going with a Gates accessory belt kit partially because it has some pretty solid reviews but mainly because I am well over budget (oops!).

I've removed the crankshaft pulley bolt but I have not been able to remove the harmonic balancer. It has four spokes and no bolt holes, so none of the pullers I have fit. The only puller I've found that looks like it might work is $185 (https://schleytools.com/products/17...pulley-puller-set?_pos=1&_sid=7a8ada61f&_ss=r).

Has anyone hear run into this before? Is there a cheaper tool or a different method for removing it?


jtl

Member
Messages
7
Likes
18
Location
Sandy, UT
#47
Has anyone hear run into this before? Is there a cheaper tool or a different method for removing it?
I'll keep posting my experience here in case it helps out anyone down the road.

I was able to get the crankshaft pulley off without a puller but now I need to replace it. I was trying to pry it off at the bottom and I broke a piece off the edge. If anyone else encounters the pulley itself not coming off, don't pry it like that lol.

What did work:
I sprayed lots of penetrating oil in there. I let it sit for a while. Then I rotated the pulley clockwise. The crankshaft couldn't turn with the pulley due to the pin that is in place (Locking Tool, Crankshaft, 303-748) to keep it from rotating past TDC, and the pulley came loose.

I also used an old chisel as a wedge behind the pulley which did push it out a little bit, though I wouldn't recommend this approach because it scratched up the back of the pulley. It may have helped a little bit but the pulley did not come off until I rotated it, so I am skeptical as to how much it helped. I will note that at that point it was rotating quite easily. I initially thought I had inadvertently rotated it clockwise and out of TDC and it was just rotating back, until the pulley came off.


Messages
238
Likes
125
Location
Santa Rosa
#48
107k on mine, but 2015 (MFD in 2014) so the belt is really 10 years old. I'm doing mine asap. Don't wait for 150k people, its idiotic. 150k is if you drive like a grandma, too.


Messages
107
Likes
52
Location
HB, CA
#49
These are my figures:- Timing belt - $57.90, Belt tensioner - $86.33, Water pump and gasket - $88.00, Serpentine belt -$27.50. These are the prices I paid shopping around. During the replacement I also had the overflow coolant bottle (leaking) replaced along with the hose which was brittle at $72.30 plus the radiator cap $27.27. Thermostat assembly $117.95. Now the expensive part, labour came to $2,200 and I used my Ford Pass points which brought the total charged to $2,376.50. Now the car will outlive me! So now I have enough points to get quite a few oil and filter changes!
Hello, so you ended up getting it all done at Star Ford in Glendale ? Any issues ? How long was turnaround time ? Thanks.


OP
Capri to ST

Capri to ST

1000 Post Club
Messages
1,748
Likes
2,249
Location
CHAPEL HILL, NC, USA
Thread Starter #50
I bit the bullet and had my timing belt, water pump and other related parts, and the other drive belt done. I decided to do it based on time, 8 years, not mileage because I'm doing low mileage and would basically never get there. As I said above, this is an interference engine and if you break a timing belt it's basically destroyed, so I did it now to be on the safe side .
I have an independent shop that I trust and have done business with for a long time and I'm friendly with the particular mechanic who did the job. Even though they're an independent shop, they have the Ford tools to hold things in place.
The labor came to about $1,150, much less than one member reported above, and the parts were about $600, which was much more. I could have sourced my own parts and saved money. This shop lets you do that and I brought my own coolant and some unrelated parts for other service, but I wanted them to get the timing belt parts so they would be responsible for them, even though that meant paying a considerable markup, and they got OEM parts from Ford for me.
The shop gives a 3-year/36,000 mi warranty on parts, which is good. Let's say I supply the water pump and it goes bad in 6 months. The place I got it from would be responsible for the part, but I'd be responsible for all that labor cost again to get to it and reinstall it.


Last edited:

rallytaff

1000 Post Club
Premium Account
Messages
1,322
Likes
905
Location
Los Angeles
#51
I bit the bullet and had my timing belt, water pump and other related parts, and the other drive belt done. I decided to do it based on time, 8 years, not mileage because I'm doing low mileage and would basically never get there. As I said above, this is an interference engine and if you break a timing belt it's basically destroyed, so I did it now to be on the safe side .
I have an independent shop that I trust and have done business with for a long time and I'm friendly with the particular mechanic who did the job. Even though they're an independent shop, they have the Ford tools to hold things in place.
The labor came to about $1,150, much less than one member reported above, and the parts were about $600, which was much more. I could have sourced my own parts and saved money. This shop lets you do that and I brought my own coolant and some unrelated parts for other service, but I wanted them to get the timing belt parts so they would be responsible for them, even though that meant paying a considerable markup, and they got OEM parts from Ford for me.
The shop gives a 3-year/36,000 mi warranty on parts, which is good. Let's say I supply the water pump and it goes bad in 6 months. The place I got it from would be responsible for the part, but I'd be responsible for all that labor cost again to get to it and reinstall it.
How long did they warranty it for? Just asking. I have a comeback if I ever need one, the dealer did the work on mine!


OP
Capri to ST

Capri to ST

1000 Post Club
Messages
1,748
Likes
2,249
Location
CHAPEL HILL, NC, USA
Thread Starter #53
How long did they warranty it for? Just asking. I have a comeback if I ever need one, the dealer did the work on mine!
They warranty parts they supply and labor that they do for 3 years or 36,000 mi. However, you guys have got me thinking that if a part they supply is defective, they might cover the part, but not necessarily the labor to replace it if their labor wasn't defective, which in this case just turns out to be a huge number for a timing belt/water pump job.
@rallytaff i didn't mean to imply that you might have done anything wrong by supplying the parts yourself. You obviously saved a considerable amount of money, and part of the reason I got them to do it was just because I wasn't confident I knew all the parts that were necessary. Hopefully we'll both be fine for a long time and won't have to find out what happens if anything goes bad.


Messages
12
Likes
9
Location
Raleigh, NC
#54
Just finished installing the timing belt and water pump this weekend. Looks like it was the first change at 198,584 miles o_O. Only did a short drive due to the lower coolant tank fitting being cracked (new hose on order), but it seems to be running smoothly and possibly better? Never had issue with how it ran and it could be placebo, we will see once I get the new coolant hose and coolant topped off. One thing I did notice for sure was turbo flutter off throttle that wasn't there before. Could be the stretch in the old belt was enough to impact timing? Double checking the Diverter valve connection when I replace the coolant hose to be sure.

I originally was doing the job to help get the car sold, but now I'm leaning torwards keeping it for longer. Outside of the Alfa GTV6, this is the best handling car I've ever had and I'd really miss it!

Big thanks to @Intuit for posting the instructions here. Would of been pretty lost with out them, you tube videos are usually too simple or way over complicate it!


Messages
169
Likes
178
Location
Montreal
#57
I also did the timing belt over the last weekend and here are my thoughts on the process.

Here are exact the kits that I used :
Gates timing belt kit (one note on this. Inspect carefully the contents of the kit as soon as you receive it. I had a broken impeller from the water pump, but I only checked it 101 days after receiving it, so I could not ask for a replacement. I had to order THIS kit with rush delivery)
Gates serpentine belt kit
DPTOOL Timing tool kit
(I've seen comments on this thread about the quality of these kits. The DPTOOL kit was of good quality, I recommend it.)

And here are the extra OEM parts I ordered :
Water pump screws (6)
Water pump pulley
Water pump pulley bolts (4)
(I anticipated a rusted water pump pulley, but I was pleasantly surprised. The original one was in good condition, I could have reused it.) But I do recommend new water pump screws, with the pre-applied thread sealant. Make sure to follow the torquing sequence!!

Be prepared, you need to remove the intake manifold, the alternator, the starter motor, the engine mount, the serpentine belt and all accessories connected to it. Naturally, you need a jack to support the engine while you have the engine mount removed. I would highly suggest removing the passenger-side light and the coolant reservoir. You'll have to drain the coolant anyways, because you'll be changing the water pump and it'll gush out even though you drained the radiator. You need to remove the passenger side wheel, so you'll probably have to have the car on jack stands.

I had four ''issues'' during the process, which I'll detail below. I also did one thing differently than ALL of the guides, that most likely saved me hours of fiddling (hint, I did not need to unbolt the axle carrier). I'll detail this below as well.

Issue 1 : Starter motor bolts
I had an extremely hard time undoing the bolts from the starter motor, especially the smaller one, which is hidden behind a very stiff portion of the wiring loom. I had to remove the cold-side pipe after the intercooler to get good access to it. Even still, it took me a good hour of swearing with 13mm sockets and swivel adapters. I was only able to reach this bolt from under the car.
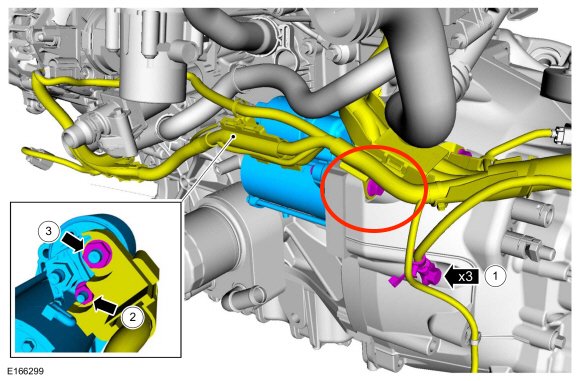
imagen2_419.jpg

Issue 2 : Main pulley stuck
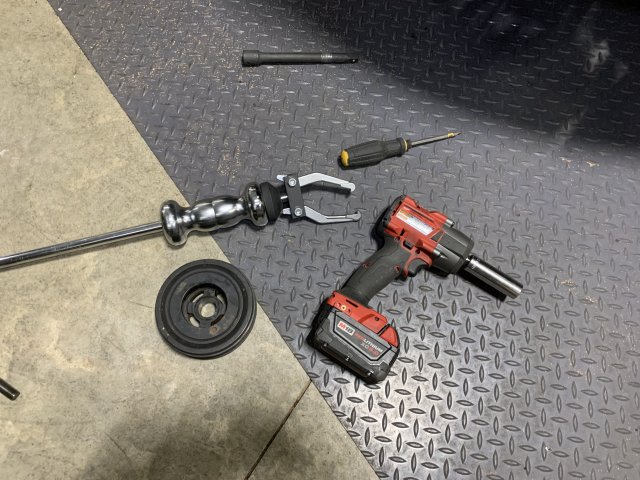
Like @jtl , my crankshaft pulley was stuck. I had to use a puller to remove it. By his account, I was very scared of damaging it and being stranded. It is a 91$ part too.
IMG_1126.jpg
So I used a puller just like this. I took my time and only took small impact to it, and it immediately started to budge. I took a good 5 minutes of whacking carefully and I was able to remove it with no damage. As you can see, I impacted the main bolt (which is a throwaway, don't reuse).
Now, you may be surprised to know that the main pulley and the crankshaft sprocket are not keyed. That's right, they are at best sliding fit items on the crankshaft! The only thing keeping this engine timed is the tension applied from the torque to yield crank bolt clamping down both the main pulley and the sprocket. This is important for issue #3.

Issue 3 : Pulley alignment tool
You need to remove the crank angle sensor to install a special tool to precisely place the crankshaft pulley.
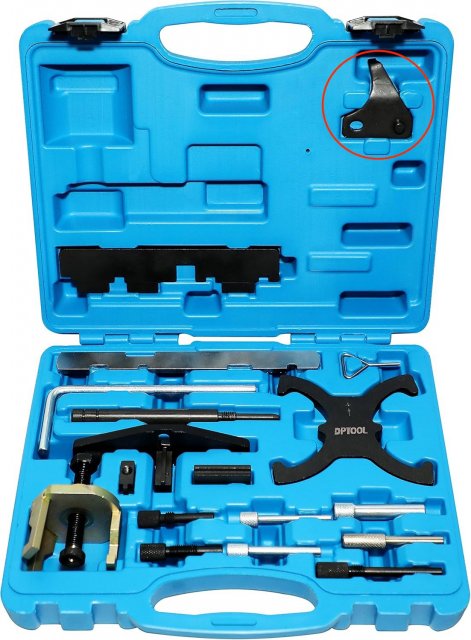
81hcc-6VIUL._AC_SL1500_.jpg
This tool needs to be inserted below.
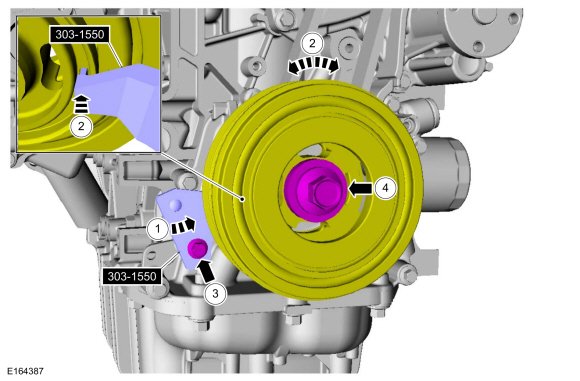
imagen2_004_194.jpg
Once you have torqued the bolt in place, the manual simply tells you to unbolt the tool and slide it out. However, this is **not** possible. The tool is first inserted into a hole and then placed over a hollow cylinder where the sensor was located upon. Check the bellow image for reference.
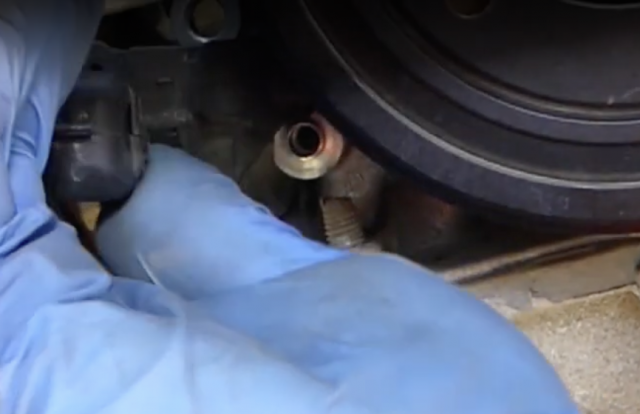
Screen Shot 2025-01-14 at 10.51.10 PM.png
Even with the bolt removed, in this configuration, you can't even budge the tool. What I had to do was crush this small cylinder inwards with a flathead screwdriver to be able to rotate out and wiggle out the tool.
Once I had the tool removed, I deformed back this cylinder to be able to accept a screw, but it was still damaged by doing so. The crank angle sensor went in fine, and it did not affect anything else.

Issue 4 : Belt cover rubbing
Final issue was the only one I consider to be a user error. I completed the timing belt change and went in to start the engine, only to hear a distinct rubber on rubber rubbing sound. It went up with RPMs and really sounded like a belt was rubbing one something. There are only two belts, the serpentine and the timing belt. The serpentine belt looked great, so I had to partially disassemble the engine mount, the whole serpentine belt and tensioner plus the cover to get to the timing belt. Once I got to it, it was clear.
imagen2_016_020.jpg
This portion was the culprit. (The yellow rubber portion of the timing belt cover). I had re-installed this part wrong, and it was pinched inwards and touching the timing belt. I suggest paying special attention to this part when re-installing the cover. There is a hook on the top, so unhook this rubber piece before installing. Only after fitting the other bolts, you should hook the rubber portion and triple check that it's placed correctly.


The thing I did differently than all the other guides : No alignment pin needed

In the service manual, you need to loosen the half-shaft bracket to get to the engine plug bolt. You then need to insert an alignment pin in there that hits the crankshaft counterweight at TDC and stops the crank from moving.
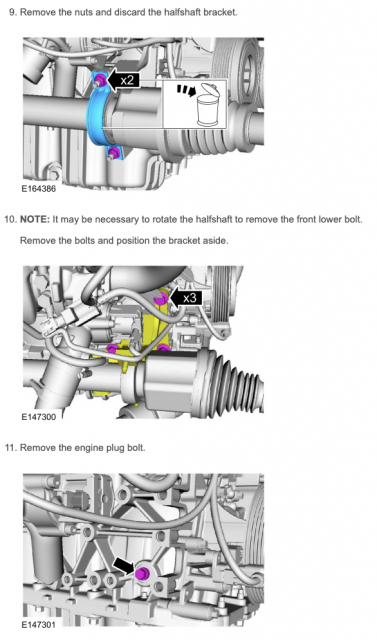
Screen Shot 2025-01-14 at 11.01.53 PM.png
However, I found this procedure to be redundant because you don't need this pin to align the crank to TDC. Let me explain.
There is only **one** way to insert the cam phaser lock tool (pictured below), but it requires two or sometimes three revolutions of the engine to reach the alignment point where the tool slides in.
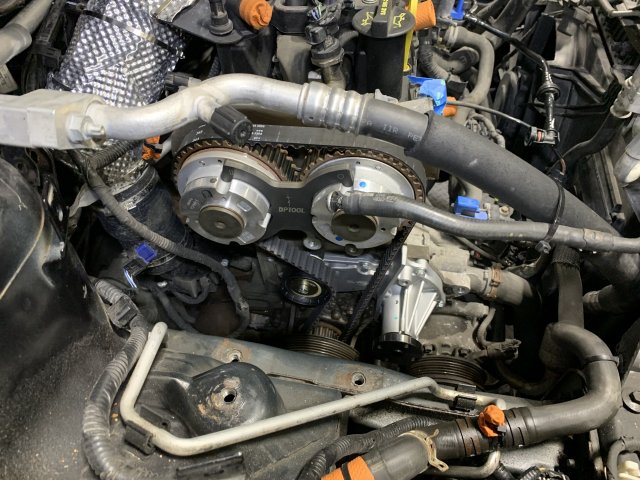
IMG_1128.jpg

I followed the service manual to turn the crank until I reached the 11 o'clock position on the markers.
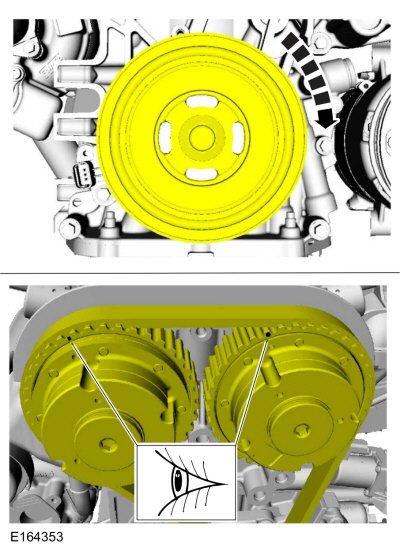
imagen2_013_018.jpg
Then I slowly and methodically turned the crank clockwise to get to 12 o'clock while placing the tool in the slots. One some revolutions, the tool did not fit at all, and I had to crank over the engine to get back to 11o'clock and re-align the tool when hitting the 12 o'clock. When the cam phasers align, the tool slides in effortlessly, and it's at TDC. After this, you install the flywheel lock tool into the starter engine hole, making sure it's deeply into the teeth of the flywheel and voilà! The engine is at TDC and completely locked from turning.

I understand why they add this alignment pin because it takes the guesswork out of figuring the TDC, but in my case, TDC was easy to find. I have not seen any other members report this and none of the videos on youtube mention this either.

Bonus section :
While you're in there, I would highly suggest you walnut blast your intake valves, they are **right there**.
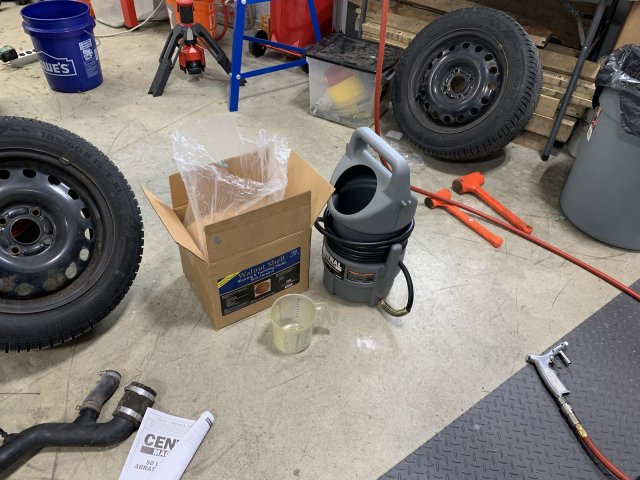
IMG_1120.jpg
This is what I used, it's super cheap. You only need an air compressor and a shop vac.
Harbor Freight media blasting kit
Walnut shell media

The only downside, is that it's messy as all hell!
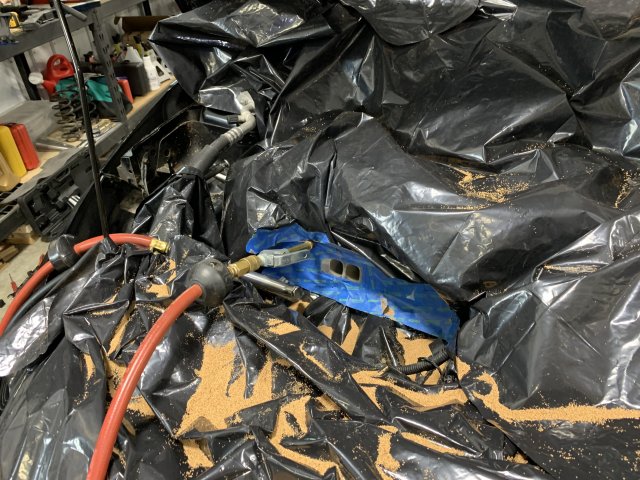
IMG_1124.jpg
This was my configuration. I took great, great time to ensure that each cylinder I was blasting was at TDC before introducing the walnut media. One trick I used for this was spraying the CRC GDI intake valve cleaner and letting it sit for 10-15 mins per cylinder before starting to blast the valves. If after 10-15 mins, the fluid was still in the valves, it meant that there the valves were fully closed and sealed, ready for blasting.

I had the blasting gun oriented upside down as shown in the picture in my left hand and I had a shop vac hose in my right hand. I positioned the gun first, aiming it at the sections that needed cleaning and positioned the shop vac hose over the hole and started to blast. Even if you have a shop vac positioned directly on the right spot, there is **so much** spillover of the walnut media, that I suggest wearing face protection, not eye protection, face protection. It took me longer than I thought to blast each valve. At least 4 minutes of continually blasting per valves to remove all the carbon build up. I ended up using about half the bag of 25lb media.

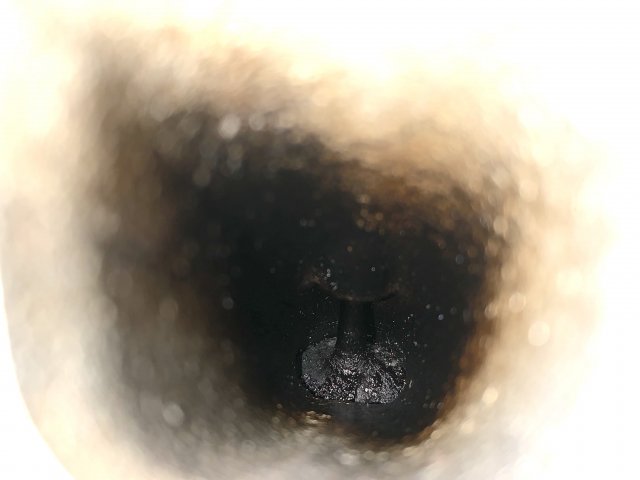
It made quite the difference. My car is a 2014MY with 148k km on it. 8k km oil changes with high-quality Quaker State Gold 0W20 oil for winter and 5W20 oil for summer. No oil catch can, nothing. Just raw 10 years of ownership on these valves.
IMG_1118.jpg
It was horrible.

IMG_1125.jpg
But not anymore!

Hope this helps others who might think of doing this on your own. It's definitely doable as a DIY. It took me around 20 hours, all said and done. I was working alone, taking my time and torquing every single bolt to spec. This time also takes into account the time I spent walnut blasting the valves and working through the four issues I had. I had access to a lift, a jack and pretty much every single power tool available on the market (my dad has a tool acquisition problem lol).


Last edited:


Top