• Sign Up! To view all forums and unlock additional cool features

    Welcome to the #1 Fiesta ST Forum and Fiesta ST community dedicated to Fiesta ST owners and enthusiasts. Register for an account, it's free and it's easy, so don't hesitate to join the Fiesta ST Forum today!


What did you do to your Fiesta ST today ?

TyphoonFiST

9000 Post Club
Premium Account
Messages
11,621
Likes
8,149
Location
Rich-fizzield
@TyphoonFiST - curious about the glossy side pillars ?
There off Amazon* They're like a piano black I do believe adds a subtle pop* Been on for 3 years now..weathered well.

AUTOCARIMAGE Glossy Piano Black Pillar Posts (B Pillars) Covers for Ford Fiesta 11 12 13 14 15 16 17 18 19-8 Pieces Hatchback https://a.co/d/68XHMaN


KXNGABE85

Member
U.S. Coast Guard Veteran
Messages
31
Likes
64
Location
Florida
What up FIST gang!

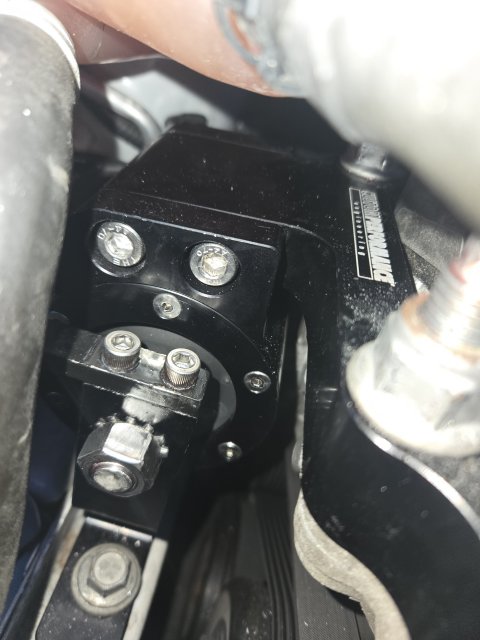
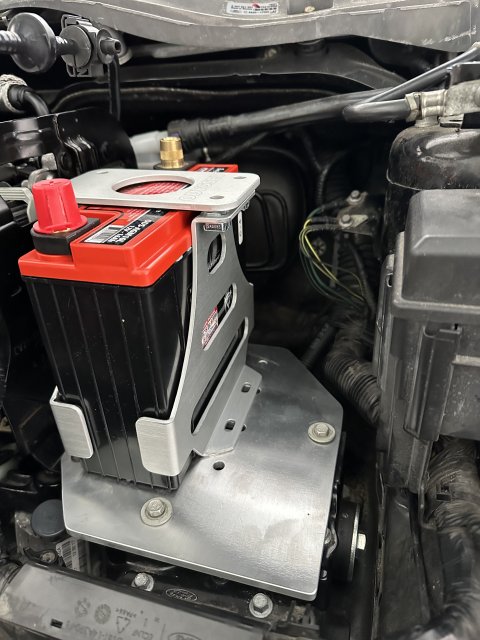
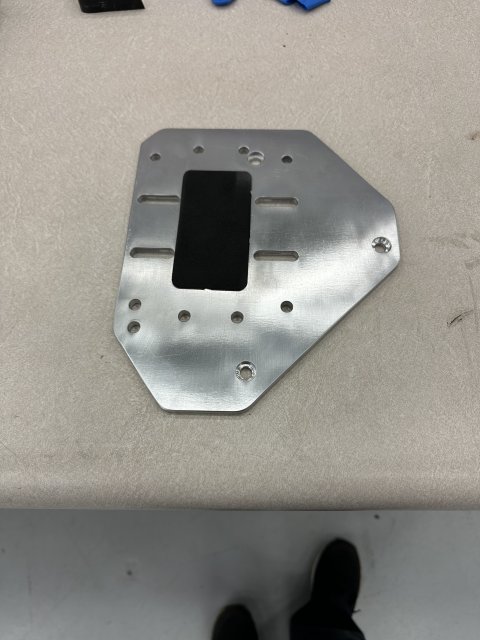
So finally got around to installing my passenger side mount by CPE. I've seen a lot of folks go with the Vibra Technics all around. I originally intended on going CPE all around as well but Ron was out of their rmm. So, I went with the vibra technics rmm, and have both CPE PMM and DMM.

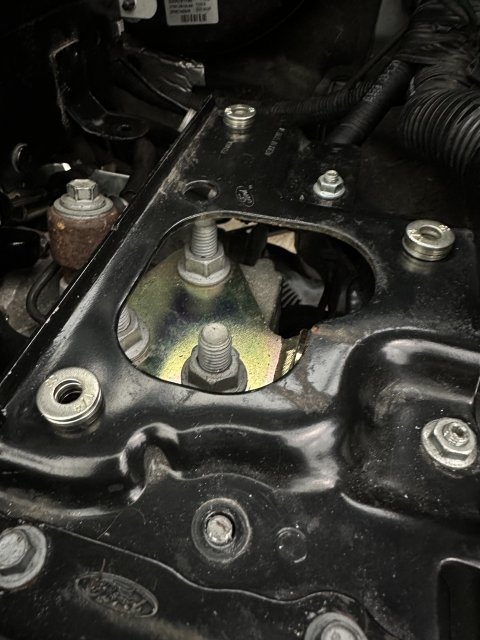
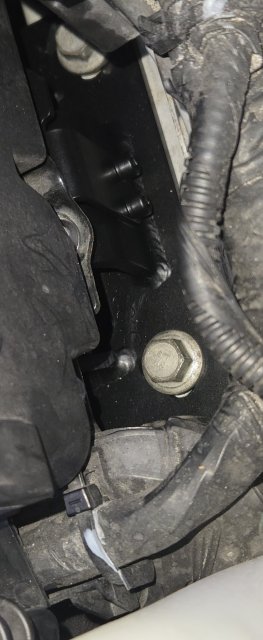
As far as installs go, the rmm which was a hybrid whoosh rmm failed after so many miles. My passenger side and trans mount were given the power flex treatment quite a long time ago and held up pretty good in the south Florida heat. Everything went well for the most part, one of the bolts connecting the rear mount was seized and eventually rounded off, so long story short, had a buddy weld a nut on the bolt and somehow got it off, nightmares. But the rmm is solid, a little more back and forth movement than I would like but overall solid rmm.

For the Cpe pmm, first addressing NVH, bar in mind the cars driven about 10 miles on the mount just today, and yes there are vibrations. My car already vibrates some so it's not unbearable at this point, but if that does worry you, then I would try the vibra technics mount out. Now, in second gear, I'm running dizzy e30, before the cpe mount, the car had some torque steer due to the torque shove, but that's completely GONE. it's Unreal how straight it pulls now, no drama whatsoever. Next up, CPE trans mount. 1000007039.jpg


KXNGABE85

Member
U.S. Coast Guard Veteran
Messages
31
Likes
64
Location
Florida
I also rounded that nut off trying to do the same thing... It's still there.
I still got the Giant nut on mine but got some Whoosh Titanium upgraded bolts but don't have the time or patience to install in this 99 Degree heat it's been lately. Perhaps fall I'll get to it when it cools down.


XanRules

Active member
Messages
605
Likes
280
Location
Portland
Swapped out the interior bits - door handles, vent trim, and steering wheel trim - for those from a Titanium. The Titanium has a slightly darker grey silver color than the ST and I like it more, plus I like the extra contrast in the door cards.


Attachments

SVTBob

Member
Premium Account
U.S. Air Force Veteran
Messages
57
Likes
50
Location
Arizona
I posted this in the Wheels/Tire section but felt I might get a more timely answer here. I’m a newbie so forgive me if this question is silly. I have a pair of Rota Titans in 17 x 8 with what I believe are 73 mm hubs and therefore required concentric hub rings on the ST. (I am away from home and the wheels and the car are there). Since the wheels are seemingly out of production, I’d like to buy another pair to have a full set before they disappear rather than junk them (and I would think I cannot sell just an pair of them). I have found some at various online dealers but most available are 17 x 7.5, not 17 x 8. The ones I’ve found that are 17 x 8 are only available in two hub sizes, 63.3 and 67.1. On the early pages of thisn thread, the hub size of the stock wheels is listed as 63.4. So, it that rounded up ? Would wheels with 63.3 hubs actually fit ? Or do I need to buy a pair of wheels with 67.1 hubs and buy rings to match to get them to fit ?


Messages
284
Likes
338
Location
Morris, CT, USA
Had an open CNC at work today and a nice scrap piece of Mic 6 laying around so I decided to make a new bottom mounting plate for the Odyssey battery box I purchased. It will now be able to utilize the factory mounting locations that the stock box uses and also be able to have the ecu mounting bracket connected to it as well kinda like it would on the stock battery box. Will update with more pictures when I get home and install it. Odyssey mounting plate on left. My hack job on right.

Update

I Have to make some counterbores for one of the three bolts that mount the plate to the car to get clearance for the battery. Other than that this is going to work awesome. Have to sit the plate on a stack of 3 1/4” washers and get 3 longer bolts to replace the stock mounting bolts. Tomorrow it should be good to go. Added some pics of how it will be when its all mounted.


Attachments

Last edited:
Messages
284
Likes
338
Location
Morris, CT, USA
Had an open CNC at work today and a nice scrap piece of Mic 6 laying around so I decided to make a new bottom mounting plate for the Odyssey battery box I purchased. It will now be able to utilize the factory mounting locations that the stock box uses and also be able to have the ecu mounting bracket connected to it as well kinda like it would on the stock battery box. Will update with more pictures when I get home and install it. Odyssey mounting plate on left. My hack job on right.

Update

I Have to make some counterbores for one of the three bolts that mount the plate to the car to get clearance for the battery. Other than that this is going to work awesome. Have to sit the plate on a stack of 3 1/4” washers and get 3 longer bolts to replace the stock mounting bolts. Tomorrow it should be good to go. Added some pics of how it will be when its all mounted.
Update removed a corner from the plate to lighten it up a little and also put the counterbores in for the mounting holes. Should be good to go now.


Attachments

KXNGABE85

Member
U.S. Coast Guard Veteran
Messages
31
Likes
64
Location
Florida
What up folks!

Got a chance and installed the drivers side CPE mount. Not the funnest install by any means, mainly because the entire bracket needed to come out. It's got 3 bolts that lie between the frame with about an 1-1/2 inches of space to get a wrench in. Two of the 3 are easy, but one is ressesed so far in it's impossible to get all the way torqued down. Got as much as I could. Otherwise the install was pretty straightforward.

The car now does what you want it to do, floor in 1st or 2nd and zero torque steer. It's very impressive, glad I changed them out.

NVH..... it's there lol 😆 but has settled significantly and has more to go. Overall, if you don't like NVH, then go with the Vibra tech mounts, but if you don't mind a little (Context: i had power flex bushing inserts race spec beforeand find the NVH to be the some), CPE is worth the extra cost IMO.

P.S. I Would've have taken more pics but I was up until to midnight getting destroyed by SOFLO mosquitoes and cursing the third ressesed bolt 😂😂


Attachments

Last edited:
Messages
284
Likes
338
Location
Morris, CT, USA
Update removed a corner from the plate to lighten it up a little and also put the counterbores in for the mounting holes. Should be good to go now.
Update new battery box plate works nicely with the Odyssey battery and battery box. Definitely cleans up the bay a little.


Attachments

Messages
284
Likes
338
Location
Morris, CT, USA
NICE! [thumb]

Is this car either stored, or kept in an enclosed garage during the New England winters?
(That battery is a bit low on CCA, why I ask.)
Yes shes stored for the winter. Well shes been stored for over a year now due to me taking my sweet ass time modifying it. Im hoping to be done and back on the road by the end of next month.


dhminer

2000 Post Club
Messages
2,319
Likes
2,744
Location
Burlington, NC, USA
Yes shes stored for the winter. Well shes been stored for over a year now due to me taking my sweet ass time modifying it. Im hoping to be done and back on the road by the end of next month.
I’m glad I’m not the only one that takes a ridiculous amount of time to get shit done on mine. Thanks for making me feel better!


Sam4

Senior Member
Messages
882
Likes
679
Location
West Chester, PA, USA
I’m glad I’m not the only one that takes a ridiculous amount of time to get shit done on mine. Thanks for making me feel better!
Any chance you've replaced the vent tube to the canister? I'm struggling with the electrical connecter (!$#%!) of all things. The release is 'upside-down' for us driveway guys...AITP? not assh@le, I think I was just timid during my first evaluation. I can't seem to find the release sweet spot - pull the hose and twist to view? its a vapor hose so no liquids...


dhminer

2000 Post Club
Messages
2,319
Likes
2,744
Location
Burlington, NC, USA
Any chance you've replaced the vent tube to the canister? I'm struggling with the electrical connecter (!$#%!) of all things. The release is 'upside-down' for us driveway guys...AITP? not assh@le, I think I was just timid during my first evaluation. I can't seem to find the release sweet spot - pull the hose and twist to view? its a vapor hose so no liquids...
You talking about the evap assembly?


Sam4

Senior Member
Messages
882
Likes
679
Location
West Chester, PA, USA
Oh, I know where it is...
It's the hose assy which fits on the large nipple on the cannister. It's a splitter whose only job in life is to throw a code eventually. I'm struggling with the electrical connector release, same as all the other I have snapped the lock/lever on. Tomorrow, it's me or ..it, code or no code, black tape or none.(y)


Top