I've noticed a musty smell after a hard rain here in Texas today and after checking the rear hatch area noticed water around the charcoal canister wiring in the trunk under the carpeted liner... I pushed down on the rubber sealer around the wiring back there and saw bits of water coming out. I didn't see this covered in the video though so I thought I'd ask here about that and how to remedy it or if it'll drain in time and its just due to an excessive amount of rain lately or something.
-
Sign Up! To view all forums and unlock additional cool features
Welcome to the #1 Fiesta ST Forum and Fiesta ST community dedicated to Fiesta ST owners and enthusiasts. Register for an account, it's free and it's easy, so don't hesitate to join the Fiesta ST Forum today!
Water Intrusion Issue - Resolved
- Thread starter Intuit
- Start date
Thread Starter
#42
Thread Starter
#42
I've noticed a musty smell after a hard rain here in Texas today and after checking the rear hatch area noticed water around the charcoal canister wiring in the trunk under the carpeted liner... I pushed down on the rubber sealer around the wiring back there and saw bits of water coming out. I didn't see this covered in the video though so I thought I'd ask here about that and how to remedy it or if it'll drain in time and its just due to an excessive amount of rain lately or something.
https://www.fiestastforum.com/threads/rear-suspension-sitting-a-lot-higher.29187/post-475720
That image might lead to some suggestions from others.
Recently joined the leaky boot club, and after looking around it appears the water is seeping... upward? from these clip things, on both sides of the boot but the right one seems more leaky... Does anyone know what they are / where they lead? Second spot seem to be further down the right side where it looks like the sealing goop wasn't evenly applied. Current plan is to RTV around all of these things but kind of worrying whether this will just trap the ingressed water between some metal and cause rust.
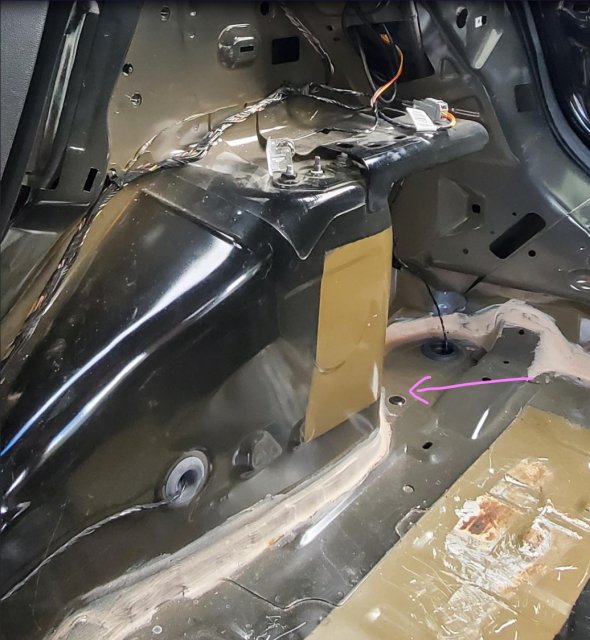
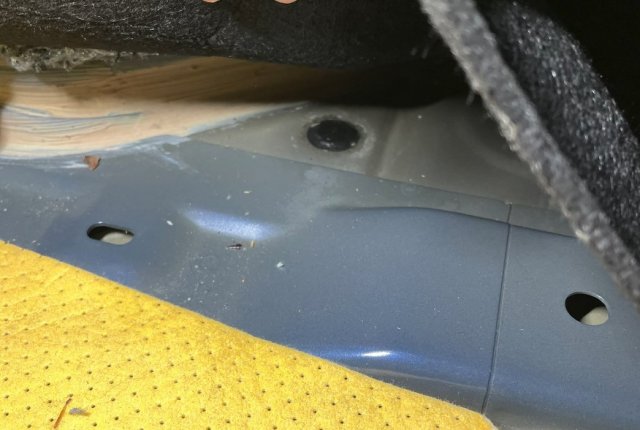
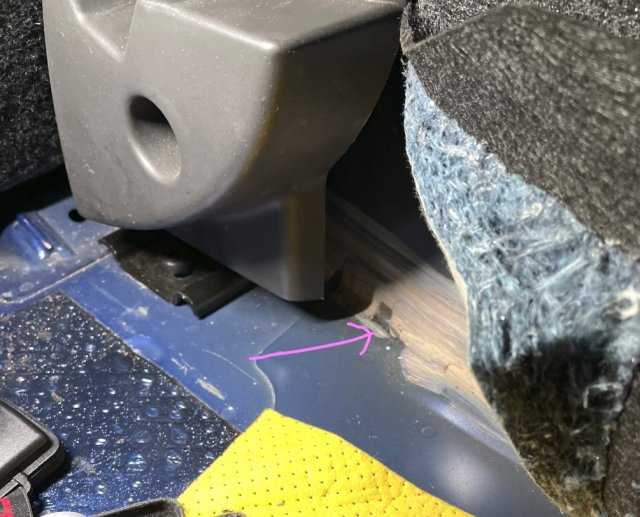


Recently joined the leaky boot club, and after looking around it appears the water is seeping... upward? from these clip things, on both sides of the boot but the right one seems more leaky... Does anyone know what they are / where they lead? Second spot seem to be further down the right side where it looks like the sealing goop wasn't evenly applied. Current plan is to RTV around all of these things but kind of worrying whether this will just trap the ingressed water between some metal and cause rust.
View attachment 52415 View attachment 52416 View attachment 52417
View attachment 52415 View attachment 52416 View attachment 52417
Sent from my moto g power using Tapatalk
Can you either post a photo or cut-out and paste one from here ?
https://www.fiestastforum.com/threads/rear-suspension-sitting-a-lot-higher.29187/post-475720
That image might lead to some suggestions from others.
https://www.fiestastforum.com/threads/rear-suspension-sitting-a-lot-higher.29187/post-475720
That image might lead to some suggestions from others.
Last edited:
Had a bad three day heavy rain storm last weekend and have standing water in the foot wells (worse on passenger side). I had to pull the carpet today as it is completely saturated. I ran a hose over the rear hatch and there does seem to be some intrusion on the driver side.
With it being all the way to the front foot wells I may check the door drain holes. This youtube video shows some spots we can investigate for possible leaks. Posting this mainly as he points out how water can defeat the front door seals. I know someone recently posted having that exact issue. @FiestaSTdude
View: https://www.youtube.com/watch?v=6PYBSRyPHS0
With it being all the way to the front foot wells I may check the door drain holes. This youtube video shows some spots we can investigate for possible leaks. Posting this mainly as he points out how water can defeat the front door seals. I know someone recently posted having that exact issue. @FiestaSTdude
Last edited:
Final update (I hope). After performing above I still had a tiny bit of water intrusion in the trunk, but not nearly as bad. I noticed a drop forming on the upper white grommet/insert that the top tail light gets screwed into! Took some clear silicon to all of the grommets (two plastic & two rubber) and that seems to have fixed it!!! Woohoo! I can finally put my carpet and rear seat back in the car.
Had a bad three day heavy rain storm last weekend and have standing water in the foot wells (worse on passenger side). I had to pull the carpet today as it is completely saturated. I ran a hose over the rear hatch and there does seem to be some intrusion on the driver side.
With it being all the way to the front foot wells I may check the door drain holes. This youtube video shows some spots we can investigate for possible leaks. Posting this mainly as he points out how water can defeat the front door seals. I know someone recently posted having that exact issue. @FiestaSTdude
View: https://www.youtube.com/watch?v=6PYBSRyPHS0
With it being all the way to the front foot wells I may check the door drain holes. This youtube video shows some spots we can investigate for possible leaks. Posting this mainly as he points out how water can defeat the front door seals. I know someone recently posted having that exact issue. @FiestaSTdude
Anybody ever try something like these in the trunk floor?
https://www.amazon.com/Silicone-Duckbill-One-Way-Backflow-Prevent/dp/B09NNKKVM4
https://www.amazon.com/Silicone-Duckbill-One-Way-Backflow-Prevent/dp/B09NNKKVM4
Thread Starter
#53
Thread Starter
#53
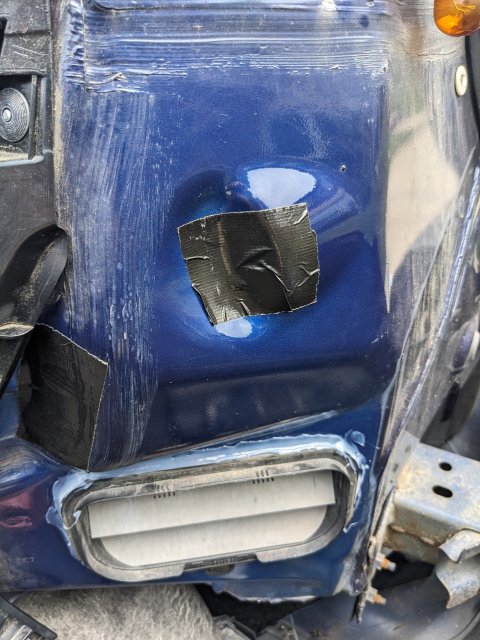
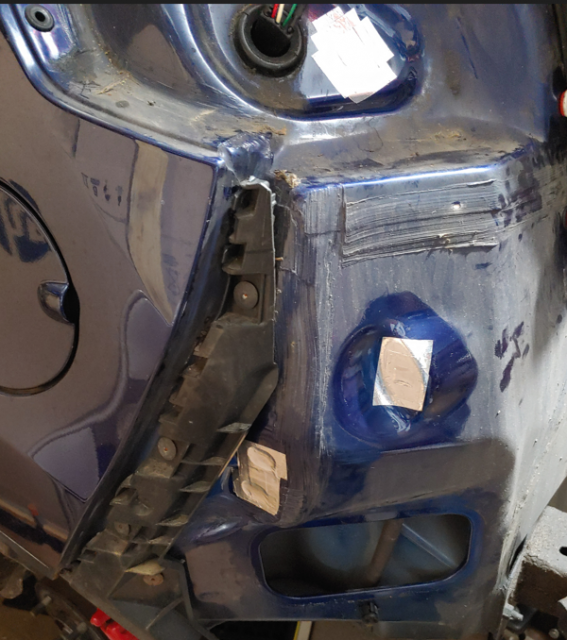
Joined the failed tape club. Tape is of course, very temporary. Engineers would know this, so this was obviously an intervention by the bean counters because square and ovoid grommets are more expensive. 🤔 Either that, or there was a part shortage and they didn't want to halt the production line. There are a pair of holes back there that do have a grommet installed. So it's senseless as to why the remaining wouldn't have them.
Warning to others. Do not let any lubricant touch your vents. In the wonderful video that @Nitelife posted, he repeated what he was told about some of the vents dry-rotting. So I applied some silicon spray as a preemptive measure. That ruined them. 😮 Otherwise they were perfectly fine. The rubber immediately expanded. Motor oil or any other effective oil/silicon based lubricant will have the same impact. The effect is permanent. I had to order replacements and that took about a week. As a temporary workaround until replacements arrive, may be able to use plastic wrap around the inside of the vent. But that will likely get sucked/blown out. In addition, plastic retention tabs may break every time one pulls the rear bumper off. The vents must close for multiple reasons. Keeps out exhaust, insects, excess humidity, water (when moving), and sewer gasses depending on where you park. The sunroof troughs drain exits right below these vents.
Photos...

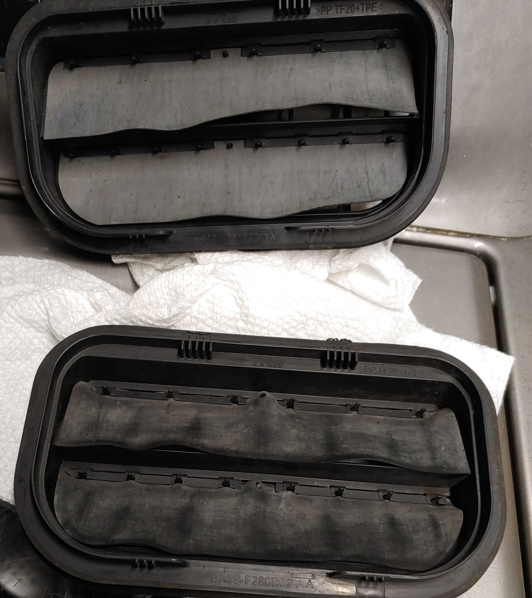
EDIT 24y12m21d:
Ran across a video showing the vents in action...
View: https://youtu.be/MIWIZYEeuVE?t=8
/EDIT
Cleaned areas with rubbing alcohol. Used metal tape to cover the holes.
Much more appropriate for this kind of application. Layers will prevent puncture/blow-out.
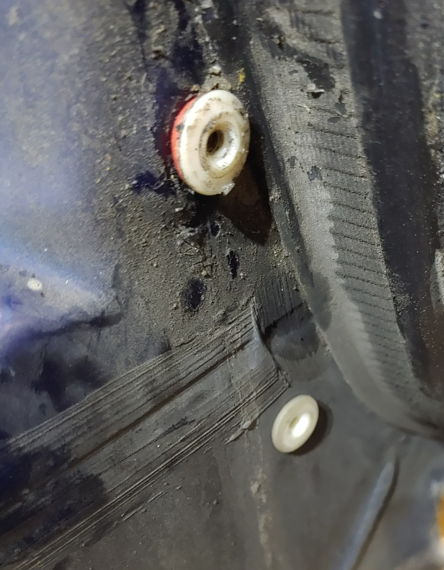
For the white plastic wall/screw anchors, I used silicon o-rings. (compare top to the bottom)
Went around everything with gasket maker aka RTV sealant. Did the vents once they came in as well.
If you're nit-picky, use a dark colored sealant for the two on the left as they may be visible around the tail light.
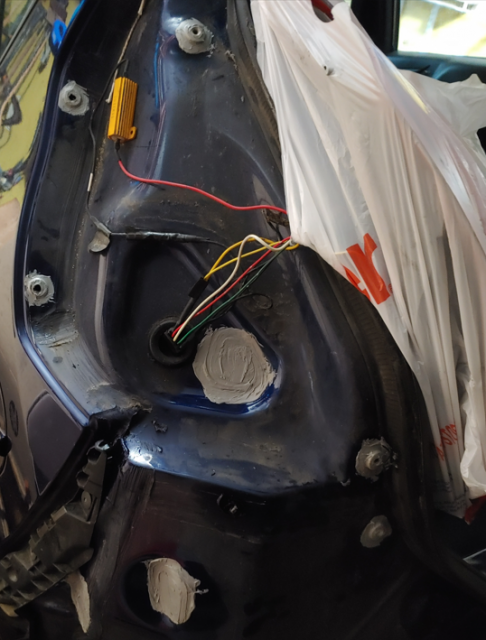
The Spec-D tail lamp grommet BTW, also has an O-Ring in there that makes them lock in there exceptionally well. No need for sealant there in my case.
.
Warning to others. Do not let any lubricant touch your vents. In the wonderful video that @Nitelife posted, he repeated what he was told about some of the vents dry-rotting. So I applied some silicon spray as a preemptive measure. That ruined them. 😮 Otherwise they were perfectly fine. The rubber immediately expanded. Motor oil or any other effective oil/silicon based lubricant will have the same impact. The effect is permanent. I had to order replacements and that took about a week. As a temporary workaround until replacements arrive, may be able to use plastic wrap around the inside of the vent. But that will likely get sucked/blown out. In addition, plastic retention tabs may break every time one pulls the rear bumper off. The vents must close for multiple reasons. Keeps out exhaust, insects, excess humidity, water (when moving), and sewer gasses depending on where you park. The sunroof troughs drain exits right below these vents.
Photos...


EDIT 24y12m21d:
Ran across a video showing the vents in action...
/EDIT
Cleaned areas with rubbing alcohol. Used metal tape to cover the holes.
Much more appropriate for this kind of application. Layers will prevent puncture/blow-out.

For the white plastic wall/screw anchors, I used silicon o-rings. (compare top to the bottom)

Went around everything with gasket maker aka RTV sealant. Did the vents once they came in as well.
If you're nit-picky, use a dark colored sealant for the two on the left as they may be visible around the tail light.

The Spec-D tail lamp grommet BTW, also has an O-Ring in there that makes them lock in there exceptionally well. No need for sealant there in my case.
.
Last edited:
I did the same thing. Turned out mine was actually leaking from under the drip rail molding. So that is a tip for those chasing a leak.
For the tape, I used RV Eternabond - it is a rubberized tape that will literally last longer than the car.
For sealing, also used an RV product, Geocell Proflex. stays flexible and sticky, non-silicone based product. Also lasts a long time.
While in there, recommend changing the mount bracket for the bumper, as most of the teeth broke off mine when removing the bumper cover.
Thread Starter
#55
Thread Starter
#55
Turned out mine was actually leaking from under the drip rail molding.
While in there, recommend changing the mount bracket for the bumper, as most of the teeth broke off mine when removing the bumper cover.
In addition, plastic retention tabs may break every time one pulls the rear bumper off.
TLDR; careful when removing that one, maybe wiggle something flat in to disengage it as you're applying force
Warning to others. Do not let any lubricant touch your vents. In the wonderful video that @Nitelife posted, he repeated what he was told about some of the vents dry-rotting. So I applied some silicon spray as a preemptive measure. That ruined them. 😮 Otherwise they were perfectly fine. The rubber immediately expanded. Motor oil or any other effective oil/silicon based lubricant will have the same impact. The effect is permanent. I had to order replacements and that took about a week. As a temporary workaround until replacements arrive, may be able to use plastic wrap around the inside of the vent. But that will likely get sucked/blown out. In addition, plastic retention tabs may break every time one pulls the rear bumper off. The vents must close for multiple reasons. Keeps out exhaust, insects, excess humidity, water (when moving), and sewer gasses depending on where you park. The sunroof troughs drain exits right below these vents.
Photos...
View attachment 62476 View attachment 62477
Photos...
View attachment 62476 View attachment 62477
Thread Starter
#59
Thread Starter
#59
I didn't get any of those broken, but I did end up stretching the tab at the very bottom of the bumper skin where it's attached to the wheel well and so now it sits ever so slightly not flush with the body panel. Its a part of the bumper skin so I'd need new one to fix that. I'm going to try getting one those tiny clamping clips for paper and apply it from the other side to see if it can take up the extra slack.
TLDR; careful when removing that one, maybe wiggle something flat in to disengage it as you're applying force
TLDR; careful when removing that one, maybe wiggle something flat in to disengage it as you're applying force
The body line for my bumper cover is a tad tweaked so it is rubbing against the metal body panel. This has breached the paint on the body panel; so rust is starting.
Do you think that some 303 would help protect them, or would even that stuff rot them out quicker??
I’ve posted elsewhere about my trip to the junkyard today but I learned the other day when replacing my taillight bulbs that I had one piece of tape and one totally empty hole where there clearly had previously been tape.
Found a Fiesta hatch at the junkyard, took the silicone grommets out from behind the taillights, slapped em in, and then put gorilla tape over them just for good measure. That should solve whatever water intrusion issues I was having, which seemed to be mild.
Found a Fiesta hatch at the junkyard, took the silicone grommets out from behind the taillights, slapped em in, and then put gorilla tape over them just for good measure. That should solve whatever water intrusion issues I was having, which seemed to be mild.
Similar threads
-
Noise after timing belt and water pump replacement?
- Started by Fizzer600
- Replies: 4
-
Plugging up holes after rear seat delete, water accumulation under seats
- Started by WolfDampf
- Replies: 2
-
Timing Belt & Water Pump Service Intervals
- Started by ploobster
- Replies: 6
-
whoosh motorsports overdriven lightweight water pump pulley for the Fiesta ST 1.6L
- Started by ron@whoosh
- Replies: 5
-
-
-
How many bottles of distilled water do you think a coolant flush takes.
- Started by unspankable
- Replies: 2
-
-
-
Ford Community Posts
-
-
Clutch pedal sticking to the floor
- Latest: TyphoonFiST
-
-
-

