Hi Jeff,
I could not have said it any better myself. Those are my thoughts EXACTLY!
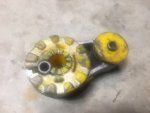
Here is the part #: C1BZ-6068-C
It is known as an upper bracket. I got it from Gaudin Ford in Vegas. They had the cheapest part+shipping price. You might ping Steve@tasca who is a vendor on this forum and see what he can do for you. You're in GA so I am guessing shipping is going to be different for you than for me in PDX.
Here is what you have to do:
*Disconnect positive and negative terminals using 10mm socket. Be careful not to touch them together (I placed a piece of wood between the positive connector and the positive terminal because the cable is pretty short and likes to snap right back into place.
*Remove battery tie-down using 10mm socket. You may need a slightly deeper socket for this one. I am guessing you have that already. If not, you may want to get a metric deep socket set.
*Before removing the battery, remove the MAF sensor so it doesn't get bumped. It also allows more clearance for the tray and the battery to come out.
*Remove the battery
*You should see a few bolts in the bottom of the tray. IIRC, one of them is an 8mm so make sure to have that size handy.
*Remove the induction hose so you can more easily access the ECU connectors.
*This next part was the most difficult, mostly because the ECU connectors are fragile and can be a headache if broken.
*The ECU connectors have a little tab that you have to push down and at the same time you pull the little white lever back until you hear a click. You can then pull them out. There are two. The bottom one is at a weird angle so be careful how you are pulling. (This forum post on the Boomba bushing install has a great explanation:
http://www.fiestast.org/forum/fiest...-racing-shifter-bracket-bushings-install.html)
*Remove the 10 mm bolts for the battery tray and carefully remove the entire tray. Be careful of the exposed pins that the ECU connectors plug into. I would cover it with a towel so minimize any potential damage.
*You will now see the black plate that covers the mount. Remove the bolts to allow it to be wiggled free. This is where you may need two people. I had my dad pull up on the airbox while I wiggled that black plate over the bolt. The plate has a downward facing lip that makes it difficult to clear the bolt that is sticking up. If you don't have two people or don't want to deal with that, just remove the airbox.
*Jack the transmission up. I needed to put the car on Rhino Ramps to get my jack to clear under the front bumper. It's the same procedure that you did with the passenger-side, except you want to jack the transmission up. You don't have to jack it up very far, just enough to relieve the tension on it.
*You can now get to the mount. It has both 18mm and 15mm bolts. The upper bolts are 18mm and the lower bolts are 15mm, just as the passenger-side.
*Remove the mount from the car.
*Push the insert into the new mount. Make sure to coat the entire insert in lithium grease of CV joint grease. In addition to making it easier to push in, it will help prevent squeaking. Make sure to use both insert pieces as that small piece will hold the insert in place!
*Install new mount and tighten 18mm large bolts to 125nm (92.2 ft-lbs) and 15mm to 89nm (65.64 ft-lbs).
*Release jack to allow transmission to sit at correct height.
*Reinstall black plate and tighten bolts. Again, you may need two people if you haven't removed the airbox to get the plate in the correct position.
*Reinstall battery tray with bolts and reconnect ECU connectors.
*Reinstall battery and plug ECU connectors back in.
*Reinstall battery tie-down.
*Reinstall induction hose and plug MAF sensor back in.
*Reinstall battery connectors.
*Enjoy your new mount!
Here is a video that will show you how to remove the battery tray and induction hose:
https://www.youtube.com/watch?v=F6Ju0TxeWMI&t=109s&index=4&list=WL
I hope this helps. Removing the ECU connectors, battery tray, and black plate are the most difficult part.
![Thumbs Up [thumb] [thumb]](/images/smilies/icon_smile_thumb.gif)

