• Sign Up! To view all forums and unlock additional cool features

    Welcome to the #1 Fiesta ST Forum and Fiesta ST community dedicated to Fiesta ST owners and enthusiasts. Register for an account, it's free and it's easy, so don't hesitate to join the Fiesta ST Forum today!


Paul's Track and Autocross Toy Build

Messages
213
Likes
95
Location
Philadelphia
#21
PFC 08 is an amazing pad. I use them on my endurance race car. LOVE THEM

I'm only getting 1-2 events from mine :( then again, that's like 20-30 hours of track time on them.
Yeah, but 40-60 hour of RACING out of a pad ain't bad! I'm just doing regular track driving!

Definitely a great pad. I used them on my old e30 as well and didn't blink twice when I saw them offered for the Stoptechs!


Woods247

2000 Post Club
Messages
2,602
Likes
4,709
Location
Atl
#22
If I may add a little advise from experience.. I tried the same pedal spacer you ordered and found it nearly impossible to heal/toe under extreme heavy braking. I removed the spacer and installed a wider Sparco pedal pad:


I also experienced a wild rear end under heavy braking into 10a at Road Atlanta, especially after the installation of my larger StopTech BBK. I increased the diameter of my rear rotors using the SVT Focus kit and it’s calmed it considerably. There are larger rear kits available now which may be better.


TDavis

1000 Post Club
Messages
1,480
Likes
1,215
Location
Columbia
#23
I cooked the Stop-tech pads that came with the kit the first track day I used them. Smeared the pad material all over the rotors. Couldn't take the heat I was generating on track.

I use the PFC 08. They are an endurance race pad. Super easy on the rotors and have good heat resistance. Not too grabby, which is why I like them. They're not cheap, but I got over 15 full track days on my last set, and they still had life left on them. I had to replace my rotors (because of a heat crack) before I had to replace the pads. They're absolutely awesome!

Link: https://www.zeckhausen.com/catalog/product_info.php?cPath=24_411&products_id=11841&osCsid=sjhgc9n6ab7p53stcckvc577v7
Just for future reference as I'm sure I'll eventually need to do so, where did you get the replacement rotors?


Messages
213
Likes
95
Location
Philadelphia
#24
Just for future reference as I'm sure I'll eventually need to do so, where did you get the replacement rotors?
These were the cheapest I could find: https://emnotek.com/collections/mini-s-r56-brakes/products/stoptech-front-big-brake-components-mini-r56

On the website they are for an R56 MINI Cooper S, but the BBK for an R56 is the same caliper/rotor size as ours, just with a different mounting bracket. They worked like a charm when I replaced them at the end of the track season this year.


Messages
204
Likes
55
Location
Virginia Beach
#25
If I may add a little advise from experience.. I tried the same pedal spacer you ordered and found it nearly impossible to heal/toe under extreme heavy braking. I removed the spacer and installed a wider Sparco pedal pad:


I also experienced a wild rear end under heavy braking into 10a at Road Atlanta, especially after the installation of my larger StopTech BBK. I increased the diameter of my rear rotors using the SVT Focus kit and it’s calmed it considerably. There are larger rear kits available now which may be better.

What pedal did you use for your accelerator?


TDavis

1000 Post Club
Messages
1,480
Likes
1,215
Location
Columbia
#26
These were the cheapest I could find: https://emnotek.com/collections/mini-s-r56-brakes/products/stoptech-front-big-brake-components-mini-r56

On the website they are for an R56 MINI Cooper S, but the BBK for an R56 is the same caliper/rotor size as ours, just with a different mounting bracket. They worked like a charm when I replaced them at the end of the track season this year.
Thats not too bad. I noticed after asking that question that the website you linked for the pads also has the Stoptech replacement parts as well. Yeah those pads are pretty hefty but if they last through that many track days I can only imagine they'll last a good time just on the street as well.


OP
P
Messages
82
Likes
25
Location
Norwich
Thread Starter #27
If I may add a little advise from experience.. I tried the same pedal spacer you ordered and found it nearly impossible to heal/toe under extreme heavy braking. I removed the spacer and installed a wider Sparco pedal pad:


I also experienced a wild rear end under heavy braking into 10a at Road Atlanta, especially after the installation of my larger StopTech BBK. I increased the diameter of my rear rotors using the SVT Focus kit and it’s calmed it considerably. There are larger rear kits available now which may be better.
Thanks for the feedback. I've read that other people like it, so I'm hoping it works out for me. If not then it's off to the buy/sell board. I've heard about the SVT brakes before, but have not looked into them yet. I'll have to check out the SVT kit. Thanks!


kevinatfms

Senior Member
Messages
888
Likes
937
Location
Germantown
#28
I suggest you look at some dampers. The rear end can be calmed down by reducing the rebound associated with the stock dampers. They are WAY to stiff for the stock springs and even some lowering springs. I had terrible chatter in the rear during high speed braking also and swapped to the Bilsteins on the stock springs which calmed it down quite a bit.

I run the Bilstein B8 and Swift springs combo currently and it is much more planted in the rear than the factory setup let alone the Bilstein/OE spring setup.

I am also the one that ran the Eibach rear bar and the TB torsion beam brace and found the car had extremely unpredictable snap oversteer. It was just too much rate into the factory beam with a regular spring/damper combo. I currently only run the Eibach bar as it feels more progressive than the torsion brace.


OP
P
Messages
82
Likes
25
Location
Norwich
Thread Starter #29
I suggest you look at some dampers. The rear end can be calmed down by reducing the rebound associated with the stock dampers. They are WAY to stiff for the stock springs and even some lowering springs. I had terrible chatter in the rear during high speed braking also and swapped to the Bilsteins on the stock springs which calmed it down quite a bit.

I run the Bilstein B8 and Swift springs combo currently and it is much more planted in the rear than the factory setup let alone the Bilstein/OE spring setup.

I am also the one that ran the Eibach rear bar and the TB torsion beam brace and found the car had extremely unpredictable snap oversteer. It was just too much rate into the factory beam with a regular spring/damper combo. I currently only run the Eibach bar as it feels more progressive than the torsion brace.
Thank you for chiming in. Based on your input, I'm thinking I'll just run the Whiteline rear bar I ordered from Ron@Whoosh, and skip the torsion beam bar from Pierce. But, I might also try each independent for some comparison testing. Challenge right now is finding 40+ degree days in CT where the tires don't act like hockey pucks.

I'm currently debating the Bilstein B8 dampers to go with the Swift Spec-R springs and the Koni Yellow and Orange dampers. Haven't read a lot about the Koni Orange, and not really sure I'm at a point where I can take advantage of adjustable. I am a Bilstein fan and glad to hear you have had positive results with them. The Bilsteins will tap out the last of my play money, but could be worth the upgrade now when I do the springs. Decisions, Decisions.....


Mikey456

Active member
Messages
672
Likes
406
Location
Los Angeles
#30
Thank you for chiming in. Based on your input, I'm thinking I'll just run the Whiteline rear bar I ordered from Ron@Whoosh, and skip the torsion beam bar from Pierce. But, I might also try each independent for some comparison testing. Challenge right now is finding 40+ degree days in CT where the tires don't act like hockey pucks.

I'm currently debating the Bilstein B8 dampers to go with the Swift Spec-R springs and the Koni Yellow and Orange dampers. Haven't read a lot about the Koni Orange, and not really sure I'm at a point where I can take advantage of adjustable. I am a Bilstein fan and glad to hear you have had positive results with them. The Bilsteins will tap out the last of my play money, but could be worth the upgrade now when I do the springs. Decisions, Decisions.....
I have that dilemma too with the Swift Springs I recently got.. it is a little bouncy with the stock shocks on my daily driver. I don’t wrench so it pricey to go back in there and install aftermarket shocks. But then again the shocks aren’t cheap either. I saw on other threads that ron whoosh recommended the bilstein b6 with the Swift springs. I also read the koni oranges were on the soft side and the yellows were the choice for autocrossers. I don’t autocross but when I took my car in the canyons I noticed the higher limits the car can achieve with the springs alone (and you kind of forget the bounciness).


OP
P
Messages
82
Likes
25
Location
Norwich
Thread Starter #31
Talked with [MENTION=5976]ron@whoosh[/MENTION] about dampers to go with the Swift springs and initially wanted the Bilstein's, until he told me they have been unavailable for months. After some more thought and research I pulled the trigger on the Koni Yellow's front and rear. Anyone have any references to material on adjusting dampers? Never had adjustables before and want to read up on how changing damper settings will affect handling (in theory at least).


OP
P
Messages
82
Likes
25
Location
Norwich
Thread Starter #32
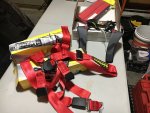
Some parts started showing up today. Had time to snap a quick picture, but no install until this weekend. Schroth Quick Fit Pro Harnesses and Schroth SHR Flex.

harness.JPG


Last edited:
OP
P
Messages
82
Likes
25
Location
Norwich
Thread Starter #33
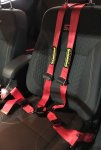
Schroth Quick Fit Harness Installed

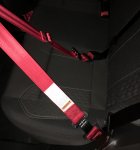
After cleaning the garage for a few hours so I got a chance to get my Schroth Quick Fit harness installed for driver and passenger. Install was pretty painless, hardest part was getting the back seat out. Darn clips that hold the back of the seat in were a pain to get un-hooked. Install as as simple as bolting in two pieces to the stock seat belt mount locations, one front one rear. I did double check the angle of the straps going to mount locations D&E and they were just under the 45* max I've read for using those locations. Took a little drive and the extra control I feel from not sliding around as much is huge. Can't wait to get them on the track. Still a bit more length adjusting so the shoulder belts hit the SHR flex in the right location, but that's just fine tuning at this point.

Here's a few pictures of the end product.

IMG_1065 (2).JPG

IMG_1066 (2).JPG


OP
P
Messages
82
Likes
25
Location
Norwich
Thread Starter #34
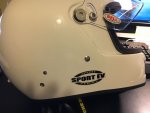
SHR Flex Install

The SHR flex install was pretty simple. I'm lucky that my Bell helmet already had mounting posts for a forward head restraint device.

IMG_1068.JPG

Install was as simple as screwing in the provided mounts on each side of the helmet (though I did ignore the whole left right thing the first time around).

IMG_1069.JPG

Attaching the SHR Flex was pretty easy once the mounts were on the helmet.

IMG_1070.JPG

Let's hope I never have to find out how well this works!


green_henry

1000 Post Club
Messages
1,042
Likes
777
Location
Pleasant Hill, CA
#35
Talked with [MENTION=5976]ron@whoosh[/MENTION] about dampers to go with the Swift springs and initially wanted the Bilstein's, until he told me they have been unavailable for months. After some more thought and research I pulled the trigger on the Koni Yellow's front and rear. Anyone have any references to material on adjusting dampers? Never had adjustables before and want to read up on how changing damper settings will affect handling (in theory at least).
I have Swifts + Koni Yellows and like them a lot. This is the second time I have had Koni Yellows, and I highly recommend adjusting them before you install them by fully compressing them and timing the rebound -- you will find that 1/2 turn (or whatever) on one will not match the same adjustment on the other; it's trial and error before the rebound will match. I backed them off of full-stiff by ~1/2 turn; great for the track, but it can be a little rough on the street -- I may soften the fronts by another ~1/2 turn (but the rears seem fine)


OP
P
Messages
82
Likes
25
Location
Norwich
Thread Starter #36
Cobb CAI / Boomba Short Throw Trans Adapter / Boomba Trans Busings / Broken Headlight

I finally have recovered from my cold enough to start installing the pile of parts I ordered. I decided to install the Cobb CAI and since that was going to be out also install the Boomba short throw transmission adapter and the solid transmission bracket bushings. Got through the install of the Boomba transmission stuff and still need to install the CAI.

Here's a nice stock before picture.
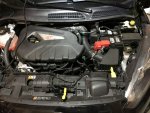
before.JPG

Cobb has you remove the entire cowl, I assume for additional access to the turbo to intake connection. Having seen many other CAI install videos do so without removing the cowling, I decide to see if I could get to the clamp on the turbo or not.
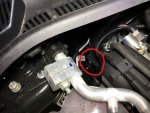
turbo_intake_connector.jpg

Turns out it was just too tight a fit for big mitts, so I decided to remove the cowl for some extra room. That's when the problems started. I had removed the two torx screws holding the driver side headlight in, but the 3rd Philips head screw connector was not coming out. Went a watched a quick video on removing the headlights and got some bad advice from the video. They recommended using a panel tool between the headlight and front radiator cover plastic to pry the pieces apart while turning the Philips screw. All I succeed in doing that was breaking off the mounting tab from the headlight itself. Same video also said to pull up on back of headlight, which I did when it would not come out. I should have wiggled more and pulled less, because I then broke off the rear mounting tab on the headlight assembly.
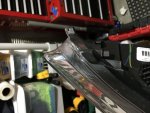
broken_light.JPG

With my broken light in hand I called Blue Spring Ford Parts since I could not figure out the correct part number in their online parts tool. Got a bit lucky and the new headlight assembly was the $130 one not the $300+ one. Have a new one coming.

But the breakage did not stop. I then broke the locking tab on the harness side of the headlight connector. When the connector did not pop right off, I assumed the locking tab need to be lifted up. That's the wrong way and I broke it.
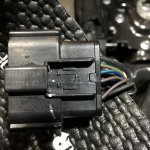
broken_light_connector.JPG

More parts to order, but I have a repair connector on the way and will swap the pins over to the new shell with the locking tab intact when it gets here.

After that I seemed to settle down got the rest of the parts and cowl removed.
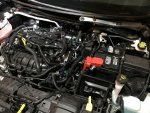
cowl_removed.JPG

As I was installing three different parts in one go, I bounced from instructions to instructions. Did get to try out my new Christmas present though and have to say it worked great.
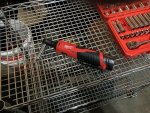
cordless_ratchet.JPG

Got the battery and battery box out with the rest of the stock airbox without incident. Hardest part of the entire install so far has been releasing the locking rings on the shift cable connectors at the trans bracket.
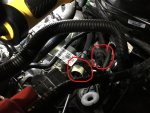
shift_cable_connectors.jpg

Right now the transmission bracket bushings are installed, the short throw adapter is installed, and I'm ready to put the CAI on and re-install all the other removed parts.


koozy

3000 Post Club
Messages
3,212
Likes
1,899
Location
Los Angeles, CA, USA
#37
Oh man rough start, hope it gets better. I found those retaining rings on the shift cables easy. It’s been awhile but IIRC with one hand you just pull on the ring while the other hand is holding the cable and it releases it hold on the bracket. It was easier than popping off the cables with screw drivers in my experience, which didn’t feel natural but did the job.


Sent from my iPhone using Tapatalk


OP
P
Messages
82
Likes
25
Location
Norwich
Thread Starter #38
Oh man rough start, hope it gets better. I found those retaining rings on the shift cables easy. It’s been awhile but IIRC with one hand you just pull on the ring while the other hand is holding the cable and it releases it hold on the bracket. It was easier than popping off the cables with screw drivers in my experience, which didn’t feel natural but did the job.


Sent from my iPhone using Tapatalk
I ended up using a plastic trim tool to unlock the connectors. Once I unlocked them once, I was able to use my fingers to get them out. I broke my first part (and can easily replace it), nothing but easy jobs from here.


OP
P
Messages
82
Likes
25
Location
Norwich
Thread Starter #40
You really want the top straps of the harness going back rather than down. Going downward, they'll compress your spine in an accident.
I wrote this response about 5 different ways, but I always sound like I'm being a jerk. That's not my intent. I'm truly tyring to learn here and be as safe a possible. With that said, these harnesses were designed by Schroth to fit the Fiesta in those exact mounting locations. I don't know what else to say. Are you saying Schroth is wrong in the way they designed there product?


Top