• Sign Up! To view all forums and unlock additional cool features

    Welcome to the #1 Fiesta ST Forum and Fiesta ST community dedicated to Fiesta ST owners and enthusiasts. Register for an account, it's free and it's easy, so don't hesitate to join the Fiesta ST Forum today!


NEW Product Release <<<<< HIGH-FLOW Turbo Inlet Elbow >>>>>

Trader history for ron@whoosh (1)

Messages
182
Likes
54
Location
Gatineau
#21
That's an interesting product and Ron always on the cutting edge for products!

There is one thing I do not understand with upsizing the pipes sizing: what is the point if it's not upsized all the way through? The turbo inlet is still smaller right? The maximum amount of air flow that can go through has to be measured at the smallest hole. (I'm throwing numbers here) If the turbo inlet is 2.5inches, it doesn't matter if all of the piping before it is 5 inches or 2.5 inches as no more than 2.5 inches worth of air is going in.

I'm also confused about downpipes and exhaust because of it. Most aftermarket downpipes are 3 inches, but I see a lot of people saying that it's not worth it upgrading to 3 inches exhaust. Doesn't make any sense to me, air flow will be limited.

From that perspective, the biggest bottle neck on that car seems to be the small intake inlet.

Does anyone have any scientific explanation as to why it makes sense?

I'm not pissing on this product for sure, it looks interesting. I am interested in doing the all of the piping in the car for something that looks better and is better quality.


Messages
132
Likes
58
Location
Mississauga
#22
Does anyone have any scientific explanation as to why it makes sense?
The basic explanation for this is if there is a larger volume of air before the turbo there will be less of a pressure drop.

That being said, whatever the true bottle neck is in the engine is going to be the real road block.
So even if there is less pressure drop in front of the turbo it may not improve power but may make the turbo work more efficiently, i.e. less WDGC for the same boost.


Messages
159
Likes
98
Location
New Castle
#23
The basic explanation for this is if there is a larger volume of air before the turbo there will be less of a pressure drop.

That being said, whatever the true bottle neck is in the engine is going to be the real road block.
So even if there is less pressure drop in front of the turbo it may not improve power but may make the turbo work more efficiently, i.e. less WDGC for the same boost.
Not sure when I became the "link to a Stratified article" - guy, but as usual, they have a post that goes into the details of this. The TLDR is Bernoulli's Principle and :

The more you reduce this pressure drop in front of and after the turbo, the slower you need to spin the turbo, the more efficiency you’ll gain...
– Turbo spends more time in the higher efficiency islands.
– The green line extends further meaning that the turbo will flow more air without over-spinning.
– The turbo spins slower, reduces exhaust back-pressure, increases overall engine efficiency
– Turbo runs cooler at lower pressures.
– Engine is less likely to knock.
– Turbo life is extended.

http://stratifiedauto.com/blog/a-technical-discussion-of-intakes-and-turbocharging/


Messages
132
Likes
58
Location
Mississauga
#24
Messages
182
Likes
54
Location
Gatineau
#25
Thanks for the answers. So basically, by just having more air hanging there, you get more efficient. Makes sense.

Correct me if I'm wrong, but while it will not really increase max power, it can provide power where it was not before by being more efficient.

That's awesome information. From that Stratified article, it seems that by removing those restrictions (turbo working less) could mean that with a tune it could make the turbo working more again and then make a bit more power right? I'm not saying 10% more here, but I guess a couple HP would be possible.


XanRules

Active member
Messages
622
Likes
291
Location
Portland
#26
Thanks for the answers. So basically, by just having more air hanging there, you get more efficient. Makes sense.

Correct me if I'm wrong, but while it will not really increase max power, it can provide power where it was not before by being more efficient.

That's awesome information. From that Stratified article, it seems that by removing those restrictions (turbo working less) could mean that with a tune it could make the turbo working more again and then make a bit more power right? I'm not saying 10% more here, but I guess a couple HP would be possible.
It's possible. The thing is that you can make stuff too efficient, especially on the super-tiny stock turbo. It'd be interesting to get before/afters for sure.


Quisp

1000 Post Club
Messages
1,118
Likes
404
Location
Davenport
#27
I have seen the PumaSpeed product and there plenty of room for either silicone or a paper gasket.
Again I don't recommend the silicone and a gasket of any kind is not necessary.
However, you can use/do what ever you want.

Except for the pictures provided, I have not seen this new product from Whoosh.
When I receive mine, I will make a paper gasket just to prove that it can be done (or not), even though I will not use it.


Dave
The stock turbo yes. The 47 R has a sliver of sealing edge.


D1JL

7000 Post Club
Staff Member
Premium Account
U.S. Navy Veteran
Messages
7,892
Likes
4,131
Location
SFV, So.Cal.
#29
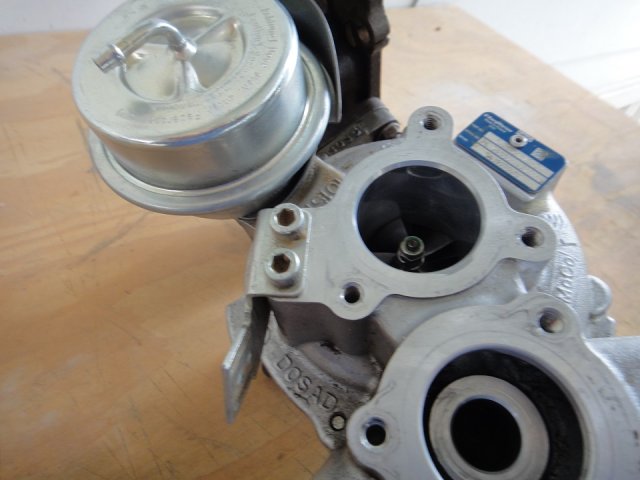
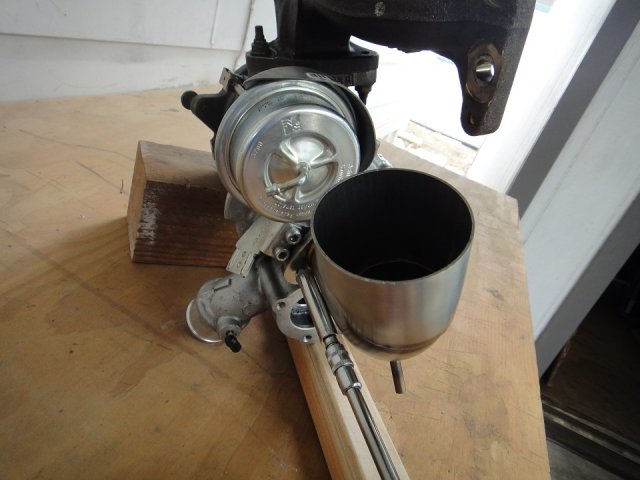
I received my Whoosh Turbo Inlet Elbow today.
First let me assure you that there is enough room for a gasket if you are so inclined.

Sense I am not going to use a gasket of any kind, I have decided not to make one.

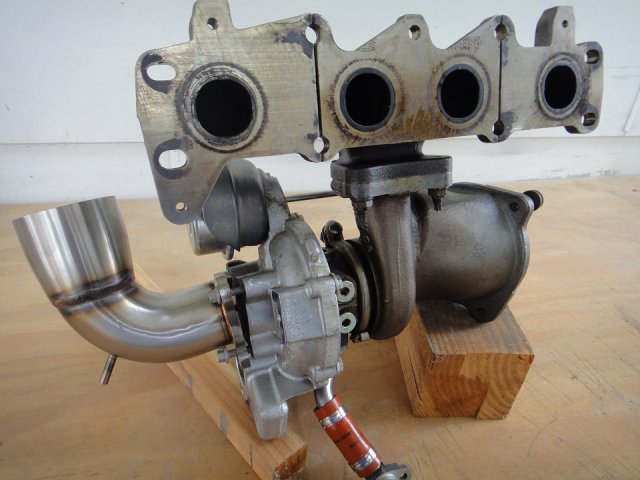
I just happen to have an extra turbo so I will show you some things off the car (it's easer to see).
Note the bracket next to the inlet.

WTI02.JPG


Since there is some play, you must make sure the new elbow sets flat on the inlet and NOT on the bracket.
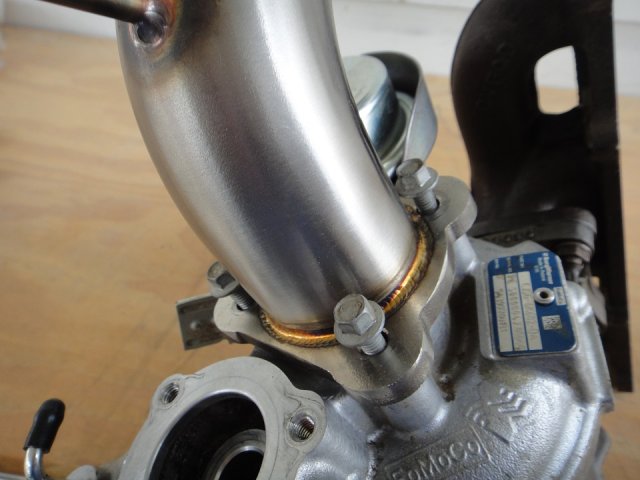
Start all three bolts (original OEM hardware) before you tighten any of them.

WTI03.JPG


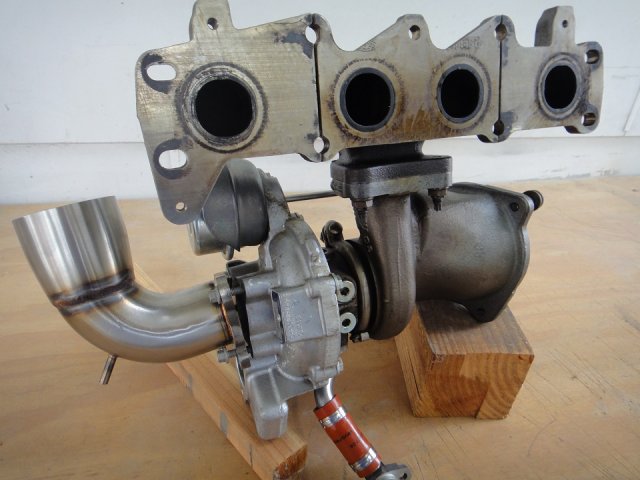
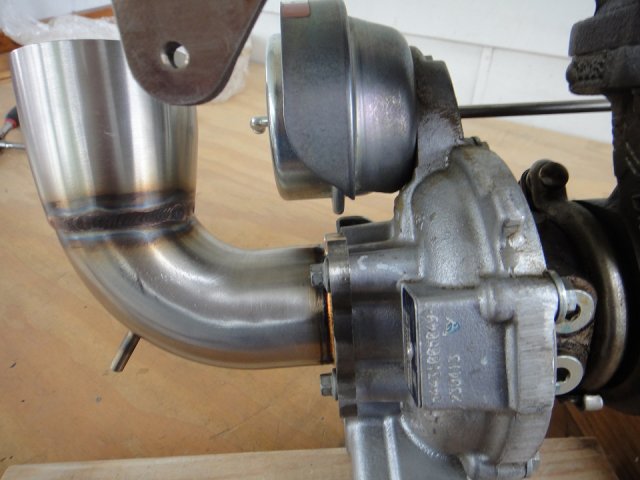
Now we will switch views so it is close to the way it is in the car.

WTI04.JPG


Next snug up the bolts, you will note that the bolt closest to the engine is very close to the pipe.
However, here you can see that I am using a 1/4 drive deep 8mm socket and it clears just fine.

WTI05.JPG


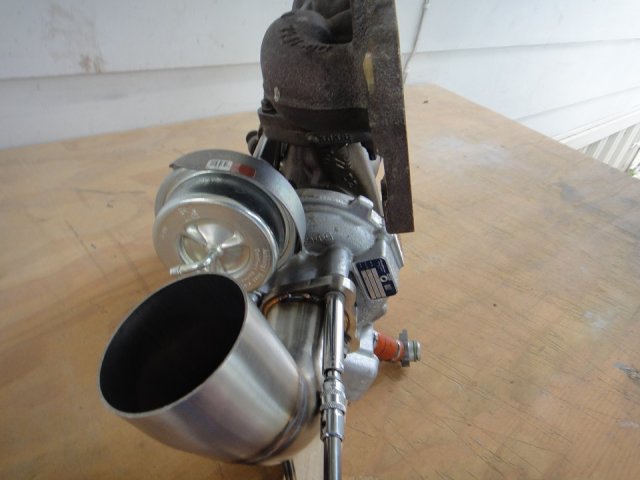
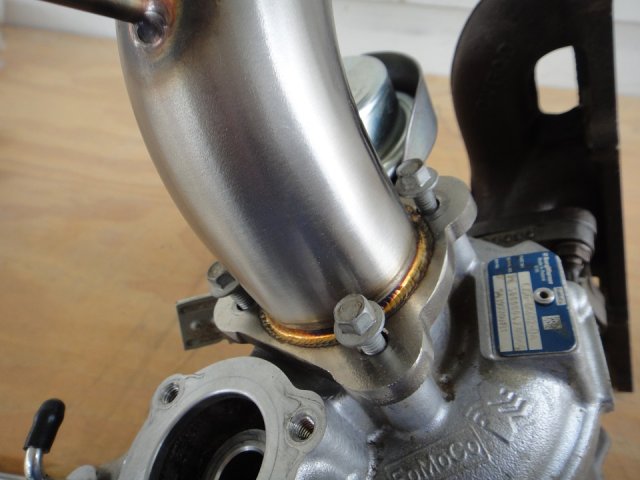
Tighten the back side bolt first, again making sure that the elbow is not on the bracket.

WTI06.JPG


When all 3 bolts are tightened, you can see here (almost impossible in the car) that there is NO gap.

WTI07.JPG


Dave


Attachments

D1JL

7000 Post Club
Staff Member
Premium Account
U.S. Navy Veteran
Messages
7,892
Likes
4,131
Location
SFV, So.Cal.
#31
I installed the Turbo Inlet Elbow today.

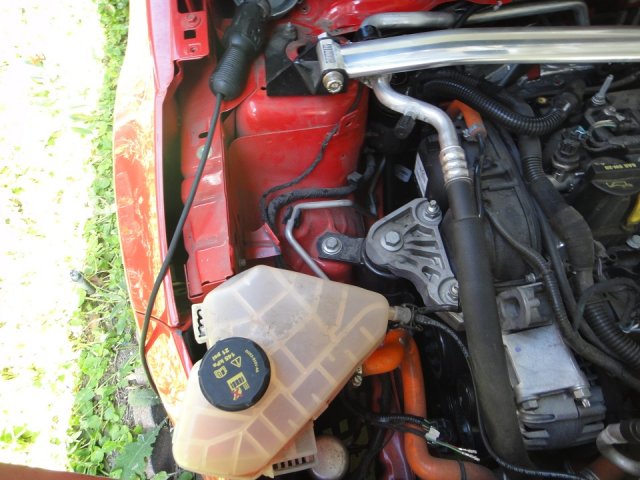
First I might suggest you move the water tank to gain additional access.

WTI08.JPG


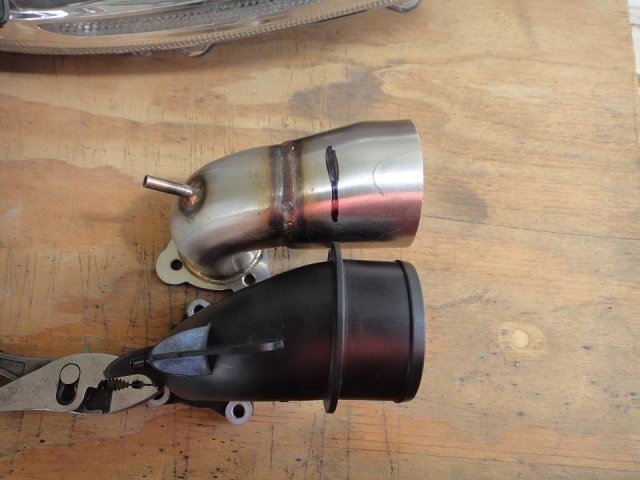
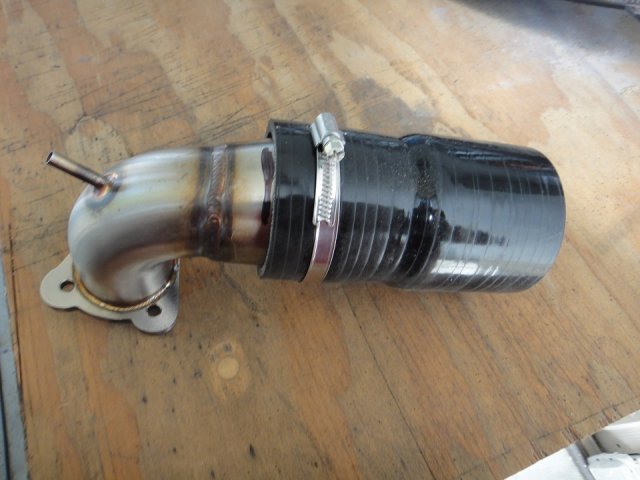
Next you might want to mark the new elbow to know how far down to push on the silicone coupler.

WTI09.JPG


Then I installed the coupler and I positioned the clamp to be at the same position as the OEM.

WTI10.JPG


Don't forget to reconnect the little hose on the elbow.
I hate those spring clamps but I would prefer to put it back on than not.

WTI11.JPG


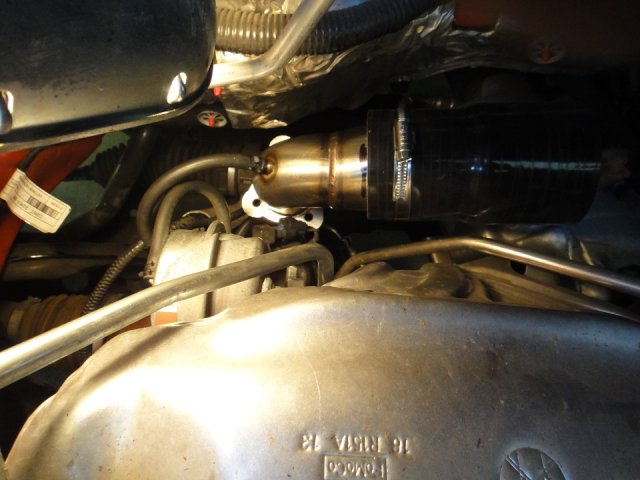
Now bolt the new elbow in.

WTI12.JPG


Next I installed my Ramair Crossover Pipe.

WTI13.JPG


Last I have to put all the remaining parts back on but I won't bore you with all that.


Dave


VirtualRonin

Active member
Active Military
Messages
562
Likes
456
Location
Spring Lake Park, MN
#33
I installed the Turbo Inlet Elbow today.

First I might suggest you move the water tank to gain additional access.


Next you might want to mark the new elbow to know how far down to push on the silicone coupler.


Then I installed the coupler and I positioned the clamp to be at the same position as the OEM.


Don't forget to reconnect the little hose on the elbow.
I hate those spring clamps but I would prefer to put it back on than not.


Now bolt the new elbow in.


Next I installed my Ramair Crossover Pipe.


Last I have to put all the remaining parts back on but I won't bore you with all that.


Dave
Nice work! Very thorough with details and pics [emoji1303]


Sent from my iPhone using Tapatalk


XanRules

Active member
Messages
622
Likes
291
Location
Portland
#34
I received my Whoosh Turbo Inlet Elbow today.
First let me assure you that there is enough room for a gasket if you are so inclined.

Sense I am not going to use a gasket of any kind, I have decided not to make one.

I just happen to have an extra turbo so I will show you some things off the car (it's easer to see).
Note the bracket next to the inlet.


Since there is some play, you must make sure the new elbow sets flat on the inlet and NOT on the bracket.
Start all three bolts (original OEM hardware) before you tighten any of them.


Now we will switch views so it is close to the way it is in the car.


Next snug up the bolts, you will note that the bolt closest to the engine is very close to the pipe.
However, here you can see that I am using a 1/4 drive deep 8mm socket and it clears just fine.


Tighten the back side bolt first, again making sure that the elbow is not on the bracket.


When all 3 bolts are tightened, you can see here (almost impossible in the car) that there is NO gap.


Dave
Sorry for the two-months-later bump, I just wanted to ask - it appears from these photos that the diameter of the high-flow inlet is the same diameter as the inlet on the turbo itself, is this correct? Therefore I would assume that the stock plastic inlet is actually smaller than the inlet on the stock turbo, right?


Top