• Sign Up! To view all forums and unlock additional cool features

    Welcome to the #1 Fiesta ST Forum and Fiesta ST community dedicated to Fiesta ST owners and enthusiasts. Register for an account, it's free and it's easy, so don't hesitate to join the Fiesta ST Forum today!


INSTALL GUIDE: European headlight installation with LED headlight bulbs and LED running light wiring

danbfree

3000 Post Club
Messages
3,510
Likes
1,201
Location
Tigard, Oregon, USA
So let me get this right....with the DEPO's you don't need to move wiring? Vs the Stock Euros you Do? [scratch]
Yeah it was on that thread with the low/high harness by VirtualRonin. The thread has good info and it's worth a read [^]
That's the thing, I read through that and while I'm always grateful to others for providing info, it would have saved so much time and effort and stress if [MENTION=1907]VirtualRonin[/MENTION] had taken just one or two sentences to explain that his Depo's worked on low out of the box with no pin changes. I mean, he goes straight into talking about how to make a harness to get both low and high working, maybe he assumed to that all flavors did that but damn, would be nice if people go back and update their first post once new info is found. Instead we have multiple threads and lots of random with no current stickied threads or updates. I know I started the LED thread, had it stickied and make sure to go back and update it... wow, it was never made clear anywhere in all these different threads that Depo are on low by default. Maybe I'll do a summary thread and ask for it to be stickied. I literally spent HOURS researching for pretty much nothing, the least I can do is help prevent future poor souls from the same mistake.


VirtualRonin

Active member
Active Military
Messages
562
Likes
456
Location
Spring Lake Park, MN
That's the thing, I read through that and while I'm always grateful to others for providing info, it would have saved so much time and effort and stress if [MENTION=1907]VirtualRonin[/MENTION] had taken just one or two sentences to explain that his Depo's worked on low out of the box with no pin changes. I mean, he goes straight into talking about how to make a harness to get both low and high working, maybe he assumed to that all flavors did that but damn, would be nice if people go back and update their first post once new info is found. Instead we have multiple threads and lots of random with no current stickied threads or updates. I know I started the LED thread, had it stickied and make sure to go back and update it... wow, it was never made clear anywhere in all these different threads that Depo are on low by default. Maybe I'll do a summary thread and ask for it to be stickied. I literally spent HOURS researching for pretty much nothing, the least I can do is help prevent future poor souls from the same mistake.
I provided a pinout (see my Resource thread and wiring diagrams) that shows the difference between the Ford OEM headlight pinout and DEPO headlight pinout. Not sure if you saw that.

DIY: Euro Headlamp DRL Harness Kit - Resource Thread
https://r.tapatalk.com/shareLink?sh...forum.com/showthread.php?t=18994&share_type=t

To be clear, my intent was never to get just the DRL Low Output only, I was working on getting both which is why my thread is focused on that.


Sent from my iPhone using Tapatalk


danbfree

3000 Post Club
Messages
3,510
Likes
1,201
Location
Tigard, Oregon, USA
I provided a pinout (see my Resource thread and wiring diagrams) that shows the difference between the Ford OEM headlight pinout and DEPO headlight pinout. Not sure if you saw that.

DIY: Euro Headlamp DRL Harness Kit - Resource Thread
https://r.tapatalk.com/shareLink?sh...forum.com/showthread.php?t=18994&share_type=t

To be clear, my intent was never to get just the DRL Low Output only, I was working on getting both which is why my thread is focused on that.


Sent from my iPhone using Tapatalk
Again, you've provided an amazing wealth of info and I truly appreciate that. I am just a little surprised that it wasn't clarified with just a sentence or two up front as it would have been really good to know, we eventually figured it out after lots of back and forth... but I'll do a summary thread and ask for it to be stickied and I'll be giving you tons of credit for all the work you did!


VirtualRonin

Active member
Active Military
Messages
562
Likes
456
Location
Spring Lake Park, MN
Again, you've provided an amazing wealth of info and I truly appreciate that. I am just a little surprised that it wasn't clarified with just a sentence or two up front as it would have been really good to know, we eventually figured it out after lots of back and forth... but I'll do a summary thread and ask for it to be stickied and I'll be giving you tons of credit for all the work you did!
There's always room for improvement. That's why I shared my findings and build process; so others can build, improve the design, or make something to suit their needs.


Sent from my iPhone using Tapatalk


danbfree

3000 Post Club
Messages
3,510
Likes
1,201
Location
Tigard, Oregon, USA
There's always room for improvement. That's why I shared my findings and build process; so others can build, improve the design, or make something to suit their needs.
Well, the Depo's arrived and they do NOT have the pin already in place for even DRL Low... and changing the pin is a bitch when you are smart enough to know exactly what to do but are just not good at it... I got the DRL to come on but my HID's weren't firing up so I have pins pinched and now nothing after fiddling with it... I'll have to try to jump them over individually without the white plastic wire separator in place just to troubleshoot then maybe use electrical tape to prevent a short or something.


VirtualRonin

Active member
Active Military
Messages
562
Likes
456
Location
Spring Lake Park, MN
Well, the Depo's arrived and they do NOT have the pin already in place for even DRL Low... and changing the pin is a bitch when you are smart enough to know exactly what to do but are just not good at it... I got the DRL to come on but my HID's weren't firing up so I have pins pinched and now nothing after fiddling with it... I'll have to try to jump them over individually without the white plastic wire separator in place just to troubleshoot then maybe use electrical tape to prevent a short or something.
Changing the pins in the Molex headlight connectors isn't too difficult if thats something you're having trouble with. I suggest reading through my harness installation guide for your model year vehicle which is part of my resource thread.

DIY: Euro Headlamp DRL Harness Kit - Resource Thread
https://r.tapatalk.com/shareLink?sh...ess-Kit---Resource-Thread.18982/&share_type=t

I included a link to a video on how to pin/de-pin the terminals in the Molex headlight connectors in my installation instructions when it comes to the part where you need to install the new wiring and terminals from my DRL harness into the factory headlight harness connectors. Might help with your testing.


Sent from my iPhone using Tapatalk


danbfree

3000 Post Club
Messages
3,510
Likes
1,201
Location
Tigard, Oregon, USA
Changing the pins in the Molex headlight connectors isn't too difficult if thats something you're having trouble with. I suggest reading through my harness installation guide for your model year vehicle which is part of my resource thread.

DIY: Euro Headlamp DRL Harness Kit - Resource Thread
https://r.tapatalk.com/shareLink?share_fid=74193&share_tid=18982&url=https://www.fiestastforum.com/index.php?threads/DIY:-Euro-Headlamp-DRL-Harness-Kit---Resource-Thread.18982/&share_type=t

I included a link to a video on how to pin/de-pin the terminals in the Molex headlight connectors in my installation instructions when it comes to the part where you need to install the new wiring and terminals from my DRL harness into the factory headlight harness connectors. Might help with your testing.


Sent from my iPhone using Tapatalk
Thanks, I saw all the pics for the one pin to move in just no good at doing it, couldn't get them all lined up, the plastic tabs to hold the wires get broken and all that, I just suck at this stuff because I have no experience working with these connectors. I'm just going to try to get some help.

But seriously, thank you very much for the specific model year details and complete guide. The video will give me some exposure to how you guys who know what they are doing handle it! :)


Last edited:

danbfree

3000 Post Club
Messages
3,510
Likes
1,201
Location
Tigard, Oregon, USA
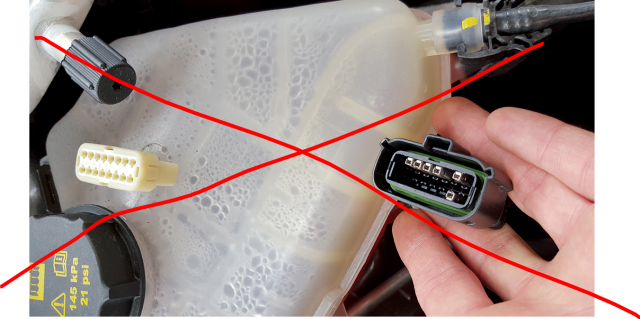
Edit: Also, to update, I DID end up just popping the white part off and moving the wire. I recommend using the high setting, it doesn't glare THAT bad at night and looks great during the day!

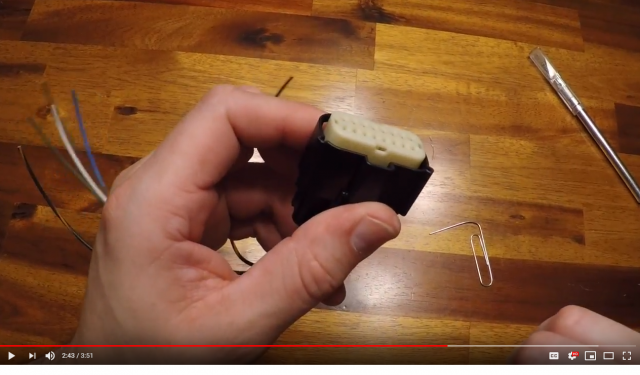
So for anyone about to try to tackle the pin swap, unless you are very well experienced in these electrical connectors, DO NOT follow the pics shown in the first post that has you completely removing the white wire separator, follow VirtualRonin's video guide HERE where you just pop the white part up slightly to unlock the wires.

1556131243794.png

Just pop that white thing up slightly like this using a small flathead in the slots you can see in the top and bottom middle of the white wire separator. At this point you can pull out pin 6 to move to pin 9 and close the white thing back in fully.
1556131292422.png
I made the mistake of taking that all apart, and with varying wire and pin and connector quality I am now stuck with a mess of twisted pinsI can't get straightened out to get back together for a good mating of each wire with the female headlight end, UGH.


Last edited:

danbfree

3000 Post Club
Messages
3,510
Likes
1,201
Location
Tigard, Oregon, USA
Well, here's yet another thread I had spammed during my transition to Euro's process... I ended up having to send back the HID's they glared just horribly despite being told they wouldn't by the company who I told was even willing to go with their LED's instead, but no go... so instead I went with the Katana H7 LED's for the low beam, they are just FANTASTIC in projectors for the money. At $46 they are VERY close to the brightness of the next best, the Hikari Ultra that's $90 but with even better color and light spread. For $95 the DDM tuning 50w Saber are awesome, beating the $120 Morimoto 2Stroke 2.0 with the same white 5250k color at a lower cost. Funny enough, the Katana's are a ripoff of the design of the Supernova V.4 that are $169 and actually are brighter than them in projectors! Yes, I was an idiot with the wiring pib change and will have to buy a new molex for the drivers side now, but like everything else with working on a new thing with your car, you learn after doing it and then rarely ever ever get to do the same thing again! LOL

Anyway, I'm REALLY glad I did these and I appreciate Blaise at BulbFacts.com for partially sponsoring me just for helping out with lots of feedback and helping him with ideas for his web site. He is the only 100% independent reviewer of LED, HID and halogen bulbs with separate results all charted for projector and reflector for low and high beams and fog lights now too! He has coupon codes on his site so check it out and just use the links provided to buy if you choose, it will help offset his costs to run the site as he does as mostly a hobby.


Messages
35
Likes
12
Location
Denver, CO, USA
Hi all. Just got the Hellas, from cars245. Also have the audew h7 LEDs and the CarRover h1 for high beams.

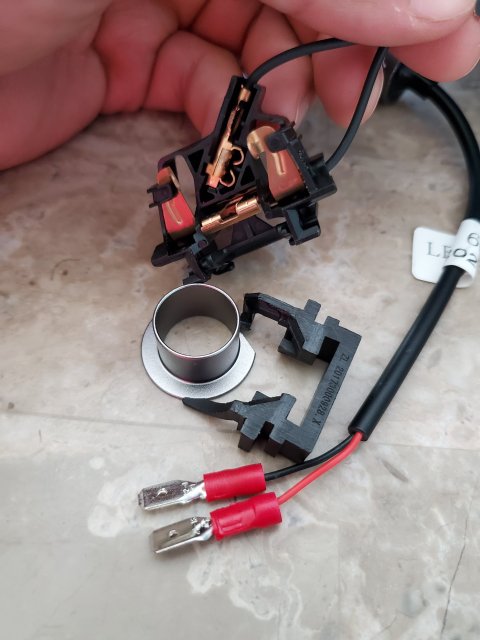
Never replaced high beams before and wanted to double check that i need to cut the black wires and crimp female adapters to them for this to work. The red and black males are from the led. Also not sure if anyone has tried super gluing the holders for these? Seems like mine wont even stay on slightly. Haven't even got the pin removal just yet. 15935526126396967367108022461495.jpg


danbfree

3000 Post Club
Messages
3,510
Likes
1,201
Location
Tigard, Oregon, USA
Hi all. Just got the Hellas, from cars245. Also have the audew h7 LEDs and the CarRover h1 for high beams.

Never replaced high beams before and wanted to double check that i need to cut the black wires and crimp female adapters to them for this to work. The red and black males are from the led. Also not sure if anyone has tried super gluing the holders for these? Seems like mine wont even stay on slightly. Haven't even got the pin removal just yet.
You just "stuff" those loose connectors from the bulbs into the stock connector in the "-" and "+" side of the connector where it's touching metal in there... To mount, what you do is take off the bulb ring, use the holders to mount them into place in the housing, then feed the bulb through and lock into place.


Messages
35
Likes
12
Location
Denver, CO, USA
You just "stuff" those loose connectors from the bulbs into the stock connector in the "-" and "+" side of the connector where it's touching metal in there... To mount, what you do is take off the bulb ring, use the holders to mount them into place in the housing, then feed the bulb through and lock into place.
thanks! i ended up stumbling across one of your previous posts haha. I actually ended up just cutting them off and crimped female connectors for a clean connection, worked great! just have to aim the low beams now and do the wiring for the strips! I dont intend to go back from LEDs lol thanks for all your help!


Messages
7
Likes
13
Location
Washington D.C., DC, USA
I provided a pinout (see my Resource thread and wiring diagrams) that shows the difference between the Ford OEM headlight pinout and DEPO headlight pinout. Not sure if you saw that.

DIY: Euro Headlamp DRL Harness Kit - Resource Thread
https://r.tapatalk.com/shareLink?share_fid=74193&share_tid=18994&url=https://www.fiestastforum.com/showthread.php?t=18994&share_type=t

To be clear, my intent was never to get just the DRL Low Output only, I was working on getting both which is why my thread is focused on that.


Sent from my iPhone using Tapatalk
So im trying to do the same and get both outputs to work as they should... however it says i dont have permission for that link?


VirtualRonin

Active member
Active Military
Messages
562
Likes
456
Location
Spring Lake Park, MN
So im trying to do the same and get both outputs to work as they should... however it says i dont have permission for that link?
There's an easier way of doing it. Contact danbfree to get more details. He made a thread about it.


Sent from my iPhone using Tapatalk


Messages
357
Likes
189
Location
Boone
Wondering if im doing something wrong. I got those philips vision plus h1s for the high beams and I'm having a lot of trouble getting them to fit. I also got those weird focus adapter things too. Have no idea why I can't get them in there. Help lol


Messages
279
Likes
346
Location
Pickerington, OH, USA
Got mine installed a running using this method. I was hoping the brows would engage as DLRs using Auto (I'm too forgetful to turn off/on every time)... is there an alternate pin setting for that, or does it require a more in depth rewire?


Lim

New Member
Messages
4
Likes
0
Location
UA
Edit: Also, to update, I DID end up just popping the white part off and moving the wire. I recommend using the high setting, it doesn't glare THAT bad at night and looks great during the day!

So for anyone about to try to tackle the pin swap, unless you are very well experienced in these electrical connectors, DO NOT follow the pics shown in the first post that has you completely removing the white wire separator, follow VirtualRonin's video guide HERE where you just pop the white part up slightly to unlock the wires.

View attachment 19673

Just pop that white thing up slightly like this using a small flathead in the slots you can see in the top and bottom middle of the white wire separator. At this point you can pull out pin 6 to move to pin 9 and close the white thing back in fully.
View attachment 19674
I made the mistake of taking that all apart, and with varying wire and pin and connector quality I am now stuck with a mess of twisted pinsI can't get straightened out to get back together for a good mating of each wire with the female headlight end, UGH.
The video is not available... Maybe someone has a copy of the video or at least a photo of how to better remove pins?..


Top