• Sign Up! To view all forums and unlock additional cool features

    Welcome to the #1 Fiesta ST Forum and Fiesta ST community dedicated to Fiesta ST owners and enthusiasts. Register for an account, it's free and it's easy, so don't hesitate to join the Fiesta ST Forum today!


Feisty the "Family Car"

OP
Dialcaliper

Dialcaliper

Senior Member
Messages
828
Likes
1,361
Location
San Francisco Bay Area
Thread Starter #101
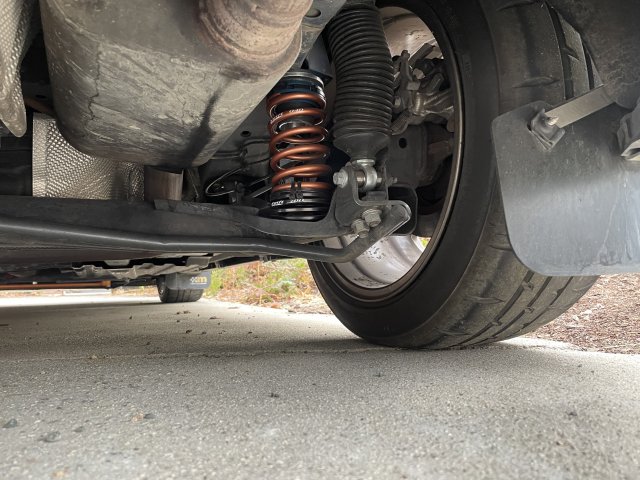
For tires which have a fairly narrow tread width (7.5"), and only ~ 0.3" taller diameter than OEM 205/40-17s, those look A LOT wider than they should, even on an 8" wide wheel.
But then every wheel/tire setup looks wider to me off of the car than on it.

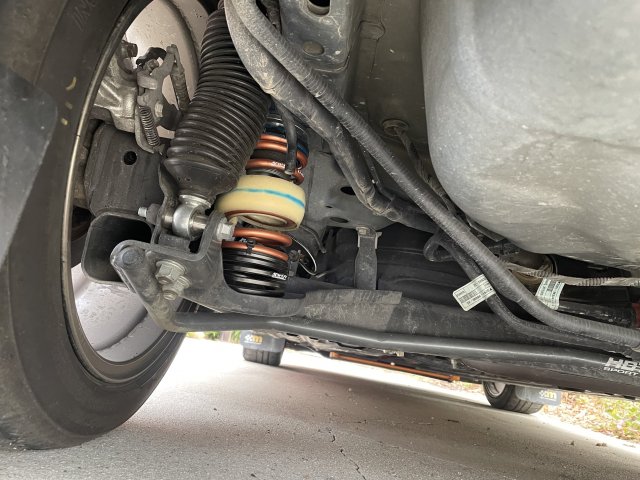
In any case, there should be NO rubbing whatsoever going on with that setup, especially with your even higher than factory (static) ride height, and higher rate springs on top of that! [nono]
So, speaking of rubbing, something weird happened. May or may not be related to the tire wear. (Thinking no because that’s showing on all four)

So my wife and daughter wanted to run up to the local state park and see the snow that fell yesterday morning. Since Rivals no like cold, I quickly tossed on the (taller than stock) snow tires.

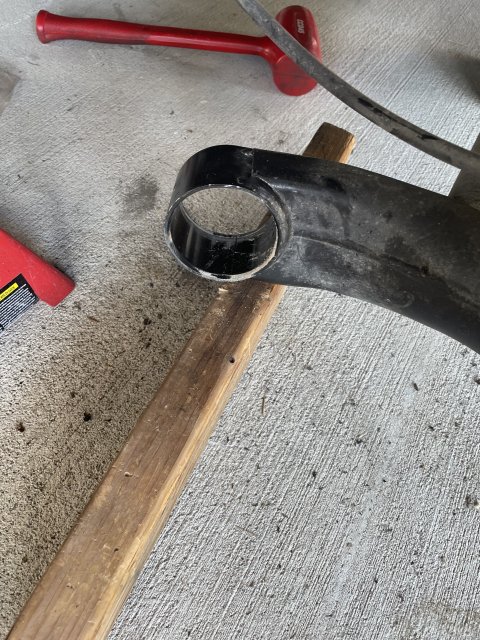
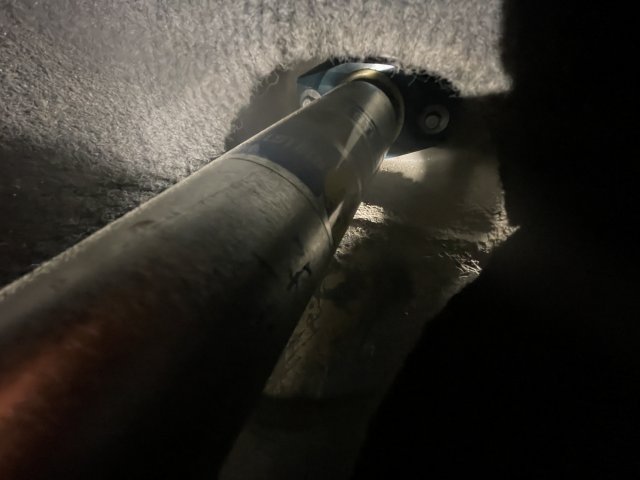
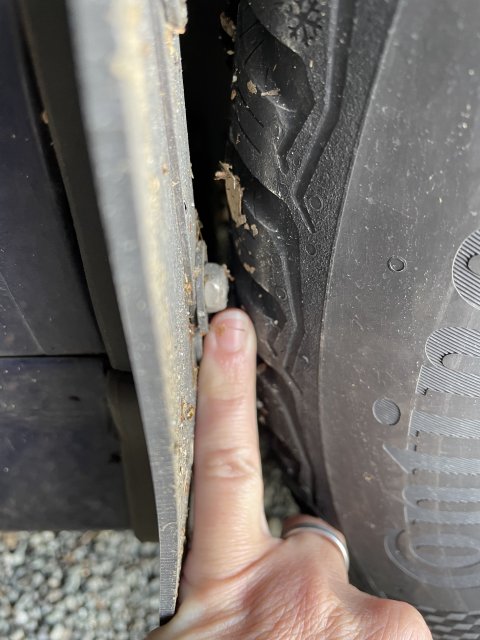
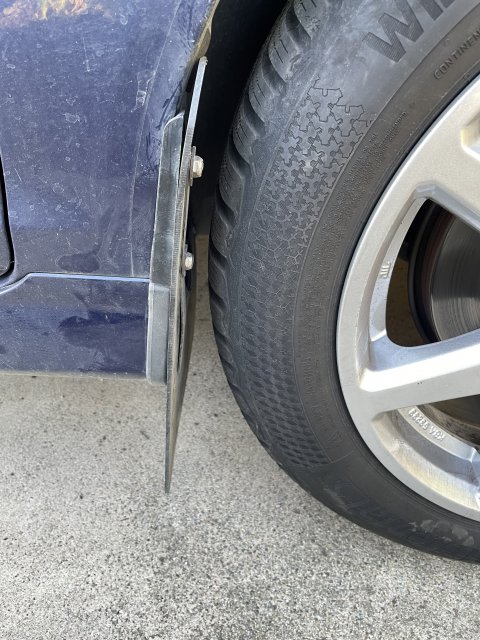
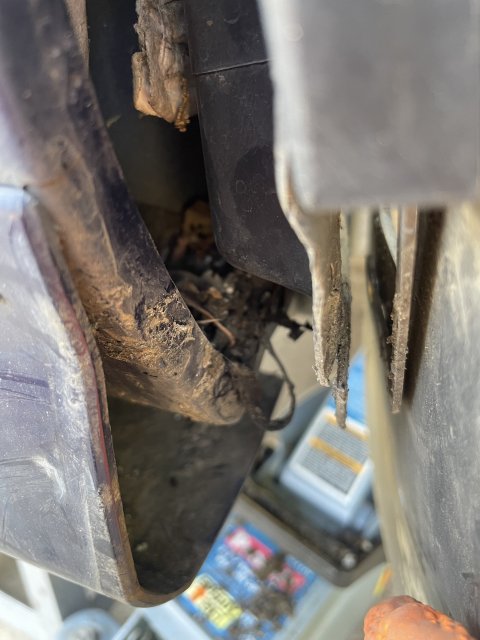
My wife reported a strange rubbing noise when braking, especially on the passenger side front tire. Took a closer look after they got back, and lo and behold, the sill cap holding the mudflap got pushed forward…by accumulation of mud, rocks and dirt that somehow managed to get above the wheel liner and wedged down into the sill.

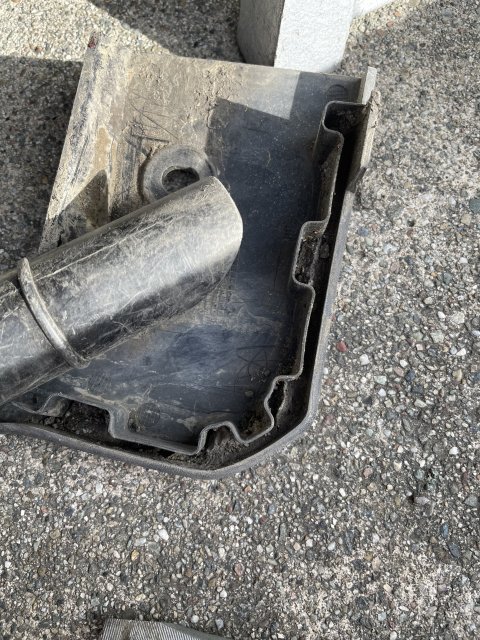
Popped off the mud flaps and got a vacuum, screwdriver and gloves in there, and holy crap a lot of damp junk came out, especially on the passenger side. Drivers side was similar, maybe not as bad but still needing attention.

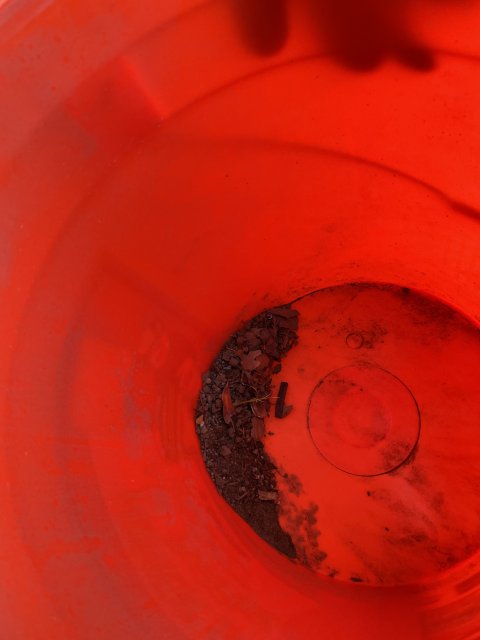
There was so much in there that I weighed it. My car is now back to being a legit half-pound lighter! You can see just how much came out in the bucket vac picture.

Also no more rubbing and everything sits back nicely against the rear tire well.

It seems like this is not just a mudflap issue, and the amount of moist stuff in the metal upper sill seems like a serious rust trap, so it’s definitely worth taking a look in there!

You can see before (pic with finger) and after (no finger) pics


Attachments

Last edited:

M-Sport fan

9000 Post Club
Messages
14,370
Likes
6,935
Location
Princeton, N.J.
That's why even if I get the Motorsport Spec Rally Armor flaps to put some flaps back onto this car, I will find a different way to mount them than the standard RA hardware kit.

I wish that @BRGT350 was still around, so I could get a better idea of just how he mounted his Sparco, and SMS mud flaps. [:(]

(He did NOT use the 'standard issue', real gravel stage rally car style, alloy angle irons on the outside of the body, drilled into the sheet metal, begging for a rust-out, method.)


OP
Dialcaliper

Dialcaliper

Senior Member
Messages
828
Likes
1,361
Location
San Francisco Bay Area
Thread Starter #103
That's why even if I get the Motorsport Spec Rally Armor flaps to put some flaps back onto this car, I will find a different way to mount them than the standard RA hardware kit.

I wish that @BRGT350 was still around, so I could get a better idea of just how he mounted his Sparco, and SMS mud flaps. [:(]

(He did NOT use the 'standard issue', real gravel stage rally car style, alloy angle irons on the outside of the body, drilled into the sheet metal, begging for a rust-out, method.)
Interesting.

But like I said, it appears the cause of the debris actually had little to do with the mudflaps - it looks like it was all entering up by the strut/spring and falling down inside the fender liner. Based on the way the sill cap sits outside the liner, and the way the liner pinches in, I suspect you’ll have some debris in there even without having modified it for flaps


Messages
234
Likes
186
Location
none
I have experienced this issue as well(buildup of muck and dirt in the sill behind the front wheels), and I have no mud flaps. It seems to be specific to the ST side skirts as I have not seen it happen on my 1.0 ecoboost non ST-Line nor my sisters 1.5 TDCI non ST-line either.


Messages
235
Likes
123
Location
Santa Rosa
This is
So I thought I’d finally get around to making a build post for my 2016 Fiesta ST that I picked up in 2022 after selling our Honda Fit to a friend. My goal is basically a “swiss army knife” build that will be adequate for use as a daily, but be ready to go for some canyon carving or an occasional “for fun” track day/autocross, yet be equipped to haul a family of 3 on ski trips and occasional dirt excursions (backpacking trips, etc.

I’ll accept in this kind of build that a lot of compromises will have to be made, like no built motors, passing emissions without a huge hassle, reasonable ride height, etc. Fortunately my wife and daughter like cars, and are willing to put up with a fair amount of my shenanigans. When we went to look at buying it, my wife, ever the voice of reason said to me, “Wait, you didn’t tell me it had Recaros…lets buy it.”

Mods are a mix of off the shelf bolt-on parts and custom DIY stuff, but with an emphasis on quality and reliability. It’s the family car after all…

View attachment 55442


Someday I’ll get a good picture of the car actually clean!

Street tires:

View attachment 55444

Mud and Snow Tires!

View attachment 55480

My daughter has affectionately nicknamed the car “Feisty”, and it has stuck, so I’ll roll with it.

I'll slowly make some catch-up posts for projects I've already completed and add new stuff as I go.
This is exactly what I’ve done to mine. Same goals and everything. Feel free to shoot me a message if you wanna exchange ideas.


OP
Dialcaliper

Dialcaliper

Senior Member
Messages
828
Likes
1,361
Location
San Francisco Bay Area
Thread Starter #106
Sometimes it’s little things to make you sleep at night. A week ago, I went to top off my coolant reservoir, and classic, the top of the radiator cap snapped off.

Decided I didn’t want any part of the plastic cap junk, and not keen on switching to a metal reservoir.

I accidentally bought the Boomba cap because it looked less bling, and it wasn’t until I recieved it I realized it was only a dressup

It turns out that the only cap that’s functional is the one made by VUDÙ out of the UK. Found it on sale for under $100 shipping+tax.

I was initially worried about metal cap on plastic reservoir threads but I greased the o-rings with some Superlube, and it fit like a glove. Even has the little detent like the factory cap so that it clicks into the correct orientation. I like the design of the relief check valve (supposedly matching the OEM 23psi), and of course the body is one piece of billet aluminum that won’t snap off ever again.

The only downside so far is that it makes my slightly yellow reservoir look shabby by comparison, and will certainly outlast it.

Overall it seems like a decent alternative to a $200+ metal coolant tank if your OEM one is still in decent shape.


Attachments

M-Sport fan

9000 Post Club
Messages
14,370
Likes
6,935
Location
Princeton, N.J.
True, but I figure one is almost half way to the co$t of an Airtec tank from Whoosh with just the price of that cap, so if I could get over the OCD of not being able to check the coolant level, (and just as importantly, condition!), as quickly and easily as a translucent factory (style) tank allows, I would probably go that route myself. [wink]


OP
Dialcaliper

Dialcaliper

Senior Member
Messages
828
Likes
1,361
Location
San Francisco Bay Area
Thread Starter #108
True, but I figure one is almost half way to the co$t of an Airtec tank from Whoosh with just the price of that cap, so if I could get over the OCD of not being able to check the coolant level, (and just as importantly, condition!), as quickly and easily as a translucent factory (style) tank allows, I would probably go that route myself. [wink]
To be fair, the $100 I quoted includes both tax and shipping, so it’s significantly less than halfway to a Mishimoto or Airtec tank which you’re probably looking at almost $250 or $275 when all is said and done, even from Whoosh.


M-Sport fan

9000 Post Club
Messages
14,370
Likes
6,935
Location
Princeton, N.J.
To be fair, the $100 I quoted includes both tax and shipping, so it’s significantly less than halfway to a Mishimoto or Airtec tank which you’re probably looking at almost $250 or $275 when all is said and done, even from Whoosh.
True, but I said "almost half way" above.

I too would prefer the translucent tank as well, just for ease of viewing/checking the coolant level and condition.
But to not ever have to worry about age/heat cycle cracks and leaks of the tank for the life of the car (and the subsequent risk of breaking the connectors/lines every time one changes out the much less costly plastic tanks) is a tempting proposition. [wink]


OP
Dialcaliper

Dialcaliper

Senior Member
Messages
828
Likes
1,361
Location
San Francisco Bay Area
Thread Starter #110
Just got back my second oil sample. Amsoil Signature Series 5W-30 - so far it looks like the real deal for extended intervals.

Oil was changed in Aug-2022. 1 year and 9 months ago, Almost 17k miles on the oil, and with the exception of the oil darkening in color, the analysis report suggests everything is on track to hit at least 20k miles before needing to change, which is pretty impressive on a high strung little turbo car, even if its not the 25k miles advertised. I'll probably test again after 20-22k, and if the TBN is below 2.0, I'll probably change it at that point.

Low metals and contamination, additives rising slightly is odd but within measurement error. Seemingly better than some oils look when brand new.

Also worth noting that this car doesn't get coddled. No track days so far on this oil, but at least 1/3 of those miles were canyon runs in the hills. After the next oil change if I get out for a trackday, I might try a before/after oil analysis to see how this stuff holds up there.

While I was in there extracting the oil sample, I took the opportunity to swap out for the Quinton Hazell dipstick that I got from the UK. I'm amazed at how much easier to read the classis metal strip dipstick is compared to the OEM plastic torpedo .

Second, replaced the front brake pads with the OEM summer pads (the B-max ones from Roackauto not the original FiST pads. A little less grabby, but still decent.

Lastly, a little sneak peek at what's coming soon


Attachments

Last edited:
Messages
145
Likes
132
Location
Montreal
First time I'm hearing about these B-Max pads. What are the advantages over the regular summer FiST pads? If they are less dusty and with decent bite, I'll get a set when I do my fronts next spring.

Nice billet rear top mounts, that will be a treat!


OP
Dialcaliper

Dialcaliper

Senior Member
Messages
828
Likes
1,361
Location
San Francisco Bay Area
Thread Starter #113
First time I'm hearing about these B-Max pads. What are the advantages over the regular summer FiST pads? If they are less dusty and with decent bite, I'll get a set when I do my fronts next spring.

Nice billet rear top mounts, that will be a treat!
Just dropped off the finished parts today at a local anoziding place along with a batch of other aluminum suspension parts, adapters, bumpstop perches, etc. Soon!

From what I can find, these pads are a subtle downgrade in initial bite but otherwise very similar to the OEM summer pads. If you look at the box picture I posted, it appears that Motorcraft is substituting these pads for the ST pads. Purchased from Rockauto.

The box (and what was purchased from RA) is marked AY1Z-2001-D and BRF1494, which is supposed to be the ST part number as far as I’m aware. But the pads inside the box are marked AY11-20K21-CA which comes up as a UK Ford B-Max pad in the catalog. (Apparently a fiesta chassis compact van in the UK).

So far they are very similar. They may be the same compound. The main visual difference is that they are not chamfered like the ST pad, which theoretically means they cost less to make. I’ve seen other posts on the internet reporting the same substitution, so it looks like it’s not a mistake; the ST Motorcraft pads may be superseded by these unless you happen to find old stock of the original ST pad. That or if you cared enough, you could chamfer them yourself with a sander.


OP
Dialcaliper
Messages
828
Likes
1,361
Location
San Francisco Bay Area
Thread Starter #114
Belated update - did a ton of changes on the car a month or so ago, then got busy at work plus still a few kinks to work out with the overall setup. This take a couple of posts to actually sort the pictures and do it all justice.

First, the anodizing came back looking pretty good. tossed in the battery mount, the new rear shock mounts and various spring and perch adapter parts, and really happy with the result. Hard anosizing always comes out a little flat on the color with a hint of teal compared to typical decorative blue anodizing, but it's actually functional for corrosion resistance. I still think it looks great.

Second, my Bilsteins are finally back from Fat Cat Motorsports. A few pics assembled off the car

Rear shock and shock mounts and front struts assembled. The rear shocks mounts I made to accept the same multicellular urethane foam inserts used in Spec Miata (basically heavily compressed chunks of MCU bumpstop compressed). I have these shock mounts on the MIata, and while they are stiffer (less motion of the shock end), there's relatively quite a bit more damping mass than the flimsy stock rubber ones, so there should be an improvement in rear ride quality. Testing so far on the car is going to be hard to tell since I never had a chance to test with the poorly valved rear dampers prior to having them retuned.

There's a lot more to show, stay tuned!


Attachments

Messages
14,370
Likes
6,935
Location
Princeton, N.J.
Are those the B14s you had totally re-valved and rebuilt, or are they the generic Bilstein Motorsport dampers (also re-valved to your specs/springs)??

Either way, all stainless tubes/damper bodies, correct?


OP
Dialcaliper
Messages
828
Likes
1,361
Location
San Francisco Bay Area
Thread Starter #117
Are those the B14s you had totally re-valved and rebuilt, or are they the generic Bilstein Motorsport dampers (also re-valved to your specs/springs)??

Either way, all stainless tubes/damper bodies, correct?
The fronts are the B14’s, the rears are a 5125 inverted truck shock.

Both have been completely revalved and had some additional modifications to the pistons.

The rears also had to have the pistons changed out, as the piston they came with was a Linear/Digressive instead of Double Digressive. Gas pressure on both has also been reduced as much as possible without affecting performance to improve ride quality.

The shock bodies are steel with zinc plating for better longevity than the standard yellow painted steel Bilsteins. They are actually rather chunky fellas (~6-7 lbs each for the rear compared with about 2-3 lbs for the OEM dampers) but fortunately everything is inverted, so the unsprung weight is actually lower.


Last edited:
OP
Dialcaliper
Messages
828
Likes
1,361
Location
San Francisco Bay Area
Thread Starter #118
Some details on the rear - the retuned 5125 Bilsteins, originally a truck/jeep shock. Swift 4k (224lb/in) 65mm 7" long springs with tall 100 lb/in tenders to cope with the increased rear shock travel - about an additional 0.5" in both droop and compression. I would have used 225lb/in springs, but for whatever reason, the Swift metric springs have more usable compression than the "conventional" ones. Normally you wouldn't care that much, but with the increased suspension travel, I actually had to be quite careful to have enough total spring travel that I'm not "blocking" the main spring past its usable range. The spring rate ramps, you can damage the spring and compressing a non-tender type spring metal to metal can give a nasty wallop that will upset the car and all my careful planning everywhere else. You can see some of my nice blue adapters on the spring adjusters.

I initially tried an 8" spring, but that made the rear sit almost an inch high even at the lowest perch height. I tried with a shorter tender, but there was not enough travel to keep the spring fully engaged in droop. My target ride height is between stock and 0.5" lowering to put the front roll center at around the right height.

The bumpstops on my own custom made perches (more blue!) are Speedthane 76mm "red" soft made from multicellular urethane like the OEM bumpstops. I've either not hit a bump hard enough to engage them yet or they're just well matched enough that its hard to tell! After some soul searching, I decided to install the black accordion boots to protect the bumpstop from dirt/sand/water (The shock would actually be fine), hiding my fancy blue bumpstop perch. In this case its partly because Anodizing is costs the same for a minimum batch size, so it's basically free to do a couple extra bits in the same batch. Sometimes its the little things you decide to make with care that make a difference, even when nobody will ever see besides you...

The blue stripe spring rubber on the left hand spring is to match my last corner weights w/driver as the left rear is ~100lbs heavier. The harder spring rubber is "estimated" to add about 25lb/in to the main spring rate (effectively ~250 lb/in on the left). The reason for this is that now both right and left corners have the same natural frequency. I've found that this gets rid of a lot of the unpleasant "rocking" feeling that I originally though was directly due to the stiffer rear sway bar, but it's now become apparent that that feeling (which many of you are probably familiar with) is actually initially caused by the two corners recovering slightly out of phase after hitting a bump because they have slightly different bounce frequencies.

Later on I plan to do a simple "bounce" test to verify that the car matches my analysis - The design for the rear is targeted around 2.1 Hz both sides. Without the rubber added, the left side would be closer to 2.0 Hz and as it lags behind the right rear following a bump, you end up with a lateral roll, when then *does* excite the higher frequency (3-4Hz) sway bar+spring roll motion, giving you that uncomfortable rocking motion, which most dampers are not well tuned to cope with. Remove the initial cause, and the behavior is significantly reduced.

I could talk your ear off about it, but suffice to say, most of what you "feel" as suspension bounce is not actually the road. Only that initial "thunk" going over a bump is the actual bump. The bouncing that follows is the suspension "recovering" as a spring/mass/damper system. This is more obvious in an underdamped system (stiff spring, weak damper) which results in the infamous "Honda bounce" after a bump.

While I was swapping out the rear, I went ahead and swapped out the rear bushings for Superpro (2-piece, best designed in my personal opinion). Getting the old bushings out was a bear even with the threaded rod press I made, until I just gave up and removed the lip off an old chisel - that was enough to get some purchase to remove the oem bushings.

I doubt the spring rubber is hitting the "exact" frequency, but it brings the two sides close enough that the rocking is greatly reduced and the car feels more stable. So far so good.


Attachments

Last edited:

M-Sport fan

9000 Post Club
Messages
14,370
Likes
6,935
Location
Princeton, N.J.
I wish that I had the facilities, tools, and where with all to do a suspension system like this!

It would probably be much more functional for mostly street use than even the 3 way adjustable R2/Rally 4 M-Sport Reigers, for much MUCH less total coin as well. [twothumb]


Similar threads


Top