-
Sign Up! To view all forums and unlock additional cool features
Welcome to the #1 Fiesta ST Forum and Fiesta ST community dedicated to Fiesta ST owners and enthusiasts. Register for an account, it's free and it's easy, so don't hesitate to join the Fiesta ST Forum today!
DIY: Spark Plug Change for FiST
- Thread starter chalituna
- Start date
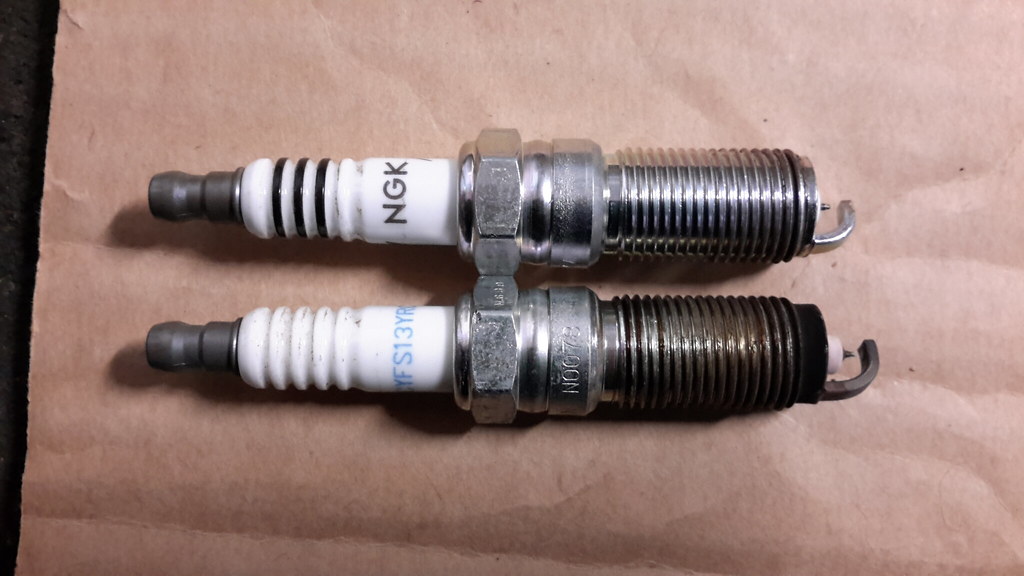
Last night, I swapped out the stock spark plugs for NGK LTR7IX-11 6510 plugs at 5,000 miles to prep for my new Dizzy Stage 2 tune. I haven't swapped plugs on a modern car so it was a little different from my '54 Willys CJ-3B. I thought I would give a quick write-up with my process and experience for reference to others doing this job.
I bought 11 plugs mainly to get a discount, but I figured I could index them as well. Indexing is the process of making sure that each plug is aligned with a certain place in the cylinder. Each plug and threading on the cylinders are a little different so at the spec'd torque the opening between the electrode and ground arm on the plug will align in the cylinder differently. I will say this is a pain in the ass as it probably took me 5 times longer than just gapping the plugs and installing them facing every which way in the cylinder. I installed a total of 20 plugs to index. I also needed all 11 plugs to get it where I wanted it. I have no real experience whether this provides a performance benefit, I just read it here and it seemed reasonable.
https://www.fiestastforum.com/forum/threads/661-Fiesta-ST-Spark-plug-tech?p=6833&viewfull=1#post6833
Plug Removal:
Removal of the stock plugs was pretty straight forward. I would recommend making sure the engine is cool, as I tried to do this while hot and it seemed more difficult to remove and install plugs, it seemed easier when cool. Also depending on how much crap is down near the plugs I would recommend taking a look and blowing out any debris before you remove the plugs. Also remove and replace one plug at a time to make sure the engine isn't open any longer than it needs to be.
Getting the coil packs off was no problem with an 8 mm nut driver. The coil pack on the right side of the engine (looking from the front) is under a breather hose, this has to be disconnected to remove the pack. I used a regular 5/8" spark plug socket with rubber insert and a 6" extension from a Kobalt (Lowes) socket set for removing the stock plugs.
Plug Installation Initial & Indexing
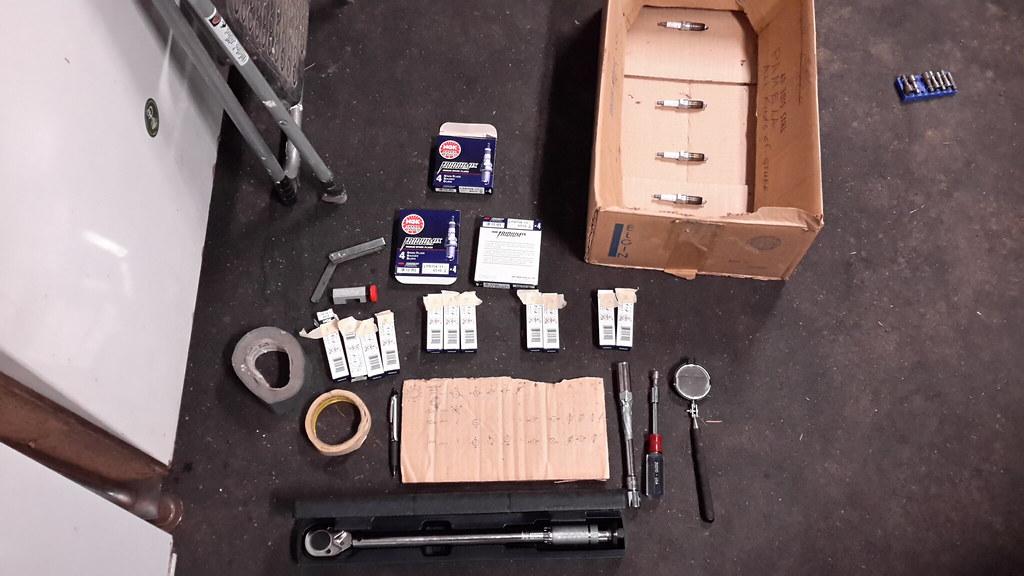
First I labeled all of the new plugs packaging with a number so I could track which ones I had indexed.
I started at the left cylinder looking from the front and worked left to right. I pulled the coil pack and original plug and I grabbed one of the new plugs (not gapped yet) and inserted it into the socket and I noted which way the opening of the electrode was facing by looking at how it lined up with engraved markings on the end of my 6" extension. I would find a marking that lined up and then make note of it for alignment documentation later. I then hand threaded the plug in until it stopped, then I would break out the torque wrench to thread it the rest of the way. I used a 1/2" torque wrench (overkill, but its what I had), I had to use a 3/8" to 1/2" adapter which made hand threading a little easier also because it gave some extra leverage.
Note: I didn't use anti-seize (read about the pros and cons elsewhere), and as others have described it felt like I would tighten for a while and the plug would seem to be getting tighter than all of sudden break loose and spin almost freely, before getting a little tight again, and repeating this about three times before actually getting seated. This was very disconcerting at first as I was very afraid of cross-threading, but I got used to it after doing it 10+ times. This happened on every cylinder, and it probably took me another four to five turns with the wrench before it got seated. I will say that once it was seated it was very apparent, it would basically come to a stop all of a sudden and not want to turn anymore.
Once the plug was torqued to spec, (I used 10 ft/lbs, it sounds like it might need to be a little more though 10, 12, 14?) I would check where the opening was aligned and make a note on my note pad (i.e. piece of cardboard ripped off a box nearby) where it aligned in the cylinder. If it didn't line up where I wanted it I would pull it out and try the next plug. I would repeat this process until I found a plug that aligned where I wanted it while also making notes of the alignments of the previous plugs for future reference.
Plug Gapping:
Once I found a plug that aligned with the cylinder I would pull it out and gap it. I used a feeler gauge that I confirmed with a micrometer for 0.028" (this is the specified gap for Dizzy tunes) to check the gap. And I was lucky and a local guy made up some gapping tools for a great price. The tool seemed like a better idea to me than just tapping the ground arm on a hard surface until you were happy with the gap. I will say it was more difficult than expected to get the gap exactly where I wanted it, if you over do it and compress it to much it is a little stressful trying to bend the ground arm back in place (this happened once or twice.) I would use the gapping tool to screw the arm down to where I wanted it, then release and the arm would move back a little and then I would check the gap, then tighten it a little tiny bit more and release and check again, I would do this probably 2-4 times until I got the gap where I wanted it. I would also check the make sure a 0.030" feeler wouldn't fit just to be sure.
Plug Installation Final:
Once I had the indexed plug gapped, I would then move to install. The install process was pretty simple basically the same as the Plug Installation described above. Except for some reason I had a really hard time getting the socket to come off the plug once it was installed. After some stressing, I wound up just duct taping the socket to the extension link. I duct taped in two directions, around the socket and in line with the extension (it ripped when it was just around the socket.) It still took a good amount of wiggling and pulling before the stupid thing would pop loose. Then it was just re-install the coil pack and move on to indexing the next plug.
Start-up:
After the install I started the engine and everything started as normal (no hesitation), I did my regular commute to work which has about 12 miles of various traffic and road conditions, and everything ran fine. So far so good.
I hope this helps some folks.
Here's some pics.


Any idea why major manufacturers like Ford haven't embraced the newer spark plug designs over the 30+ year old traditional frame? Is it just a price thing or are there durability and/or performance issues? Maybe there's just not enough of a benefit, if any at all, to justify the price increases?
IF I remember correctly, the 1.8 16V in my A2 GTI came from the factory with, and was specced for a Bosch (or Beru?) 3 ground electrode, copper core plug, even though most seemed to replace them with Bosch or Beru Silbers (silver plated/alloy center electrode), or NGK V-Power coppers, both being single ground electrode style. 
I know this is old but I must comment. Indexing plugs can have a minor benefit if the plug is offset in the cylinder head. This was common in older 2 valve combustion chambers like shown in the 1st pic. Setting the open side of the plug toward the center of the cylinder (arrow) theoretically un-sheilds the spark and allows it it to burn faster. Our plugs are near the center of the 4 valve combustion chamber (2nd pic) and therefore there is no benefit to pointing them in any direction.
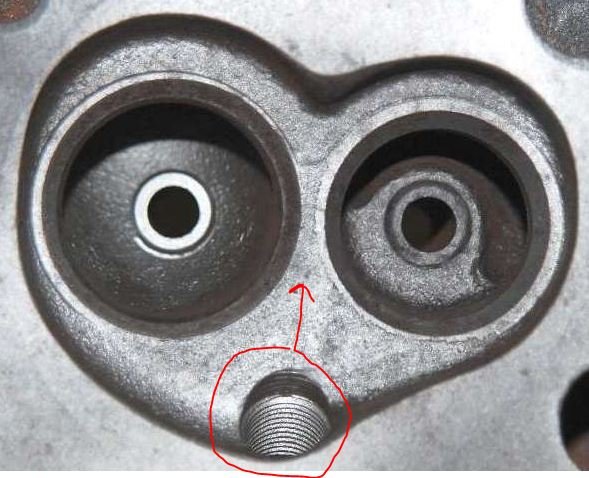
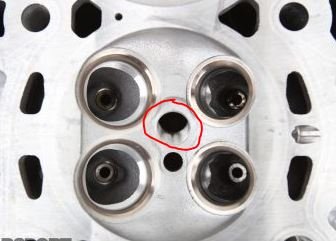


I know this is old but I must comment. Indexing plugs can have a minor benefit if the plug is offset in the cylinder head. This was common in older 2 valve combustion chambers like shown in the 1st pic. Setting the open side of the plug toward the center of the cylinder (arrow) theoretically un-sheilds the spark and allows it it to burn faster. Our plugs are near the center of the 4 valve combustion chamber (2nd pic) and therefore there is no benefit to pointing them in any direction.
View attachment 47848 View attachment 47849
View attachment 47848 View attachment 47849
TIP:
The anti-seize is really good at capturing debris.
This is despite preemptively blowing out the wells with 150 PSI compressed air.
After several changes, this may become an issue.
(should be less of an issue with our coil design)
To clean this out, people were using thread-taps. This has the potential to needlessly remove thread material.
Instead, I've use an oversized steel wire pipe cleaner brush. Turned it with vice grips. This is extremely effective at cleaning up the threads.


TIP:
The anti-seize is really good at capturing debris.
This is despite preemptively blowing out the wells with 150 PSI compressed air.
After several changes, this may become an issue.
(should be less of an issue with our coil design)
To clean this out, people were using thread-taps. This has the potential to needlessly remove thread material.
Instead, I've use an oversized steel wire pipe cleaner brush. Turned it with vice grips. This is extremely effective at cleaning up the threads.
View attachment 47852
5 Things You Should Know About Spark Plugs - NGK Spark Plugs
I hope you're not referring to using anti-seize on the spark plugs
Anti-seize was a thing back with the '94 vehicle I had and eventually ran into that issue.
This is generally not needed with modern engines but some continue to use it anyway.
Personally, haven't had issue with just following manufacturer's instructions. So in addition to not using anti-seize, I won't be touching my plugs for some years yet. My motorcycle doesn't need it and haven't had any issues.
Just letting them know how to resolve issues with anti-seize and debris build up; as some here are using it.
Anti-seize was a thing back with the '94 vehicle I had and eventually ran into that issue.
This is generally not needed with modern engines but some continue to use it anyway.
Personally, haven't had issue with just following manufacturer's instructions. So in addition to not using anti-seize, I won't be touching my plugs for some years yet. My motorcycle doesn't need it and haven't had any issues.
Sent from my SM-N975U1 using Tapatalk
Similar threads
-
Intake Valve Walnut Blasting - My DIY Experience
- Started by jtl
- Replies: 4
-
DIY immobiliser install/wiring diagrams
- Started by mick1199
- Replies: 0
-
DIY “Fun Mode” - Automatic Sport Mode/ESC-Off Circuit
- Started by Dialcaliper
- Replies: 3
-
Reverse bleed clutch DIY tutorial video
- Started by jessemon1106
- Replies: 2
-
Nice Job fomoco! Outboard HVAC vent Replacement DIY
- Started by TyphoonFiST
- Replies: 4
-
-
-
LPFS/ Low Pressure Fuel Sensor DIY
- Started by TyphoonFiST
- Replies: 14
-
-
Ford Community Posts
-
-
Removed driver side blend door actuator without replacing it
- Latest: Sprinkle_Star
-
Clutch pedal sticking to the floor
- Latest: Sprinkle_Star
