-
Sign Up! To view all forums and unlock additional cool features
Welcome to the #1 Fiesta ST Forum and Fiesta ST community dedicated to Fiesta ST owners and enthusiasts. Register for an account, it's free and it's easy, so don't hesitate to join the Fiesta ST Forum today!
CG's daily fun ride
- Thread starter CanadianGuy
- Start date
Thread Starter
#285
Thread Starter
#285
June 11th 2017 Hot day meant staying in the shade Tire Lettering
They are not perfect. Will require a few more coats to make it even but I and happy with how they turned out. Used Sharpie oil pen, cleaned the area well with a rubber safe degreaser and alcohol, applied light coats and used a heat gun in between coats.


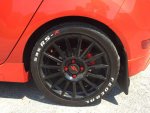
They are not perfect. Will require a few more coats to make it even but I and happy with how they turned out. Used Sharpie oil pen, cleaned the area well with a rubber safe degreaser and alcohol, applied light coats and used a heat gun in between coats.


Thread Starter
#287
Thread Starter
#287
Damn that looks good! Hate to say it but I'm gonna have to steal this idea. The sharpie you used, fine or medium tip? Did you find that the paint bleeds at all?
They are not perfect. Will require a few more coats to make it even but I and happy with how they turned out. Used Sharpie oil pen, cleaned the area well with a rubber safe degreaser and alcohol, applied light coats and used a heat gun in between coats.
View attachment 14771
View attachment 14772
View attachment 14773
View attachment 14771
View attachment 14772
View attachment 14773
But my RS-RR's side walls turn brown so quickly (and they've NEVER even had any 'dressing' of ANY sort on them at all since new!), that I must use a brush aggressively on them at washing time, so this lettering would probably get rubbed off.
![Frown [:(] [:(]](/images/smilies/frown.png)
Thread Starter
#289
Thread Starter
#289
That looks SHARP!! ![Thumbs Up [thumb] [thumb]](/images/smilies/icon_smile_thumb.gif)
But my RS-RR's side walls turn brown so quickly (and they've NEVER even had any 'dressing' of ANY sort on them at all since new!), that I must use a brush aggressively on them at washing time, so this lettering would probably get rubbed off.![Frown [:(] [:(]](/images/smilies/frown.png)
But my RS-RR's side walls turn brown so quickly (and they've NEVER even had any 'dressing' of ANY sort on them at all since new!), that I must use a brush aggressively on them at washing time, so this lettering would probably get rubbed off.
![Frown [:(] [:(]](/images/smilies/frown.png)
Thread Starter
#290
Thread Starter
#290
July 1st 2017.
Finally got around to installing some oil monitoring gauges. I had many false starts with this as I wanted the gauges in the small cubby hole. I tried 2" ones but they were too deep. The equus 1 1/2" fit perfectly. I cute the cubby out and installed the bracket from the back with liberal use of JB weld. I replaced the incandescent light with LED back light (much bright and nicer, picture does not do them justice). I fished the hose through the sound symposer tube (pretty easy). The kit have just enough tubing, the water temp sensor was too big for the sandwich plate so I will order their electric version. Don't really need the volt but meh why not. The main goal is to have a true oil temp and pressure monitor, especially in winter. Over all I am happy.
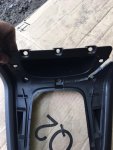
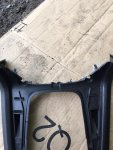
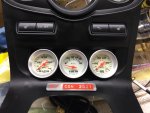
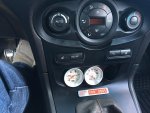
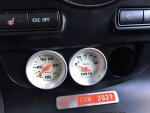

Finally got around to installing some oil monitoring gauges. I had many false starts with this as I wanted the gauges in the small cubby hole. I tried 2" ones but they were too deep. The equus 1 1/2" fit perfectly. I cute the cubby out and installed the bracket from the back with liberal use of JB weld. I replaced the incandescent light with LED back light (much bright and nicer, picture does not do them justice). I fished the hose through the sound symposer tube (pretty easy). The kit have just enough tubing, the water temp sensor was too big for the sandwich plate so I will order their electric version. Don't really need the volt but meh why not. The main goal is to have a true oil temp and pressure monitor, especially in winter. Over all I am happy.


Thread Starter
#296
Thread Starter
#296
Nice install! looks really good!
I don't understand the cutout; is there a pocket behind the pocket? (I obviously haven't had my dash apart!)
I don't understand the cutout; is there a pocket behind the pocket? (I obviously haven't had my dash apart!)
Similar threads
-
-
-
-
-
-
-
WRX to FiST? (for autocross and daily)
- Started by AriaFury
- Replies: 5
-
-
2015 Daily driver build project (first project car) -
- Started by TalkToTheFiST
- Replies: 18
-
