-
Sign Up! To view all forums and unlock additional cool features
Welcome to the #1 Fiesta ST Forum and Fiesta ST community dedicated to Fiesta ST owners and enthusiasts. Register for an account, it's free and it's easy, so don't hesitate to join the Fiesta ST Forum today!
BoostBumps RaceRed Build Thread
- Thread starter BoostBumps
- Start date
- Status
- Not open for further replies.
Hey thx Tom! I saw how nice your FiST looked with your new badges which got me inspired to find someone that offered gel covers since DMB no longer offers them with the Ford logo.......
Thread Starter
#103
Thread Starter
#103
Symposer Delete with Blanking Plug
As I mentioned a few months ago (earlier in another thread below) I had initially deleted my Sound Symposer using an expansion plug for two reasons...
http://www.fiestastforum.com/forum/threads/146-Fiesta-ST-Sound-Symposer?p=45189&viewfull=1#post45189
1) Was not happy with the artificial exhaust noise it created which is accomplished by channeling intake air from the charge pipe to an internal diaphragm where the air hitting against this diaphragm is used to create this faux exhaust sound...
2) But more importantly (IMO)....Considering that I've now raised max boost levels higher (with my current tune), along with some future projects planned, I simply wasn't comfortable having that much boost pressure channeled directly to a sound symposer box diaphragm which could get damaged over time and cause some problematic leaks to occur since the symposer source is taken directly off the charge pipe...
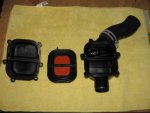
Symposer box exposed (thanks to member "Sekred" for posting image in an earlier thread)...
[HR][/HR]
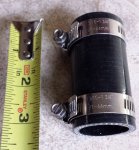
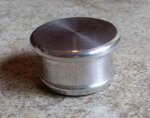
Knowing that the expansion plug might not be a lasting long term permanent solution I was able to recently source a 32mm blanking plug / 32mm (1.25" ID) short 3" silicone hose / and 2 worm clamps:
List of materials needed along with sources:
(2) Worm clamps ($0.99 ea)
http://www.siliconeintakes.com/liquid-air-adapter/worm-gear-clamps-p-1038.html
(1) 1.25" ID / 3" long silicone hose ($4.99ea)
http://www.siliconeintakes.com/silicone-hose/silicone-turbo-hoses-p-479.html
(1) 32mm Blanking Plug ($6.45 ea)
http://www.summitracing.com/parts/TBS-TS-0205-2015
[HR][/HR]
Now I already received the hose and clamps and should have the Turbosmart blanking plug in early next week to complete the install...
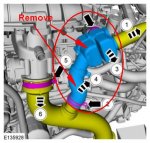
Here is a diagram showing what will be removed and replaced by the short hose with blanking plug...Note that just a 32mm blanking plug could also be inserted and clamped into the existing stock hose (see location # 4 noted on image below) which would be an even less expensive approach to take however I would still replace the stock hose clamps with worm clamps I listed above....


As I mentioned a few months ago (earlier in another thread below) I had initially deleted my Sound Symposer using an expansion plug for two reasons...
http://www.fiestastforum.com/forum/threads/146-Fiesta-ST-Sound-Symposer?p=45189&viewfull=1#post45189
1) Was not happy with the artificial exhaust noise it created which is accomplished by channeling intake air from the charge pipe to an internal diaphragm where the air hitting against this diaphragm is used to create this faux exhaust sound...
2) But more importantly (IMO)....Considering that I've now raised max boost levels higher (with my current tune), along with some future projects planned, I simply wasn't comfortable having that much boost pressure channeled directly to a sound symposer box diaphragm which could get damaged over time and cause some problematic leaks to occur since the symposer source is taken directly off the charge pipe...
Symposer box exposed (thanks to member "Sekred" for posting image in an earlier thread)...

[HR][/HR]
Knowing that the expansion plug might not be a lasting long term permanent solution I was able to recently source a 32mm blanking plug / 32mm (1.25" ID) short 3" silicone hose / and 2 worm clamps:
List of materials needed along with sources:
(2) Worm clamps ($0.99 ea)
http://www.siliconeintakes.com/liquid-air-adapter/worm-gear-clamps-p-1038.html
(1) 1.25" ID / 3" long silicone hose ($4.99ea)
http://www.siliconeintakes.com/silicone-hose/silicone-turbo-hoses-p-479.html
(1) 32mm Blanking Plug ($6.45 ea)
http://www.summitracing.com/parts/TBS-TS-0205-2015
[HR][/HR]
Now I already received the hose and clamps and should have the Turbosmart blanking plug in early next week to complete the install...
Here is a diagram showing what will be removed and replaced by the short hose with blanking plug...Note that just a 32mm blanking plug could also be inserted and clamped into the existing stock hose (see location # 4 noted on image below) which would be an even less expensive approach to take however I would still replace the stock hose clamps with worm clamps I listed above....


Thread Starter
#106
Thread Starter
#106
As I mentioned a few months ago (earlier in another thread below) I had initially deleted my Sound Symposer using an expansion plug for two reasons...
http://www.fiestastforum.com/forum/threads/146-Fiesta-ST-Sound-Symposer?p=45189&viewfull=1#post45189
1) Was not happy with the artificial exhaust noise it created which is accomplished by channeling intake air from the charge pipe to an internal diaphragm where the air hitting against this diaphragm is used to create this faux exhaust sound...
2) But more importantly (IMO)....Considering that I've now raised max boost levels higher (with my current tune), along with some future projects planned, I simply wasn't comfortable having that much boost pressure channeled directly to a sound symposer box diaphragm which could get damaged over time and cause some problematic leaks to occur since the symposer source is taken directly off the charge pipe...
Symposer box exposed (thanks to member "Sekred" for posting image in an earlier thread)...
View attachment 3037
[HR][/HR]
Knowing that the expansion plug might not be a lasting long term permanent solution I was able to recently source a 32mm blanking plug / 32mm (1.25" ID) short 3" silicone hose / and 2 worm clamps:
List of materials needed along with sources:
(2) Worm clamps ($0.99 ea)
http://www.siliconeintakes.com/liquid-air-adapter/worm-gear-clamps-p-1038.html
(1) 1.25" ID / 3" long silicone hose ($4.99ea)
http://www.siliconeintakes.com/silicone-hose/silicone-turbo-hoses-p-479.html
(1) 32mm Blanking Plug ($6.45 ea)
http://www.summitracing.com/parts/TBS-TS-0205-2015
[HR][/HR]
Now I already received the hose and clamps and should have the Turbosmart blanking plug in early next week to complete the install...
Here is a diagram showing what will be removed and replaced by the short hose with blanking plug...Note that just a 32mm blanking plug could also be inserted and clamped into the existing stock hose (see location # 4 noted on image below) which would be an even less expensive approach to take however I would still replace the stock hose clamps with worm clamps I listed above....
View attachment 3038
View attachment 3039
View attachment 3040
View attachment 3041

Thread Starter
#109
Thread Starter
#109
Awesome job on the delete kit! Have you considered removing the plumbing that goes from the symposer to the cabin? Or will that just be left in place?
For now I left that plastic ribbed symposer hose leading to the cabin in place and just coiled it up and tie wrapped it to keep it from uncoiling...
Hey thanks!
For now I left that plastic ribbed symposer hose leading to the cabin in place and just coiled it up and tie wrapped it to keep it from uncoiling...
For now I left that plastic ribbed symposer hose leading to the cabin in place and just coiled it up and tie wrapped it to keep it from uncoiling...
Thread Starter
#111
Thread Starter
#111
It's going to be difficult to remove the hose completely that runs to the cabin as it goes through the firewall with a wire bundle. As we speak, I have been tracing it through the cabin. I plan on cutting it close to the firewall on both sides and using it as a pass through for my ethanol content analyzer wiring. It could also be used for a pass through for an amp power wire.
It's going to be difficult to remove the hose completely that runs to the cabin as it goes through the firewall with a wire bundle. As we speak, I have been tracing it through the cabin. I plan on cutting it close to the firewall on both sides and using it as a pass through for my ethanol content analyzer wiring. It could also be used for a pass through for an amp power wire.
Russ
On mine, I've already cut that hose to the firewall and used the pass through to run my wiring for my ethanol content analyzer. Worked great actually, lol. All I need now is the plug, hose and clamps 
Do you mind me bugging you about your badges again? I have a question about ordering via the UK site and how you did it to ensure that it arrived on your doorstep in the states. What shipping method did you choose? It looks like one of them is free and the other is 6-7 pounds. Also, did you go through the whole checkout process in pounds vs US dollars? Thank you for your help!
Thread Starter
#118
Thread Starter
#118
Do you mind me bugging you about your badges again? I have a question about ordering via the UK site and how you did it to ensure that it arrived on your doorstep in the states. What shipping method did you choose? It looks like one of them is free and the other is 6-7 pounds. Also, did you go through the whole checkout process in pounds vs US dollars? Thank you for your help!
http://www.domedbadge.co.uk/

- Status
- Not open for further replies.


