• Sign Up! To view all forums and unlock additional cool features

    Welcome to the #1 Fiesta ST Forum and Fiesta ST community dedicated to Fiesta ST owners and enthusiasts. Register for an account, it's free and it's easy, so don't hesitate to join the Fiesta ST Forum today!


What did you do to your Fiesta ST today ?

Dialcaliper

Senior Member
Messages
914
Likes
1,487
Location
San Francisco Bay Area
I'm out of luck, don't have such a bar in my tool collection. Are the torques specs that high?
The pre-torque on the big subframe bolts is only 100Nm (74ft lbs). The hair-raising part is adding an extra 2/3 turn on an M14 bolt.

I had the car jacked up pretty high to drop the subframe, and with my measly 18” breaker bar, I was having to push hard enough that I started getting nervous about pushing the car down on top of me.

I found the 6ft pipe lying around, and at first I was like, I’ll cut a 3ft cheater bar out of it. But then I looked at it and…oh…


Bull Run

Member
U.S. Army Veteran
Messages
247
Likes
406
Location
Chandler, AZ, USA
The pre-torque on the big subframe bolts is only 100Nm (74ft lbs). The hair-raising part is adding an extra 2/3 turn on an M14 bolt.

I had the car jacked up pretty high to drop the subframe, and with my measly 18” breaker bar, I was having to push hard enough that I started getting nervous about pushing the car down on top of me.

I found the 6ft pipe lying around, and at first I was like, I’ll cut a 3ft cheater bar out of it. But then I looked at it and…oh…
Thanks for sharing. How long did the swap take? Did you need any special tools? How much did it help with the steering?


Dialcaliper

Senior Member
Messages
914
Likes
1,487
Location
San Francisco Bay Area
Thanks for sharing. How long did the swap take? Did you need any special tools? How much did it help with the steering?
I did the sway bar and rack bushings intermittently and took my time over a long weekend but you could probably do it in a day if you were motivated.

The steering feels much more “direct” now. With aggressive alignment and tires, it almost feels twitchy since there’s basically no dead play, but in a good way.

Special tools. Besides big ass breaker bar, you’ll need 4 tall jackstands, an inverted torx socket for the front subframe bolts. A transmission Jack was helpful lining the steering shaft back up on install, but you could do it with a regular jack.

Also, you’ll need a puller for the steering rack bushings. I’ve found the best tool for bushing pulling is not a press, which is really awkward, but rather a 1/2” threaded rod, some nuts and washers, and assorted galvanized pipe fittings (nipples, reducers etc) that are the approximate size of the bushings (to press and a larger one to press into). The torque spec for grade 8 at 1/2” makes 6 tons, so there’s plenty to pull the bushings, especially if you grease the threads at the nut.

Also, to do it properly, you’ll need new nuts and bolts. The subframe bolts and tie rod/sway bar nuts are all “one use” and also the little bolt that clamps the steering column u-joint to the rack (inside the cabin), which is the same as the one on the upper u-joint (the parts diagram is confusing)


Bull Run

Member
U.S. Army Veteran
Messages
247
Likes
406
Location
Chandler, AZ, USA
I did the sway bar and rack bushings intermittently and took my time over a long weekend but you could probably do it in a day if you were motivated.

The steering feels much more “direct” now. With aggressive alignment and tires, it almost feels twitchy since there’s basically no dead play, but in a good way.

Special tools. Besides big ass breaker bar, you’ll need 4 tall jackstands, an inverted torx socket for the front subframe bolts. A transmission Jack was helpful lining the steering shaft back up on install, but you could do it with a regular jack.

Also, you’ll need a puller for the steering rack bushings. I’ve found the best tool for bushing pulling is not a press, which is really awkward, but rather a 1/2” threaded rod, some nuts and washers, and assorted galvanized pipe fittings (nipples, reducers etc) that are the approximate size of the bushings (to press and a larger one to press into). The torque spec for grade 8 at 1/2” makes 6 tons, so there’s plenty to pull the bushings, especially if you grease the threads at the nut.

Also, to do it properly, you’ll need new nuts and bolts. The subframe bolts and tie rod/sway bar nuts are all “one use” and also the little bolt that clamps the steering column u-joint to the rack (inside the cabin), which is the same as the one on the upper u-joint (the parts diagram is confusing)
Thanks for the info! I'm going to for the "go-kart" feel so just ordered a set of aluminum bushings (will also upgrade the sway bar at the same time). You don't happen to have the part numbers for bolts and nuts, do you?


Dialcaliper

Senior Member
Messages
914
Likes
1,487
Location
San Francisco Bay Area
Thanks for the info! I'm going to for the "go-kart" feel so just ordered a set of aluminum bushings (will also upgrade the sway bar at the same time). You don't happen to have the part numbers for bolts and nuts, do you?
The Delrin feel plenty go-cart for me (and I haven’t noticed any significant increase in NVH)

Front Sway Bar and Steering Rack Install Hardware
Front Subframe Bolts - Forward W714404-S442 x2
Front Subframe Bolts - Aft W714343-S900 x2
Outer Tie Rod Nuts W520204-S442 x2
Stabilizer Link Nut W715135-S440 x2
Steering Column Shaft Lower Bolt AY1Z-3R827-A x1
Balljoint Pinch Bolts W709618-S442 x2
Baljoint Pinch Nuts W520203-S442 x1
Steering Rack Bolts w712486-s442 x3

Steering rack bolts are optional. The balljoint pinch bolts don’t need to be removed for the job, but while I was in there, I replaced the factory 10.9 bolts with Class 12.9 M10x60mm bolts and washers and Class 10 locknuts, as apparently they are under a lot of stress and a potential weak point. (Or you can pay out the nose for shipping for the Pumaspeed kit, which is the same thing you can get at McMaster Carr or the hardware store)


Last edited:

Dpro

6000 Post Club
Messages
6,361
Likes
5,984
Location
Los Feliz (In the City of Angels) aka Los Angeles
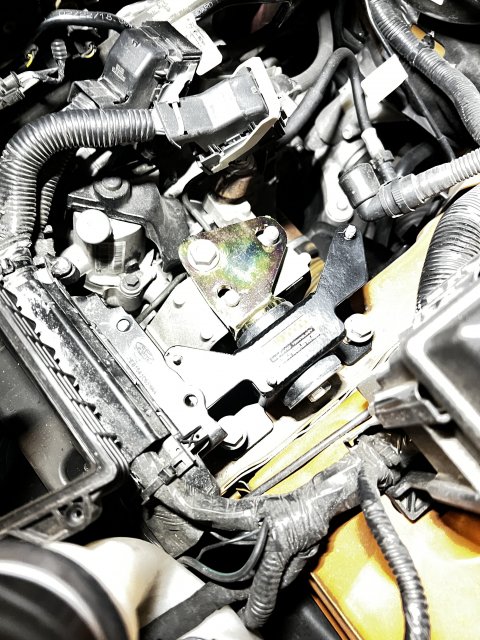
Finally got around to putting this in yesterday afternoon. Vibratechnics Fast Road passenger side engine mount added a ver slight amount of vibration at idle that will probably go away after break in. Will report back on driving impressions.

so reporting back in drives great , feels like it puts power down more solidly definitely helped the high hp torque steer.
I should add the car now is all Vibratecnics ,pasenger side , engine side and RMM.
6F139D3A-0435-4E54-B2CF-729F08AE214F.jpeg


Last edited:

akiraproject24

1000 Post Club
U.S. Marine Veteran
Messages
1,114
Likes
1,265
Location
Pennsylvania
Finally got around to putting this in yesterday afternoon. Vibratechnics Fast Road passenger side engine mount added a ver slight amount of vibration at idle that will probably go away after break in. Will report back on driving impressions. View attachment 53063
what are your temps where youre at? Probably be even less come spring summer. I had to take my car outta storage yesterday (roof antenna and 2 doors being replaced warranty) but my whoosh street poly mount nvh was harsh. The ole lady got me the vibra technics fast road for xmas. May do the other two mounts as well.


Dpro

6000 Post Club
Messages
6,361
Likes
5,984
Location
Los Feliz (In the City of Angels) aka Los Angeles
what are your temps where youre at? Probably be even less come spring summer. I had to take my car outta storage yesterday (roof antenna and 2 doors being replaced warranty) but my whoosh street poly mount nvh was harsh. The ole lady got me the vibra technics fast road for xmas. May do the other two mounts as well.
It was in the high 50’s. I drove it today in the mid 60’s.
Ya I like their mounts a lot . I edited my post above to add initial driving impressions. I am firmly of the opinion if you do one side you should do the other . I was getting torque steer to my right under high load, It took that away now all I get is a little wiggle back and forth which is totally controllable with a little steering input. It used to hook to the right when I mashed it under high boost.
The car is an angry pokemon.


Last edited:
Messages
162
Likes
396
Location
lorton, VA
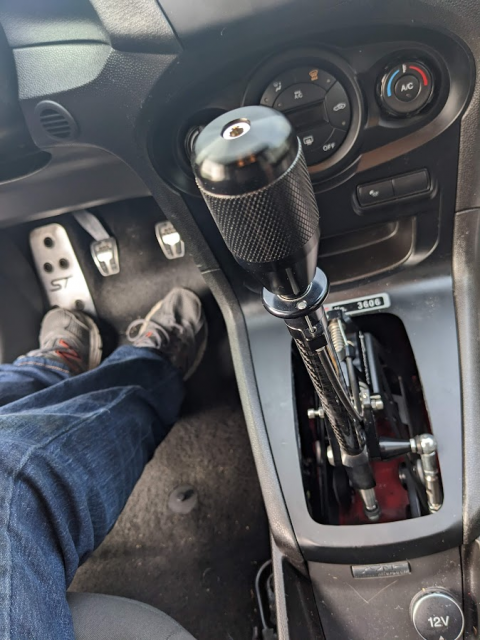
Finally got my Coolerwerx shifter installed today. Its not quite as notchy as my Hybrid shifter I ran on the CRZ but its definitely much shorter then the stock shifter. I probably need some shifter cable bushings to get a more notchy feel. The shifter position is much better then the stock shifter. I can easily reach the shifter handle now and don't have to stretch my harm out like I did on the stock shifter.
1671583699390.png


M-Sport fan

9000 Post Club
Messages
14,481
Likes
7,035
Location
Princeton, N.J.
It was in the high 50’s. I drove it today in the mid 60’s.
Ya I like their mounts a lot . I edited my post above to add initial driving impressions. I am firmly of the opinion if you do one side you should do the other . I was getting torque steer to my right under high load, It took that away now all I get is a little wiggle back and forth which is totally controllable with a little steering input. It used to hook to the right when I mashed it under high boost.
The car is an angry pokemon.
Yes, their ('fast road' at least) mounts do not have as much NVH as most of the (even lower durometer) poly stuff has, and they are much less prone to becoming like SOLID mounts when the temps dip below 30*F like poly mounts (and to a lesser extent the higher durometer, but also rubber/EPDM CP-E RMM) do.
(Something you will never have to worry about anyway, unless you take the beastie into the High Sierras during the winter. [wink])

Eventually, I need to do the other two Vibra-Technics mounts to match my RMM from them.


M-Sport fan

9000 Post Club
Messages
14,481
Likes
7,035
Location
Princeton, N.J.
Finally got my Coolerwerx shifter installed today. Its not quite as notchy as my Hybrid shifter I ran on the CRZ but its definitely much shorter then the stock shifter. I probably need some shifter cable bushings to get a more notchy feel. The shifter position is much better then the stock shifter. I can easily reach the shifter handle now and don't have to stretch my harm out like I did on the stock shifter.
View attachment 53064
Badazz that you got that deal from Ron for the carbon lever at the standard lever kit's price! [wink][twothumb]


Dpro

6000 Post Club
Messages
6,361
Likes
5,984
Location
Los Feliz (In the City of Angels) aka Los Angeles
Yes, their ('fast road' at least) mounts do not have as much NVH as most of the (even lower durometer) poly stuff has, and they are much less prone to becoming like SOLID mounts when the temps dip below 30*F like poly mounts (and to a lesser extent the higher durometer, but also rubber/EPDM CP-E RMM) do.
(Something you will never have to worry about anyway, unless you take the beastie into the High Sierras during the winter. [wink])

Eventually, I need to do the other two Vibra-Technics mounts to match my RMM from them.
hehehe stop putting ideas in my head and ya problem with the High Sierra at this time of year is they will force me to run chains! o_O Yikes! Ya that’s a whole other ball of wax.


Last edited:

dhminer

2000 Post Club
Messages
2,389
Likes
2,816
Location
Burlington, NC, USA
Today I joined the 300hp club! Ofcourse this is according to Vdyno but it definitely feels about right. Probably still have 1 or 2 more revisions before I start tuning for E30. Can't friggin wait!

Looks great. What fueling mods? I'd imagine you'll get more top end out of this tune still. That dip after 6200 will probably get smoothed out


Messages
29
Likes
77
Location
Chico, ca
Looks great. What fueling mods? I'd imagine you'll get more top end out of this tune still. That dip after 6200 will probably get smoothed out
I saved up and went with the XDI HPFP and the 30% uprated injectors. I plan on at least attempting to pass ca smog down the road so aux fuel wasn't really an option. I still have stock exhaust and the ST200 airbox so it looks pretty stock. That fuel pump does kinda stick out but I will probably paint it black or something.


Last edited:
Messages
430
Likes
727
Location
Ontario, CA, USA
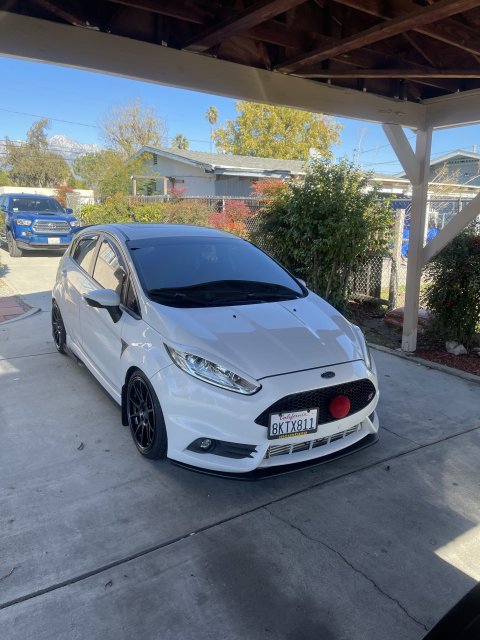
Installed my Maxton lip since my other one broke going under a puddle of water on a rainy day. My fault as It was a dip and didn’t slow down enough. I decided to get the same one. How it sits before a wash. And yes I have a rain deer nose. Gotta experience FeSTivity 219308D8-F7C4-437C-8290-ED902A2CED8B.jpeg


Last edited:

M-Sport fan

9000 Post Club
Messages
14,481
Likes
7,035
Location
Princeton, N.J.
Installed my Maxton lip since my other one broke going under a puddle of water on a rainy day. My fault as It was a dip and didn’t slow down enough. I decided to get the same one. How it sits before a wash. And yes I have a rain deer nose. Gotta experience FeSTivity View attachment 53078
You get enough rain in one shot to actually have a deep puddle on the road? [???:)]


dhminer

2000 Post Club
Messages
2,389
Likes
2,816
Location
Burlington, NC, USA
Installed my Maxton lip since my other one broke going under a puddle of water on a rainy day. My fault as It was a dip and didn’t slow down enough. I decided to get the same one. How it sits before a wash. And yes I have a rain deer nose. Gotta experience FeSTivity View attachment 53078
Was the resistance from the water so much that it ripped the splitter off?


Top