• Sign Up! To view all forums and unlock additional cool features

    Welcome to the #1 Fiesta ST Forum and Fiesta ST community dedicated to Fiesta ST owners and enthusiasts. Register for an account, it's free and it's easy, so don't hesitate to join the Fiesta ST Forum today!


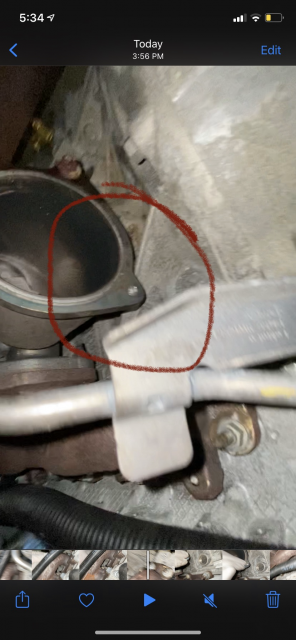
I snapped the top bolt connecting the downpipe to the turbo exhaust manifold - can I just put the other two back and drive?

Messages
43
Likes
11
Location
Richmond, RI, USA
#1
I was installing the whoosh catted downpipe and when detaching the stock one from the turbo I snapped the top bolt. It’s not accessible with pliers to torch it and wiggle out or drill. Someone told me I could just attach the remaining two bolts, use high temp gasket sealer, and a C clamp where the last bolt is and send it. Since this is way cheaper than a shop I’m wondering is this a safe and viable long term option?


Attachments

MagnetiseST

1000 Post Club
Premium Account
Messages
1,317
Likes
1,166
Location
Dania Beach
#2
Anything using a C Clamp is not a permanent fix when it is related to a vehicle. The best way to fix it is to remove the turbo and drill out the broken bolt then replace it. Because of its design I'd say that is actually the one that you need most compared to the other two.


Jabbit

2000 Post Club
Messages
2,244
Likes
2,902
Location
New England
#3
lol c clamp. You are telling me you can get a c clamp up there and tightened but not a drill/tap? I'd take the turbo/manifold off and do it the right way. It will inevitably be good practice for when you replace the turbo some day. No offense but the lengths that people go to cheap out on doing things the proper way is impressive.


OP
D
Messages
43
Likes
11
Location
Richmond, RI, USA
Thread Starter #4
lol c clamp. You are telling me you can get a c clamp up there and tightened but not a drill/tap? I'd take the turbo/manifold off and do it the right way. It will inevitably be good practice for when you replace the turbo some day. No offense but the lengths that people go to cheap out on doing things the proper way is impressive.
Do you know of any online tutorials for getting the turbo out?


OP
D
Messages
43
Likes
11
Location
Richmond, RI, USA
Thread Starter #5
Anything using a C Clamp is not a permanent fix when it is related to a vehicle. The best way to fix it is to remove the turbo and drill out the broken bolt then replace it. Because of its design I'd say that is actually the one that you need most compared to the other two.
That’s what I figured. I was hoping for it to be trye lol. Do you know of any tutorials for getting the turbo out?


Messages
38
Likes
42
Location
Phoenix, AZ, USA
#6
No offense to the OP but based off your questions and original post I don’t think you have any business being all up in the engine bay. neither do the people you know that suggested the ridiculous “fix”. Do not attempt to remove the turbo if you have no clue how to go about it. 🤦🏼‍♂️


TyphoonFiST

9000 Post Club
Premium Account
Messages
11,708
Likes
8,213
Location
Rich-fizzield
#7
I saw this in morning....You my friend are what we like to call Up secretion tributary without means of propulsion. It needs to come out....Plain and simple. Get an easy out set and become familiar with it. This will be a great learning Exp. I could have that thing out and on the bench in about 30 mins. Here is a ATP removal of stock Turbsky and replace with A Garrett core. but it will get you where you need to go...Good luck

https://www.atpturbo.com/root/help/pdf/install/Fiesta_ST_Turbo_Install.pdf


OP
D
Messages
43
Likes
11
Location
Richmond, RI, USA
Thread Starter #8
No offense to the OP but based off your questions and original post I don’t think you have any business being all up in the engine bay. neither do the people you know that suggested the ridiculous “fix”. Do not attempt to remove the turbo if you have no clue how to go about it. 🤦🏼‍♂️
This is my first car that I’m working on. The friend in question is a mechanic for planes and has built a couple cars but they all have been pretty… ghetto for lack of a better word.
I looked up videos of the stock turbo removal and it looks pretty easy but I’m concerned about another snapped bolt in the manifold.


OP
D
Messages
43
Likes
11
Location
Richmond, RI, USA
Thread Starter #9
I saw this in morning....You my friend are what we like to call Up secretion tributary without means of propulsion. It needs to come out....Plain and simple. Get an easy out set and become familiar with it. This will be a great learning Exp. I could have that thing out and on the bench in about 30 mins. Here is a ATP removal of stock Turbsky and replace with A Garrett core. but it will get you where you need to go...Good luck

https://www.atpturbo.com/root/help/pdf/install/Fiesta_ST_Turbo_Install.pdf
Thank you. It’s definitely coming out and now it’s if I do it or a shop. What do you think the over under is that I snap another bolt in the manifold or similar? That’s my main concern; making the car undrivable trying to fix this.


TyphoonFiST

9000 Post Club
Premium Account
Messages
11,708
Likes
8,213
Location
Rich-fizzield
#10
Thank you. It’s definitely coming out and now it’s if I do it or a shop. What do you think the over under is that I snap another bolt in the manifold or similar? That’s my main concern; making the car undrivable trying to fix this.
Do you know of anyone else besides the other "friend" who is mechanically inclined? Are there any forum members who can lend a hand? When I took my stock Turbo out at 46k I soaked everything with Deep creep penetrating oil over night. I came out and repeatedly sprayed the questionable studs/bolts. All of them came off like a glove. Just make sure you have extra Studs and nuts on hand. Use the correct tools also...DON'T IMPROVISE* it will only cost you time and more money. The studs will need to be Torqued to spec also....NOT the old gutentight crap either. Then recheck within 250 miles for any backing out and re-torque them essentially.

Sent from my SM-N975U1 using Tapatalk


Jabbit

2000 Post Club
Messages
2,244
Likes
2,902
Location
New England
#11
There is no harm in having a shop do the work. Depends on how soon you need the car back. About 15 years ago I was upgrading an intercooler on a Saab and I flat out got stuck and couldn't do what I needed to do. Had the car towed to a shop and got it running again. I've been there.


Messages
38
Likes
42
Location
Phoenix, AZ, USA
#12
This is my first car that I’m working on. The friend in question is a mechanic for planes and has built a couple cars but they all have been pretty… ghetto for lack of a better word.
I looked up videos of the stock turbo removal and it looks pretty easy but I’m concerned about another snapped bolt in the manifold.
Ahh, I remember those days. Well get yourself some tools, and definitely scroll the forum and YouTube for information. Gather all of the consumables BEFORE you start the job; gaskets, possible hardware, lubricants, coolants or oils ect..

FYI, I’m an aircraft mechanic myself, pretty scary that your buddy does this stuff on planes. You know, where lives are in the hands of the maintainers.


MagnetiseST

1000 Post Club
Premium Account
Messages
1,317
Likes
1,166
Location
Dania Beach
#13
I looked up videos of the stock turbo removal and it looks pretty easy but I’m concerned about another snapped bolt in the manifold.
The studs in the head tend not to break, I have only had one ever do so, and it wasn't from removing or installing.

To remove / replace the turbo you will need:

Consumables:
-Oil drain line gasket (you might also want to order the drain tube itself depending on how old it is).
-Coolant (you will lose about 1/2gal through the coolant lines to the turbo
-Oil feed line (you can re use your stock but I advise against it in case it kinks and falls apart internally)
-Exhaust manifold gasket (this is a two piece gasket, please just replace it)

Tools:
-Jack
-Jack stands
-Small Pry Bar (optional)
-8mm (socket)
-10mm (socket)
-13mm (socket & box wrench)
-15mm (deep socket 3/8th drive for the oil feed line)
-17mm (socket)
-T35 Torx Bit (for the oil drain line)

Abbreviated instructions:
-Remove headlights
-Remove wipers
-Remove Cowl
-Remove intake & crossover pipe
-Unplug wire harness from high pressure fuel pump & rear VVT solenoid, hang out of the way
-Remove 8mm bolt holding rear VVT solenoid to the head and remove VVT solenoid from the car (put this somewhere safe, do not drop it or mess up the connector)
-Remove 17mm banjo bolts from both coolant lines and move out of the way.
-Remove turbo heat shield (if not already done)
-Remove 8mm oil feed line bolt and pull feed line out of cylinder head
-Remove both T35 bolts that hold the oil drain line to the bottom of the turbo
-Remove 10mm downpipe bolts
-Remove downpipe stay bracket (13mm nuts), move exhaust / downpipe away from the turbo
-Unplug BOV and WGA solenoid wires from engine harness
-Remove 8 13mm nuts from exhaust manifold, leave the top center one on for now (these tend to come out with the studs, its fine)
-Have a friend or use your other hand to support the turbo/manifold assy when removing the last nut/stud
-Lift the turbo/manifold assy up and over the top of the engine. You will need to rotate it sideways and pull it out past the AC lines carefully.
-If replacing the oil feed line, do so after the bolt is fixed to avoid getting metal shavings into the line. Cover the holes for the coolant and oil drain as well while you drill out the bolt.

Like Typhoon said, it can be done in about 30 minutes on a cold engine with experience. Take your time to do it slowly and don't break anything else. Install in the reverse order of removal.

I don't think I missed anything.


OP
D
Messages
43
Likes
11
Location
Richmond, RI, USA
Thread Starter #14
The studs in the head tend not to break, I have only had one ever do so, and it wasn't from removing or installing.

To remove / replace the turbo you will need:

Consumables:
-Oil drain line gasket (you might also want to order the drain tube itself depending on how old it is).
-Coolant (you will lose about 1/2gal through the coolant lines to the turbo
-Oil feed line (you can re use your stock but I advise against it in case it kinks and falls apart internally)
-Exhaust manifold gasket (this is a two piece gasket, please just replace it)

Tools:
-Jack
-Jack stands
-Small Pry Bar (optional)
-8mm (socket)
-10mm (socket)
-13mm (socket & box wrench)
-15mm (deep socket 3/8th drive for the oil feed line)
-17mm (socket)
-T35 Torx Bit (for the oil drain line)

Abbreviated instructions:
-Remove headlights
-Remove wipers
-Remove Cowl
-Remove intake & crossover pipe
-Unplug wire harness from high pressure fuel pump & rear VVT solenoid, hang out of the way
-Remove 8mm bolt holding rear VVT solenoid to the head and remove VVT solenoid from the car (put this somewhere safe, do not drop it or mess up the connector)
-Remove 17mm banjo bolts from both coolant lines and move out of the way.
-Remove turbo heat shield (if not already done)
-Remove 8mm oil feed line bolt and pull feed line out of cylinder head
-Remove both T35 bolts that hold the oil drain line to the bottom of the turbo
-Remove 10mm downpipe bolts
-Remove downpipe stay bracket (13mm nuts), move exhaust / downpipe away from the turbo
-Unplug BOV and WGA solenoid wires from engine harness
-Remove 8 13mm nuts from exhaust manifold, leave the top center one on for now (these tend to come out with the studs, its fine)
-Have a friend or use your other hand to support the turbo/manifold assy when removing the last nut/stud
-Lift the turbo/manifold assy up and over the top of the engine. You will need to rotate it sideways and pull it out past the AC lines carefully.
-If replacing the oil feed line, do so after the bolt is fixed to avoid getting metal shavings into the line. Cover the holes for the coolant and oil drain as well while you drill out the bolt.

Like Typhoon said, it can be done in about 30 minutes on a cold engine with experience. Take your time to do it slowly and don't break anything else. Install in the reverse order of removal.

I don't think I missed anything.
thank you very much!! Wish me luck lol.


OP
D
Messages
43
Likes
11
Location
Richmond, RI, USA
Thread Starter #15
Ahh, I remember those days. Well get yourself some tools, and definitely scroll the forum and YouTube for information. Gather all of the consumables BEFORE you start the job; gaskets, possible hardware, lubricants, coolants or oils ect..

FYI, I’m an aircraft mechanic myself, pretty scary that your buddy does this stuff on planes. You know, where lives are in the hands of the maintainers.
Thank you! I found a couple write ups on here too. I have coolant and have to go get everything else in preparation. Regardless, this car has been, and continues to be, a big learning experience lol.


Messages
470
Likes
544
Location
Metro Detroit
#16
First off, find a local retailer who stocks Kroil. Because you need to start this process by soaking all of the manifold bolts with Kroil for 2 or 3 days and keep adding some during that 2-3 day soak. BTW, WD-40 is NOT KROIL AND DO NOT EVEN THINK ABOUT USING WD-40. WD-40 is a rust preventative and not really a true lubricant. If you want snapped bolts in your cylinder head WD-40 is a good way to do that. Note, by going to the Kroil Web Site you should be able to find a local retailer who carries it.

Second, there is a technique to getting rusted in fasteners free without snapping them and Kroil is just phase One. Phase two is very time consuming but it's the best way to keep from snapping more bolts. That is to work each bolt out one at a time and you MUST use a back and forth motion. Basically once it breaks loose you only back it out a 1/4 turn, and then you run it back in 1/8 turn. What you are doing with this back and forth method is grinding any corrosion into a very find powder. BTW, adding Kroil during this process is a GOOD thing to do. Do not be surprised if it takes 15 to 30 minutes per bolt. I had one bolt on a motorcycle I restored that took me 2 full hours to work free. Yes, you can take some shortcuts and go a full turn or two once the bolt is 1/2 half way out of more but if you feel the bolt starting to bind then stop right there and intensify the back and forth for at least 2-3 turns out. It is a bit of a feel thing, you back the screw out till it binds and then reverse and grind some power. Note, do not try and run the bolt back in for full depth, you will simply jam it into all that powder you've created. Time for getting the powder out is after you have everything apart and you will want an air gun for that.

I will also suggest CAREFULLY chasing the threads with a tap after blowing out the dust. Note, start the tap into the existing threads by at least 2 to 3 full turns by turning the tap with your naked fingers. Because it is very easy to cross thread a tap into existing threads if you try and just run it in with a tap wrench. Using your fingers means that you'll have to wiggle the tap into full engagement with the existing threads.


anticon

Active member
Messages
603
Likes
531
Location
Sherwood
#17
First off, find a local retailer who stocks Kroil. Because you need to start this process by soaking all of the manifold bolts with Kroil for 2 or 3 days and keep adding some during that 2-3 day soak. BTW, WD-40 is NOT KROIL AND DO NOT EVEN THINK ABOUT USING WD-40. WD-40 is a rust preventative and not really a true lubricant. If you want snapped bolts in your cylinder head WD-40 is a good way to do that. Note, by going to the Kroil Web Site you should be able to find a local retailer who carries it.

Second, there is a technique to getting rusted in fasteners free without snapping them and Kroil is just phase One. Phase two is very time consuming but it's the best way to keep from snapping more bolts. That is to work each bolt out one at a time and you MUST use a back and forth motion. Basically once it breaks loose you only back it out a 1/4 turn, and then you run it back in 1/8 turn. What you are doing with this back and forth method is grinding any corrosion into a very find powder. BTW, adding Kroil during this process is a GOOD thing to do. Do not be surprised if it takes 15 to 30 minutes per bolt. I had one bolt on a motorcycle I restored that took me 2 full hours to work free. Yes, you can take some shortcuts and go a full turn or two once the bolt is 1/2 half way out of more but if you feel the bolt starting to bind then stop right there and intensify the back and forth for at least 2-3 turns out. It is a bit of a feel thing, you back the screw out till it binds and then reverse and grind some power. Note, do not try and run the bolt back in for full depth, you will simply jam it into all that powder you've created. Time for getting the powder out is after you have everything apart and you will want an air gun for that.

I will also suggest CAREFULLY chasing the threads with a tap after blowing out the dust. Note, start the tap into the existing threads by at least 2 to 3 full turns by turning the tap with your naked fingers. Because it is very easy to cross thread a tap into existing threads if you try and just run it in with a tap wrench. Using your fingers means that you'll have to wiggle the tap into full engagement with the existing threads.
I watched some YouTube tests on different penetrating oils and acetone mixed with ATF was shown to be very good, if you can get it on the bolts. Also tap them with a hammer and heat are other methods that should be mentioned for extracting rusted nuts, stud, and bolts.


FiestaSTdude

1000 Post Club
Premium Account
Messages
1,448
Likes
1,789
Location
Cary, NC
#20
The studs in the head tend not to break, I have only had one ever do so, and it wasn't from removing or installing.

To remove / replace the turbo you will need:

Consumables:
-Oil drain line gasket (you might also want to order the drain tube itself depending on how old it is).
-Coolant (you will lose about 1/2gal through the coolant lines to the turbo
-Oil feed line (you can re use your stock but I advise against it in case it kinks and falls apart internally)
-Exhaust manifold gasket (this is a two piece gasket, please just replace it)

Tools:
-Jack
-Jack stands
-Small Pry Bar (optional)
-8mm (socket)
-10mm (socket)
-13mm (socket & box wrench)
-15mm (deep socket 3/8th drive for the oil feed line)
-17mm (socket)
-T35 Torx Bit (for the oil drain line)

Abbreviated instructions:
-Remove headlights
-Remove wipers
-Remove Cowl
-Remove intake & crossover pipe
-Unplug wire harness from high pressure fuel pump & rear VVT solenoid, hang out of the way
-Remove 8mm bolt holding rear VVT solenoid to the head and remove VVT solenoid from the car (put this somewhere safe, do not drop it or mess up the connector)
-Remove 17mm banjo bolts from both coolant lines and move out of the way.
-Remove turbo heat shield (if not already done)
-Remove 8mm oil feed line bolt and pull feed line out of cylinder head
-Remove both T35 bolts that hold the oil drain line to the bottom of the turbo
-Remove 10mm downpipe bolts
-Remove downpipe stay bracket (13mm nuts), move exhaust / downpipe away from the turbo
-Unplug BOV and WGA solenoid wires from engine harness
-Remove 8 13mm nuts from exhaust manifold, leave the top center one on for now (these tend to come out with the studs, its fine)
-Have a friend or use your other hand to support the turbo/manifold assy when removing the last nut/stud
-Lift the turbo/manifold assy up and over the top of the engine. You will need to rotate it sideways and pull it out past the AC lines carefully.
-If replacing the oil feed line, do so after the bolt is fixed to avoid getting metal shavings into the line. Cover the holes for the coolant and oil drain as well while you drill out the bolt.

Like Typhoon said, it can be done in about 30 minutes on a cold engine with experience. Take your time to do it slowly and don't break anything else. Install in the reverse order of removal.

I don't think I missed anything.
Where do y'all buy the gaskets from?


Top