Bit of background: Previously I have installed on this car a Cobb RMM, Mishimoto OCC, drop in air filter, with stage 1 OTS map.
This is my first project-car, so I'm learning along the way, but seeing as how this is a new product, I thought I'd share my thoughts for others out there with 2016s or limited experience like me.
The box arrived yesterday after a long anticipated wait. I got it during a "pre-sale" what seemed like months ago. The expected shipping date had been pushed back more than once, which was frustrating, but I really enjoyed the quality and ease of install of the Mishi OCC, so I had confidence in their new intake despite the setbacks. As far as I am aware, this is the first 2016 compatible intake on the market, so I didn't have any option but to be patient.
Upon arrival, everything looked good. Mostly...

There were a few little nicks here and there, but these scratches on the inside of the air box were really the only glaring imperfection. If they'd been on the exterior of the box, I'd have been upset, but because they're under cover I can live with it. Welds all looked ample and I like the wrinkle black coat on the metal pipe. They also failed to include 2 large worm-gear clamps, which was a bit of a bummer, but I was eventually able to reuse some factory clamps (more on that later).
I called Mishimoto customer service right away to advise them to check their stock for any similar scratching/clamp-omission problems. I hope nobody else runs into the same issues.
The installation took a lot more time than I was expecting. I was enjoying the process, taking my time, and trying to avoid mistakes, so I certainly wasn't rushing. But I ran into a few obstacles that cost me time, which I'll try to detail below. Before anyone attempts this install, I'd recommend watching the Mishi install video. They only have online a video for the older style intakes, but the steps are mostly identical:
https://youtu.be/081rXltV8-s
The only difference between the newer and older model year intakes is the addition of an extra valve on the intake piping. More info can be found on this thread, including some forum user DIYs to adapt older intakes to 2016 spec:
http://www.fiestastforum.com/forum/threads/6670-2016-guys-with-intakes-chime-in
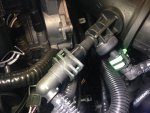
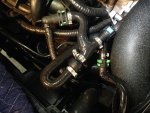
Personally, I think Mishi has developed a handsome and functional adapter. There's no install video for this adapter, and no detailed how-to reference material, but fortunately it's very straightforward. The two pieces of tubing fit together via nipple and (provided, thankfully) worm-gear clamp. Valves from the car are different sizes and can only be connected one way to the adapter, simplifying the process. Here's a before/after of the area in question on my car:
Now for the easy part. Mostly...
Getting the old intake out is straightforward except for the very last worm-gear clamp that connects the intake piping to the turbo inlet. This screw is very hard to get to, and after many attempts, I decided to remove the coolant reservoir from its 2 vertical tabs to swing it out of the way. This was also tricky, but it gave me much better access to the turbo inlet. So even though it took some time, I would recommend this solution as loosening/tightening a clamp in that location would have been impossible for me otherwise.
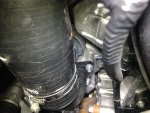
Clamp in question at bottom left corner (after install of new silicone hose). So tight I couldn't even get a proper picture!
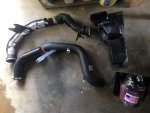
Obligatory comparison shot. The American flag on the air filter packaging seemed a perfect reminder of fireworks the night before.
Just as in life, it's putting the pieces back together that is the hard part. Mostly...
As I mentioned earlier, I wasn't given 2 large worm gear clamps in my package, so I had to lift a pair off the factory tubes. One worked just fine, but the other was almost too small in diameter that it barely fit over the large end of the silicone hose which connects to the new metal induction tube. It took lots of finesse, but I eventually made it work. In retrospect, I'd go out and buy a 25 cent clamp. Driving to the store would take about the same amount of time as fiddling with it for 30 mins, but it'd be so much easier.
After the parts are roughly in place, getting everything to fit exactly right was a bit of a wresting match. There is little room to spare, and the tubes just didn't freely align themselves into the new air box with enough room to firmly fit the air filter. Keeping clamps and fasteners loose (and all sensors left unconnected!) allowed me to work a bit more freely. Getting the air filter on should be the first part of this process. Make sure the filter is clamped snug around the entire diameter of the pipe, and the air box is saddled into place, before working your way backwards toward the turbo to tighten down the rest of the clamps.
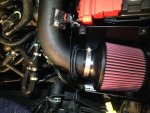
Lastly, I ran into a hurdle when trying to separate the duct from the factory airbox. The Mishi install video makes prying it off look easy, but I only managed to scratch it up with my panel tool. Eventually I just hulked out and ripped the duct out bare-handed with no damage to the duct or myself (not pictured).
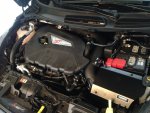
Anyway, this is how she sits now. I know some folks would prefer a colored intake pipe and an exposed filter, but I'm going for a more sleeper look, and I like it!
So what! What about the performance? Well, the Result...
...is immediately noticeable. Engine sounds different, more throaty, angrier up the revs. But most noticeable is the turbo noise. I'm whooshing and shushing all over! With the windows down it becomes a public library! "SHUUUSHHH" Maybe more importantly, I could tell an increase in power on the butt dyno. Though I admit the possibility of placebo effect, getting a blinking traction control warning light has been easier since the install, an clear indication of added power, methinks.
So... I love it! Mostly...
Love the look
Love the quality
Love the sound
Love the performance
Bummed about the scratches
Install took a lot longer than expected
Didn't get all the parts in the box
Had to wait forever for it
Customer Service was half-excellent/half-poor (a story for another time...)
All in all, I'd highly recommend this intake, well, because for a 2016 what other option do you have?
This is my first project-car, so I'm learning along the way, but seeing as how this is a new product, I thought I'd share my thoughts for others out there with 2016s or limited experience like me.
The box arrived yesterday after a long anticipated wait. I got it during a "pre-sale" what seemed like months ago. The expected shipping date had been pushed back more than once, which was frustrating, but I really enjoyed the quality and ease of install of the Mishi OCC, so I had confidence in their new intake despite the setbacks. As far as I am aware, this is the first 2016 compatible intake on the market, so I didn't have any option but to be patient.
Upon arrival, everything looked good. Mostly...

There were a few little nicks here and there, but these scratches on the inside of the air box were really the only glaring imperfection. If they'd been on the exterior of the box, I'd have been upset, but because they're under cover I can live with it. Welds all looked ample and I like the wrinkle black coat on the metal pipe. They also failed to include 2 large worm-gear clamps, which was a bit of a bummer, but I was eventually able to reuse some factory clamps (more on that later).
I called Mishimoto customer service right away to advise them to check their stock for any similar scratching/clamp-omission problems. I hope nobody else runs into the same issues.
The installation took a lot more time than I was expecting. I was enjoying the process, taking my time, and trying to avoid mistakes, so I certainly wasn't rushing. But I ran into a few obstacles that cost me time, which I'll try to detail below. Before anyone attempts this install, I'd recommend watching the Mishi install video. They only have online a video for the older style intakes, but the steps are mostly identical:
https://youtu.be/081rXltV8-s
The only difference between the newer and older model year intakes is the addition of an extra valve on the intake piping. More info can be found on this thread, including some forum user DIYs to adapt older intakes to 2016 spec:
http://www.fiestastforum.com/forum/threads/6670-2016-guys-with-intakes-chime-in
Personally, I think Mishi has developed a handsome and functional adapter. There's no install video for this adapter, and no detailed how-to reference material, but fortunately it's very straightforward. The two pieces of tubing fit together via nipple and (provided, thankfully) worm-gear clamp. Valves from the car are different sizes and can only be connected one way to the adapter, simplifying the process. Here's a before/after of the area in question on my car:


Now for the easy part. Mostly...
Getting the old intake out is straightforward except for the very last worm-gear clamp that connects the intake piping to the turbo inlet. This screw is very hard to get to, and after many attempts, I decided to remove the coolant reservoir from its 2 vertical tabs to swing it out of the way. This was also tricky, but it gave me much better access to the turbo inlet. So even though it took some time, I would recommend this solution as loosening/tightening a clamp in that location would have been impossible for me otherwise.

Clamp in question at bottom left corner (after install of new silicone hose). So tight I couldn't even get a proper picture!

Obligatory comparison shot. The American flag on the air filter packaging seemed a perfect reminder of fireworks the night before.
Just as in life, it's putting the pieces back together that is the hard part. Mostly...
As I mentioned earlier, I wasn't given 2 large worm gear clamps in my package, so I had to lift a pair off the factory tubes. One worked just fine, but the other was almost too small in diameter that it barely fit over the large end of the silicone hose which connects to the new metal induction tube. It took lots of finesse, but I eventually made it work. In retrospect, I'd go out and buy a 25 cent clamp. Driving to the store would take about the same amount of time as fiddling with it for 30 mins, but it'd be so much easier.
After the parts are roughly in place, getting everything to fit exactly right was a bit of a wresting match. There is little room to spare, and the tubes just didn't freely align themselves into the new air box with enough room to firmly fit the air filter. Keeping clamps and fasteners loose (and all sensors left unconnected!) allowed me to work a bit more freely. Getting the air filter on should be the first part of this process. Make sure the filter is clamped snug around the entire diameter of the pipe, and the air box is saddled into place, before working your way backwards toward the turbo to tighten down the rest of the clamps.

Lastly, I ran into a hurdle when trying to separate the duct from the factory airbox. The Mishi install video makes prying it off look easy, but I only managed to scratch it up with my panel tool. Eventually I just hulked out and ripped the duct out bare-handed with no damage to the duct or myself (not pictured).

Anyway, this is how she sits now. I know some folks would prefer a colored intake pipe and an exposed filter, but I'm going for a more sleeper look, and I like it!
So what! What about the performance? Well, the Result...
...is immediately noticeable. Engine sounds different, more throaty, angrier up the revs. But most noticeable is the turbo noise. I'm whooshing and shushing all over! With the windows down it becomes a public library! "SHUUUSHHH" Maybe more importantly, I could tell an increase in power on the butt dyno. Though I admit the possibility of placebo effect, getting a blinking traction control warning light has been easier since the install, an clear indication of added power, methinks.
So... I love it! Mostly...
Love the look
Love the quality
Love the sound
Love the performance
Bummed about the scratches
Install took a lot longer than expected
Didn't get all the parts in the box
Had to wait forever for it
Customer Service was half-excellent/half-poor (a story for another time...)
All in all, I'd highly recommend this intake, well, because for a 2016 what other option do you have?

![Frown [:(] [:(]](/images/smilies/frown.png)