• Sign Up! To view all forums and unlock additional cool features

    Welcome to the #1 Fiesta ST Forum and Fiesta ST community dedicated to Fiesta ST owners and enthusiasts. Register for an account, it's free and it's easy, so don't hesitate to join the Fiesta ST Forum today!


Mishimoto OCC Arrived!

OP
C
Messages
130
Likes
14
Location
Milpitas, CA, USA
Thread Starter #41
Update: After ~800 miles I decided to check the OCC since I am planning to AutoX for the first time tomorrow. I've never owned an OCC so I wanted to be sure everything's in check.

Notables:
  • About a teaspoon of oil in the OCC
  • Some wear marks are present where the hose touches that bracket
  • Some wear marks present where the hose touches what I think is the A/C recharge line in the front


Attempts:
  • I couldn't get a good enough grip to take off the bottom of the OCC, so I just took the whole thing out
  • I tried to position the OCC so that the top hose didn't touch the bracket, but it wouldn't budge. Probably varied because mfg tolerances?

So far so good. [like] Just need to keep an eye out for those hoses over time.


OP
C
Messages
130
Likes
14
Location
Milpitas, CA, USA
Thread Starter #43
I'm still waiting to hear back about my order. Mine came missing a hose and a worm clamp :/
Did you pm [MENTION=1848]mishimoto[/MENTION] ? Sara's been pretty responsive. Wonder if there's a backlog on the hoses. I would guess it might go a smidge quicker if you pm her on the forums rather than mishimotos general customer service


Messages
120
Likes
37
Location
Columbus, Ohio
#44
Yea Sara was great and got me fixed up really quick. One thing I noticed was that my engine mount bolts seemed pretty loose from the factory and not torqued to what they should have been when I took them off to install bracket.


CanadianGuy

4000 Post Club
Messages
4,097
Likes
945
Location
Southern Ontario
#45
Update: After ~800 miles I decided to check the OCC since I am planning to AutoX for the first time tomorrow. I've never owned an OCC so I wanted to be sure everything's in check.

Notables:
  • About a teaspoon of oil in the OCC
  • Some wear marks are present where the hose touches that bracket
  • Some wear marks present where the hose touches what I think is the A/C recharge line in the front


Attempts:
  • I couldn't get a good enough grip to take off the bottom of the OCC, so I just took the whole thing out
  • I tried to position the OCC so that the top hose didn't touch the bracket, but it wouldn't budge. Probably varied because mfg tolerances?

So far so good. [like] Just need to keep an eye out for those hoses over time.
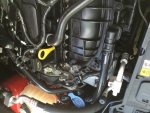
Checked mine today and 1 tablespoon in 1 week of driving (600km).

I did have the same issue with the A/C I simply pulled the A/C line towards the rad. bending it out of the way (3/4" or so)


Messages
322
Likes
49
Location
Grand Rapids
#46
I installed mine this weekend. Things never go as planned for me, but this was easy and went well.
When I put it in, I installed the bracket first. Then I installed the hoses to the can loosely. Then loosely attached the can to the bracket, clipped the hoses in and started adjusting. This allowed me to adjust everything so there is clearance by manipulation of the can in the bracket and the angles of the hoses at the barb fittings on the can.
I will recheck in a couple miles to make sure it's all still good.
Space for my big palms/short finger hands is tight, but it's overall a good spot, a solid piece and an easy install!


Messages
87
Likes
11
Location
Pittsburgh
#47
[*]I tried to position the OCC so that the top hose didn't touch the bracket, but it wouldn't budge. Probably varied because mfg tolerances?

So far so good. Just need to keep an eye out for those hoses over time.
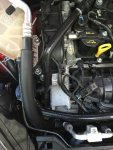
I was able to bend the OCC bracket to move the can further left in order to keep the hose from rubbing. Give that a shot.


Messages
150
Likes
28
Location
Summerville
#48
I installed mine this weekend as well and clearances are quite tight. I wouldn't be surprised if there will be some rubbing during normal operation. I'll probably see if I can do some other clocking/bending to give myself a bit more clearances.


mishimoto1

Senior Member
Messages
827
Likes
330
Location
New Castle
#49
I was able to bend the OCC bracket to move the can further left in order to keep the hose from rubbing. Give that a shot.
I installed mine this weekend as well and clearances are quite tight. I wouldn't be surprised if there will be some rubbing during normal operation. I'll probably see if I can do some other clocking/bending to give myself a bit more clearances.
I am able to unscrew the can in place. It's tight but it isn't impossible. Hardest part is comprehending the upside down lefty loosey...;) Putting it back together I just got it medium hand tight so removal will be easier.
That is what I found too.
Update: After ~800 miles I decided to check the OCC since I am planning to AutoX for the first time tomorrow. I've never owned an OCC so I wanted to be sure everything's in check.

Notables:
  • About a teaspoon of oil in the OCC
  • Some wear marks are present where the hose touches that bracket
  • Some wear marks present where the hose touches what I think is the A/C recharge line in the front


Attempts:
  • I couldn't get a good enough grip to take off the bottom of the OCC, so I just took the whole thing out
  • I tried to position the OCC so that the top hose didn't touch the bracket, but it wouldn't budge. Probably varied because mfg tolerances?

So far so good. [like] Just need to keep an eye out for those hoses over time.
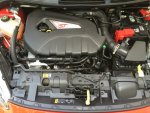
Checked mine today and 1 tablespoon in 1 week of driving (600km).

I did have the same issue with the A/C I simply pulled the A/C line towards the rad. bending it out of the way (3/4" or so)
Thanks for the feedback! Our catch cans come pre-tightened so you can install it in your car and go. We have gotten this response that they are very tight in the past and we recommend that some leverage will get that can loose for you. Tightening these back up a little less should be fine so you are not struggling to get them open the next time.

Thanks for the write-up! That is about how much we saw in our can during testing so it seems to be working nicely! The hoses should not be in contact with anything enough to cause damage to them. In some cases loosening the two small bolts on our bracket and twisting the can a bit will re-position the hoses so that they are not damaged. Have fun at autox for us! [driving]
-Sara


mishimoto1

Senior Member
Messages
827
Likes
330
Location
New Castle
#50
I'm still waiting to hear back about my order. Mine came missing a hose and a worm clamp :/
PMed you about this, let me know if you need any additional assistance!

I installed mine this weekend. Things never go as planned for me, but this was easy and went well.
When I put it in, I installed the bracket first. Then I installed the hoses to the can loosely. Then loosely attached the can to the bracket, clipped the hoses in and started adjusting. This allowed me to adjust everything so there is clearance by manipulation of the can in the bracket and the angles of the hoses at the barb fittings on the can.
I will recheck in a couple miles to make sure it's all still good.
Space for my big palms/short finger hands is tight, but it's overall a good spot, a solid piece and an easy install!
Yea Sara was great and got me fixed up really quick. One thing I noticed was that my engine mount bolts seemed pretty loose from the factory and not torqued to what they should have been when I took them off to install bracket.
Did you pm [MENTION=1848]mishimoto[/MENTION] ? Sara's been pretty responsive. Wonder if there's a backlog on the hoses. I would guess it might go a smidge quicker if you pm her on the forums rather than mishimotos general customer service
Thanks for the kind words guys!
-Sara


CanadianGuy

4000 Post Club
Messages
4,097
Likes
945
Location
Southern Ontario
#51
Thanks [MENTION=1848]mishimoto[/MENTION]

For those that found the can tight and hard to open I believe the issue is a friction of the metal on metal threads. I did mine a few times and it was difficult every time. I added a bit of lubrication (anti seize' or even oil) and it now spins on and off much like an oil filter and only stiffens up when the can reaches the rubber seal.


mishimoto1

Senior Member
Messages
827
Likes
330
Location
New Castle
#52
Thanks [MENTION=1848]mishimoto[/MENTION]

For those that found the can tight and hard to open I believe the issue is a friction of the metal on metal threads. I did oine a few times and it was difficult I added a bit of lubrication (anti seize' or even oil) and it now spins on and off much like an oil filter and only stiffens up when the can reaches the rubber seal.
Great tip! Thank you!
-Sara


J2FoRS

Senior Member
Messages
819
Likes
186
Location
Central
#53
Good tip [MENTION=2253]CanadianGuy[/MENTION] , I got mine spinning nicely now.

I have yet to install mine. Did anyone end up rigging up some sort of drain kit yet? Or are you just removing the can to empty? I'm waiting to get mine in till I solve that but haven't had time to go parts searching.


Messages
150
Likes
28
Location
Summerville
#54
I made a quick trip to a big box home improvement store, but didn't find anything that I felt would work well. I will probably check out a few other places.


Messages
331
Likes
144
Location
Gloucester, VA
#55
I have the mishi drain kit. Note that you must trim the bottom fitting threads by about 3/8" to bring them down to flush with the inside bottom of the occ to take full advantage of the limited OCC capacity. I also located the drain valve near the bottom of the hose (about 24" in length) to add the hose capacity to the total OCC capacity. I also used clear braided hose rather than their black hose to allow me to see the accumulated fluid. You could buy the clear braided hose and a brass on/off valve for less $ but I bought their kit to see what they used. I used zip ties to secure the drain valve near the bottom of the radiator. I'll try to take a photo or two so folks can see the installed result. It works as I wanted and the hose is still dry after a few hundred miles driving in mixed weather.


J2FoRS

Senior Member
Messages
819
Likes
186
Location
Central
#56
I have the mishi drain kit. Note that you must trim the bottom fitting threads by about 3/8" to bring them down to flush with the inside bottom of the occ to take full advantage of the limited OCC capacity. I also located the drain valve near the bottom of the hose (about 24" in length) to add the hose capacity to the total OCC capacity. I also used clear braided hose rather than their black hose to allow me to see the accumulated fluid. You could buy the clear braided hose and a brass on/off valve for less $ but I bought their kit to see what they used. I used zip ties to secure the drain valve near the bottom of the radiator. I'll try to take a photo or two so folks can see the installed result. It works as I wanted and the hose is still dry after a few hundred miles driving in mixed weather.
Nice would love to see!


mishimoto1

Senior Member
Messages
827
Likes
330
Location
New Castle
#58
I have the mishi drain kit. Note that you must trim the bottom fitting threads by about 3/8" to bring them down to flush with the inside bottom of the occ to take full advantage of the limited OCC capacity. I also located the drain valve near the bottom of the hose (about 24" in length) to add the hose capacity to the total OCC capacity. I also used clear braided hose rather than their black hose to allow me to see the accumulated fluid. You could buy the clear braided hose and a brass on/off valve for less $ but I bought their kit to see what they used. I used zip ties to secure the drain valve near the bottom of the radiator. I'll try to take a photo or two so folks can see the installed result. It works as I wanted and the hose is still dry after a few hundred miles driving in mixed weather.
Here's a few photos of install with drain hose...

Notice the hoses clear everything with no rubbing.


View attachment 7146 View attachment 7141 View attachment 7142 View attachment 7143 View attachment 7144 View attachment 7145
Nice! Thanks for the review and photos, looks great!
-Sara


Similar threads


Top